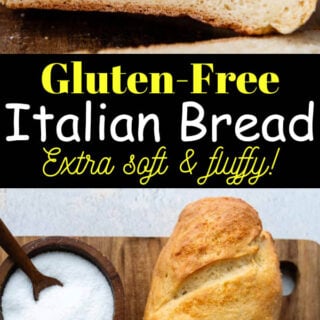
As an experienced baker, I’ve perfected many techniques for making tons of gluten-free bread recipes with fabulous, consistent results. This easy gluten-free Italian bread recipe is no exception. Learn the secret to a soft, airy Italian loaf, but without complicated steps. It only takes few minutes of mixing, one rise, and easy, fuss-free shaping to enjoy an artisanal masterpiece of your dreams!
Want to Save This Recipe?
Enter your email below & we'll send it straight to your inbox. Plus you’ll get affordable and easy gluten-free recipes delivered each week!
Gluten-Free Recipe for Soft Italian Bread
It has been my mission to transform all the beloved Italian family recipes I grew up with into gluten-free versions, Gramma and mother-approved! A crusty, yet soft and porous, gluten-free Italian bread was the next missing component after accomplishing another sorely-missed must have, thick, soft GF pizza dough.
Plus, I couldn’t resist creating a fresh, homemade Italian loaf after exhaustively testing the high-hydration GF bread dough used for soft, crusty gluten-free baguettes. Artisan breads generally require more moisture to create an open, airy crumb. But, it’s a delicate balance because more moisture can also lead to disappointing gumminess.
After many rounds of testing (and including the Mamagourmand community in the process!), I landed on the ideal wet to dry ratio for stellar gluten-free bread. To transform the dough into a classic GF Italian version only required simple adjustments in shaping and baking.
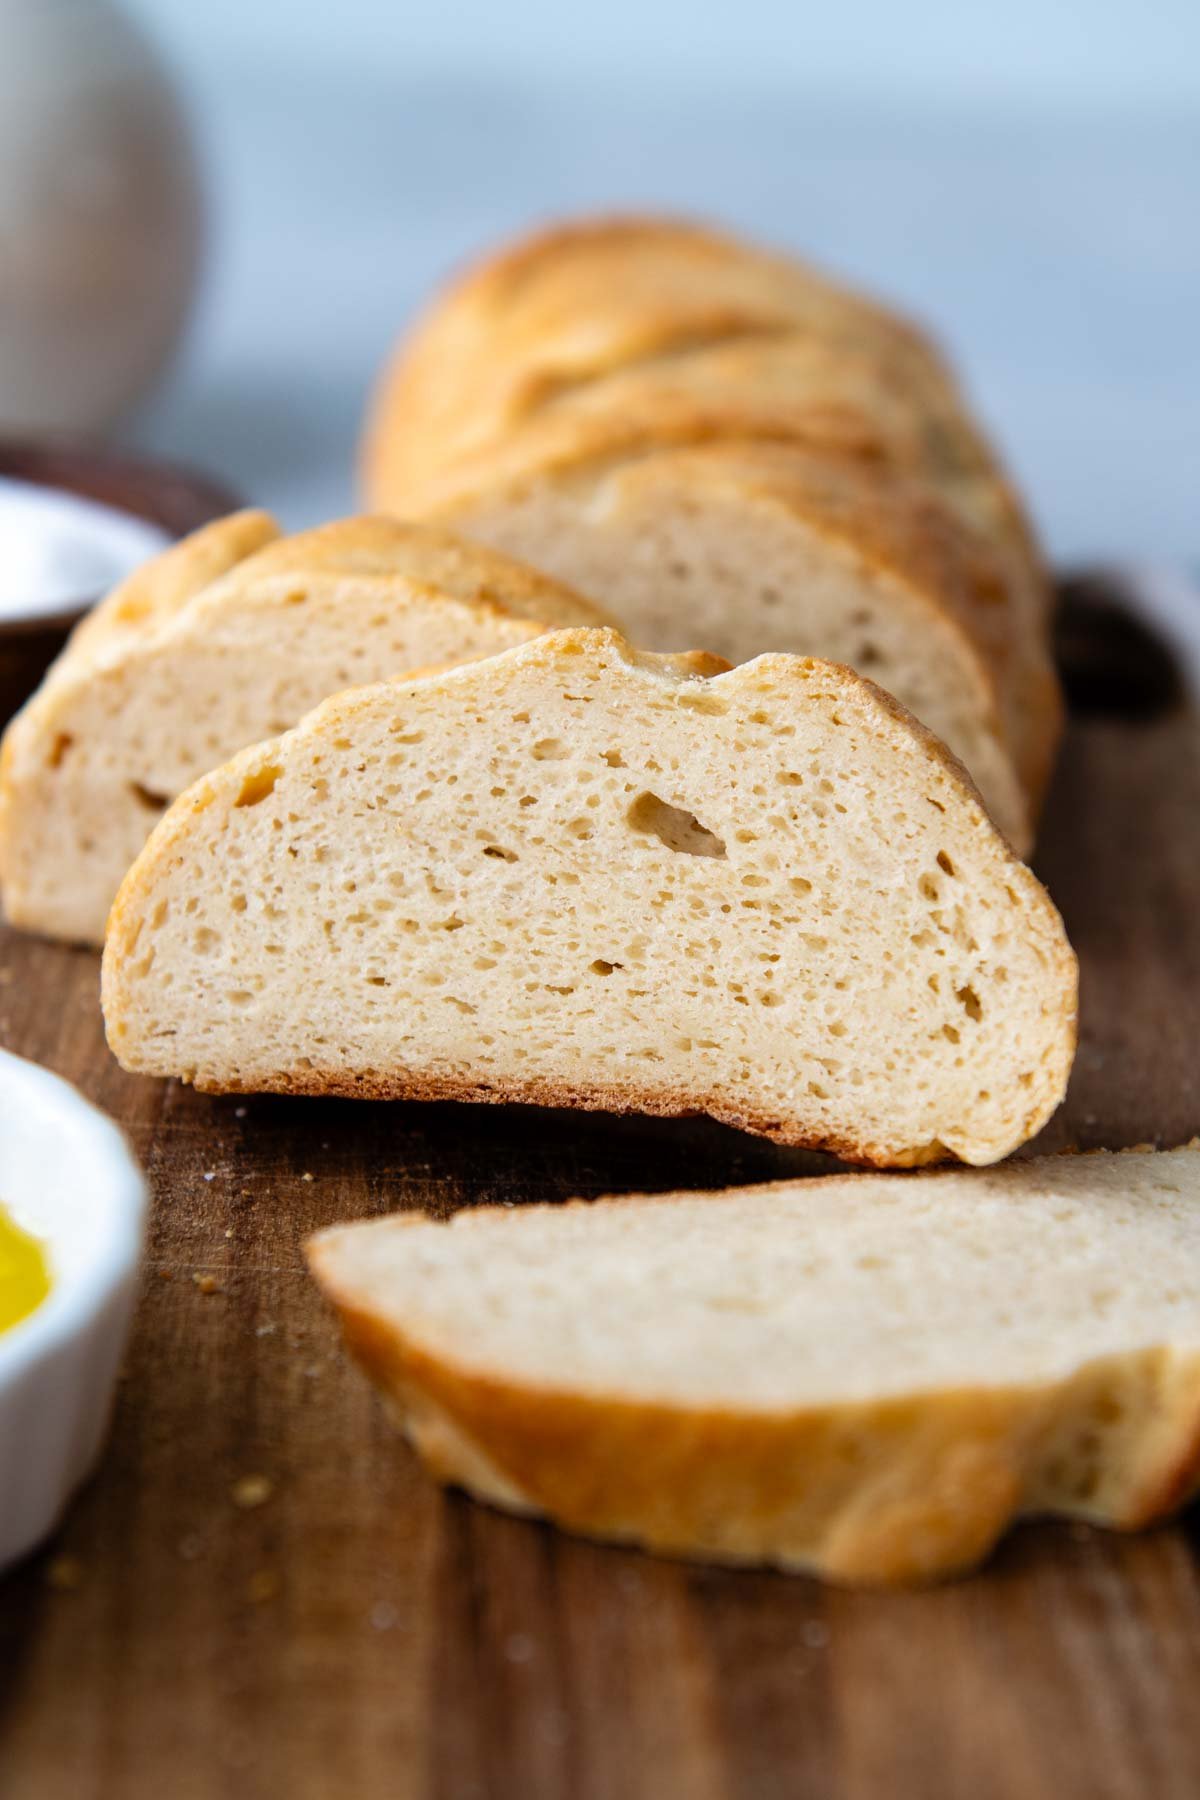
Because the loaf is shorter and plumper, it also required additional rise time. This assists the loaf to be become taller, making it ideal for sandwich slices or the other suggested Italian bread uses, with diving into a bowl of warm spinach and artichoke dip with sour cream being one of my faves!
I also wanted the outer crust to be not quite as crisp or deeply colored. Therefore, the baking starts at a slightly lower oven temp (400ºF versus 450ºF with French bread). Ice cubes are still used on the oven floor, though, to create a steamy environment for a chewy exterior.
Start to finish the bread is ready to enjoy in less than 90 minutes, with a small fraction of requiring hands-on time. The ingredients are mixed together, shaped into a log, and then rested for 40 minutes to rise. A slightly longer baking time, 35 minutes, allows time for the increased moisture to evaporate.
Free Guide! 5 easy tips for baking like a gluten-free pro!
Simple hacks for fail-proof gluten-free dishes every time!
Ingredient Tid Bits
These ingredients are pretty standard in my gluten-free bread recipes so I also have them on hand to make a quick loaf.
- Gluten-Free Flour – Using a good gluten free flour makes or breaks the GF bread quality. I highly recommend Cup4Cup gluten-free flour for the best texture and flavor.
- Potato Starch (not flour) – Secret ingredient to make GF bread soft. Instead of relying on additional flour to structure the dough, I substituted another gluten-free starch. Use for best results or additional GF flour may be substituted.
- Psyllium Husk Powder – Helps maintain moisture and prevents the baguettes from becoming dry. It also mimics gluten, allowing the dough to be shaped.
- Instant Yeast – I prefer to use instant rapid rise dry yeast because it doesn’t require proofing in water before adding to the bread dough. It is simply added with the dry ingredients. If you only have active dry yeast, pour it in the water with 1 tsp granulated sugar and let it sit for 5 minutes before adding to the dry ingredients with remaining liquids. If you are looking for a yeast-free loaf, I suggest checking out my crusty, soft GF sourdough bread.
- Eggs – Although this is a unconventional for Italian bread, it bulks the protein in the bread. The starches in GF flour don’t add any protein, which prevents the crumb from opening up. An egg white is also brushed on the exterior before baking to create a shiny crust.
- Apple cider vinegar – For an open, airy crumb, the dough also needs an acidic environment. Although other vinegars could be substituted, apple cider vinegar really does work the best.
- Baking powder – I like to couple baking powder with yeast to assist the rise and make a light, airy texture, which is harder to achieve in gluten-free breads.
- Olive oil – For added flavor and incorporates a little fat to coat the starches.
Let’s Make This Together!
(Below shows step-by-step photos and modified instructions. For the complete recipe, along with ingredient amounts, scroll down to the recipe card.)
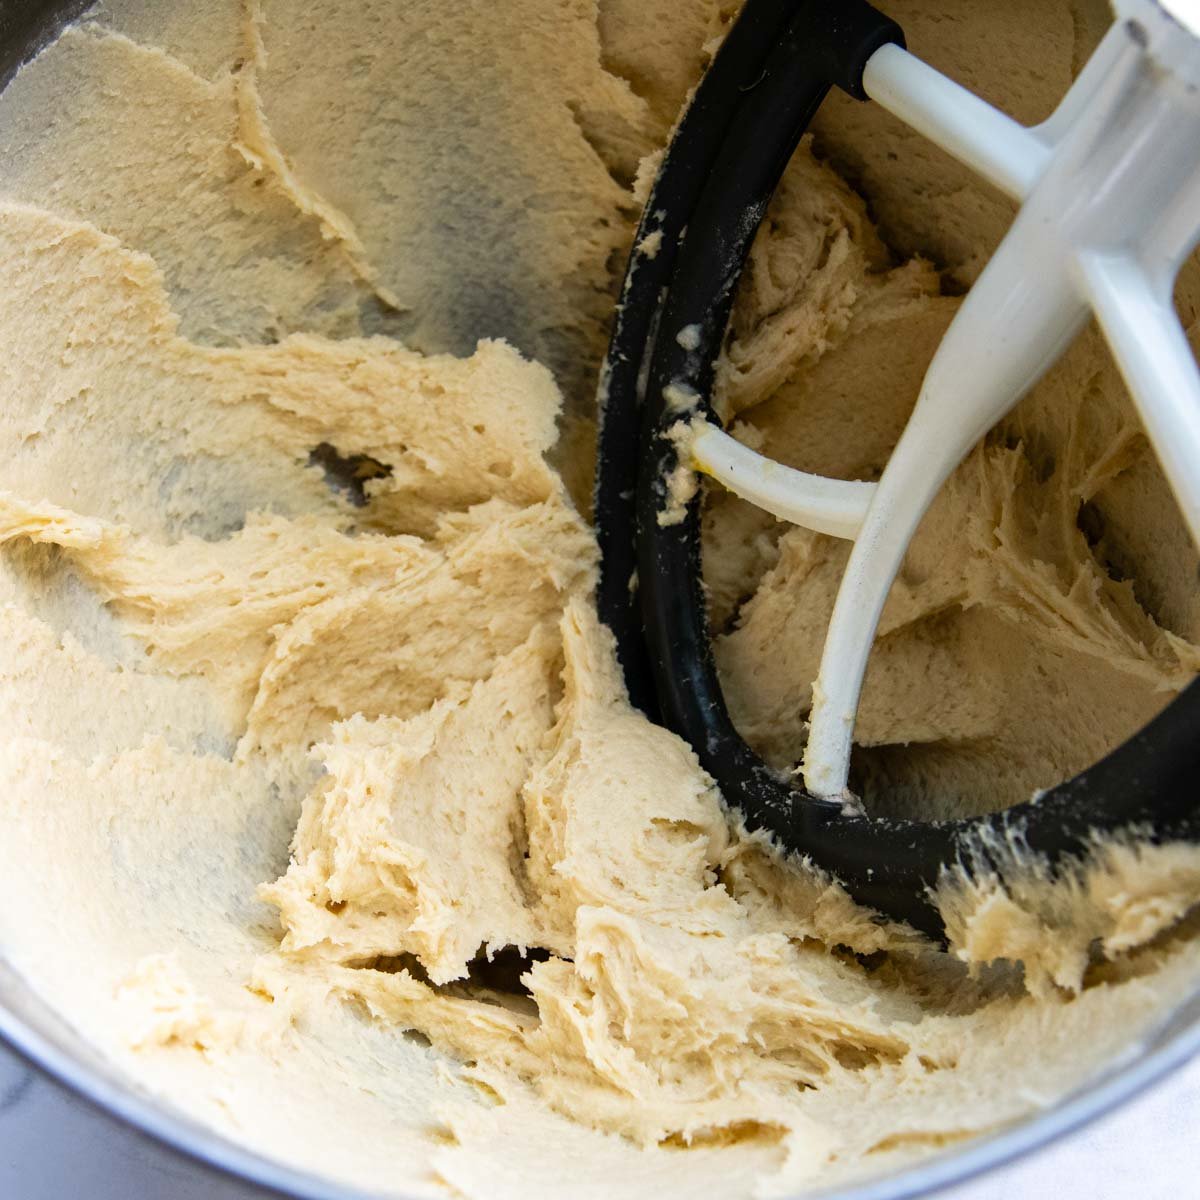
Seriously easy dough. Seriously.
In a bowl of a stand mixer, first blend together the dry ingredients using a paddle attachment. Add the wet and beat to combine. Then bump up the speed a little and mix for 5 minutes. The batter will be very stiff, but still sticky and clinging to the sides of the bowl. See, that was easy, wasn’t it??
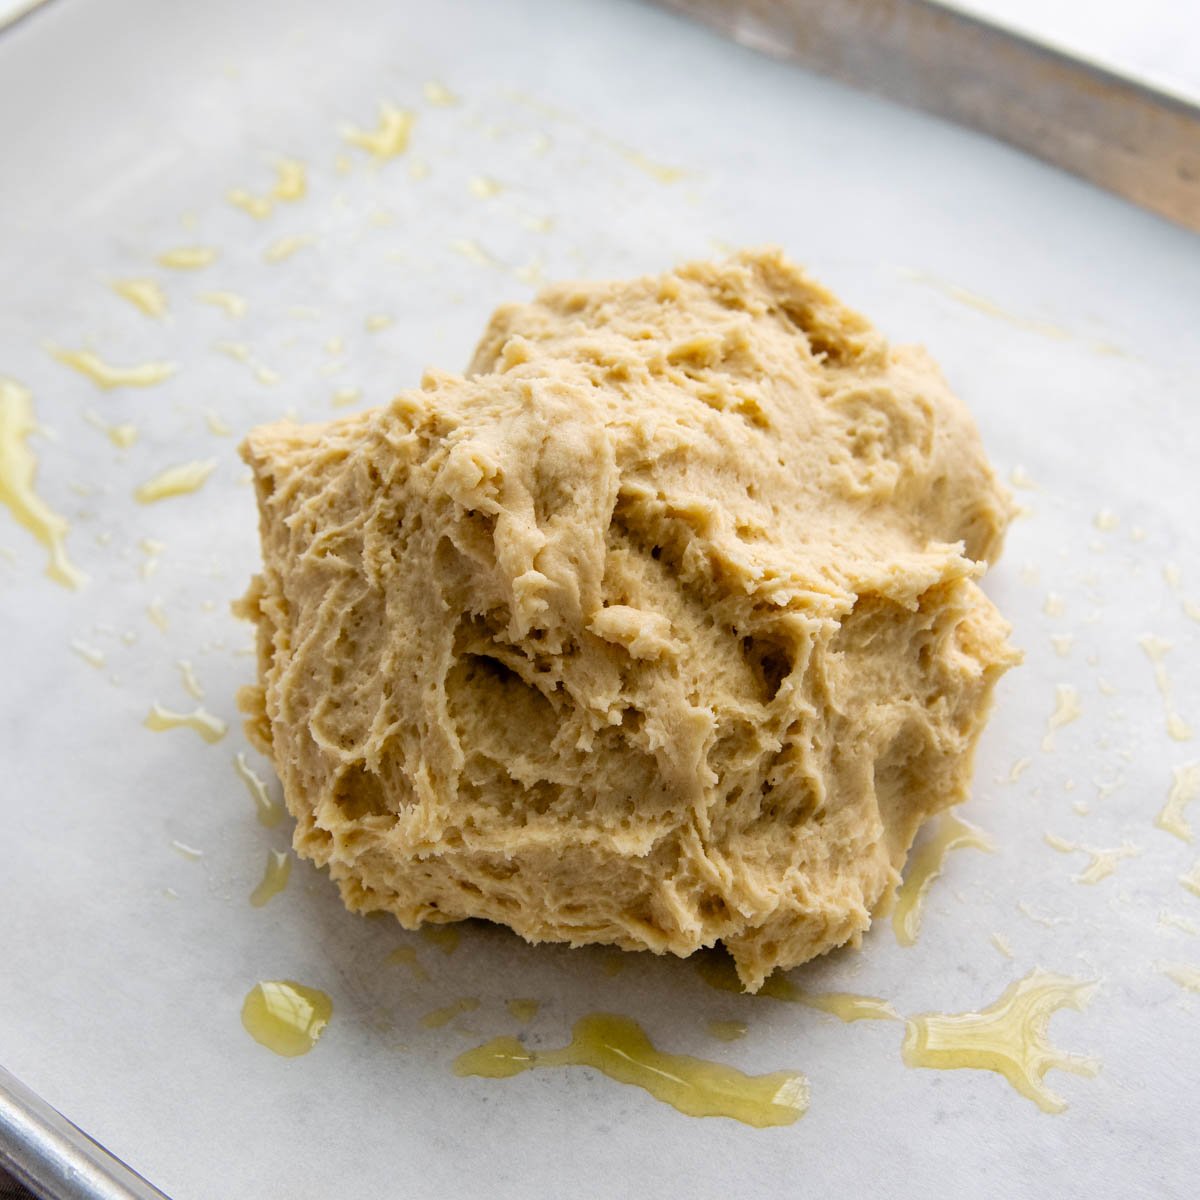
Shaping time.
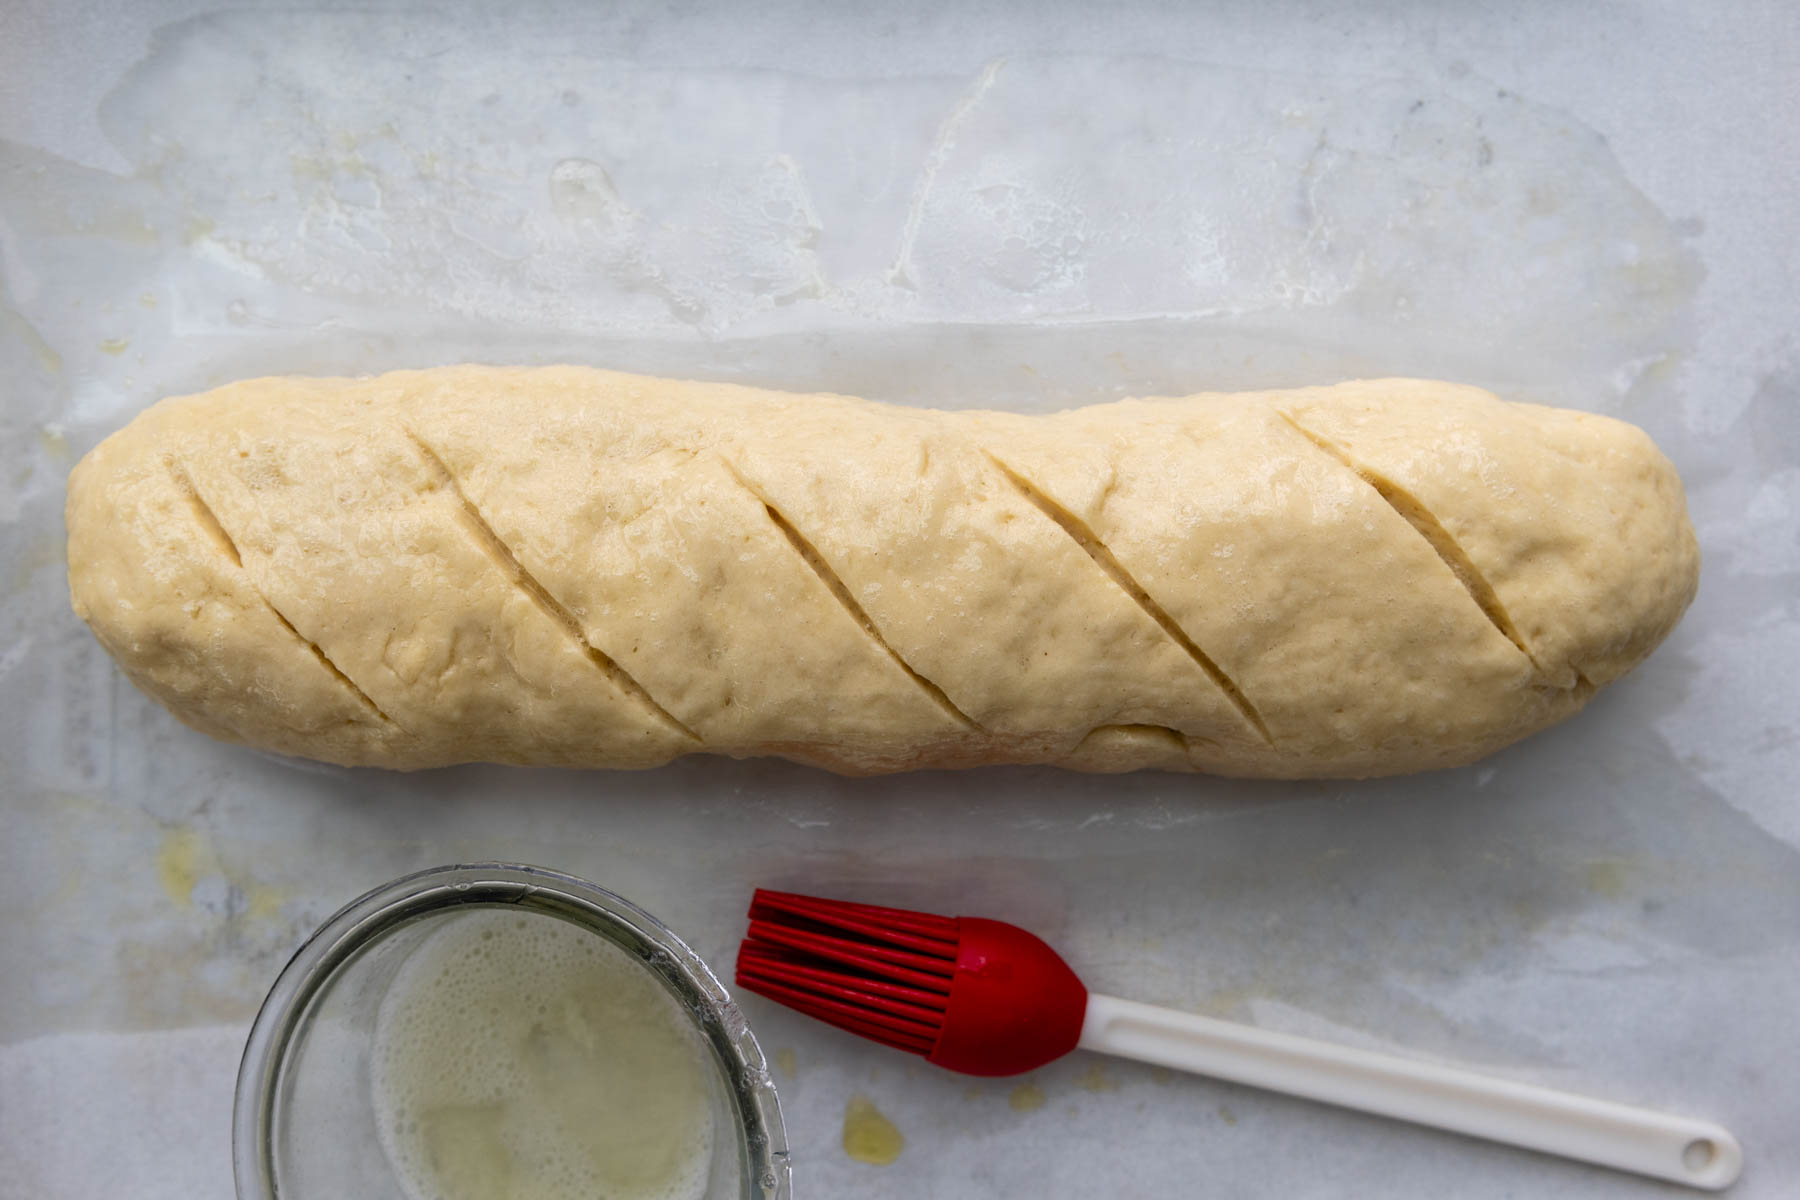
Dump the dough onto a greased parchment-lined baking sheet. You will use greased hands to shape because the dough will be a little sticky. Shape it into a smooth 12 X 2 ½-inch log using greased hands. The smoother it is the less dimply it will be after it bakes.
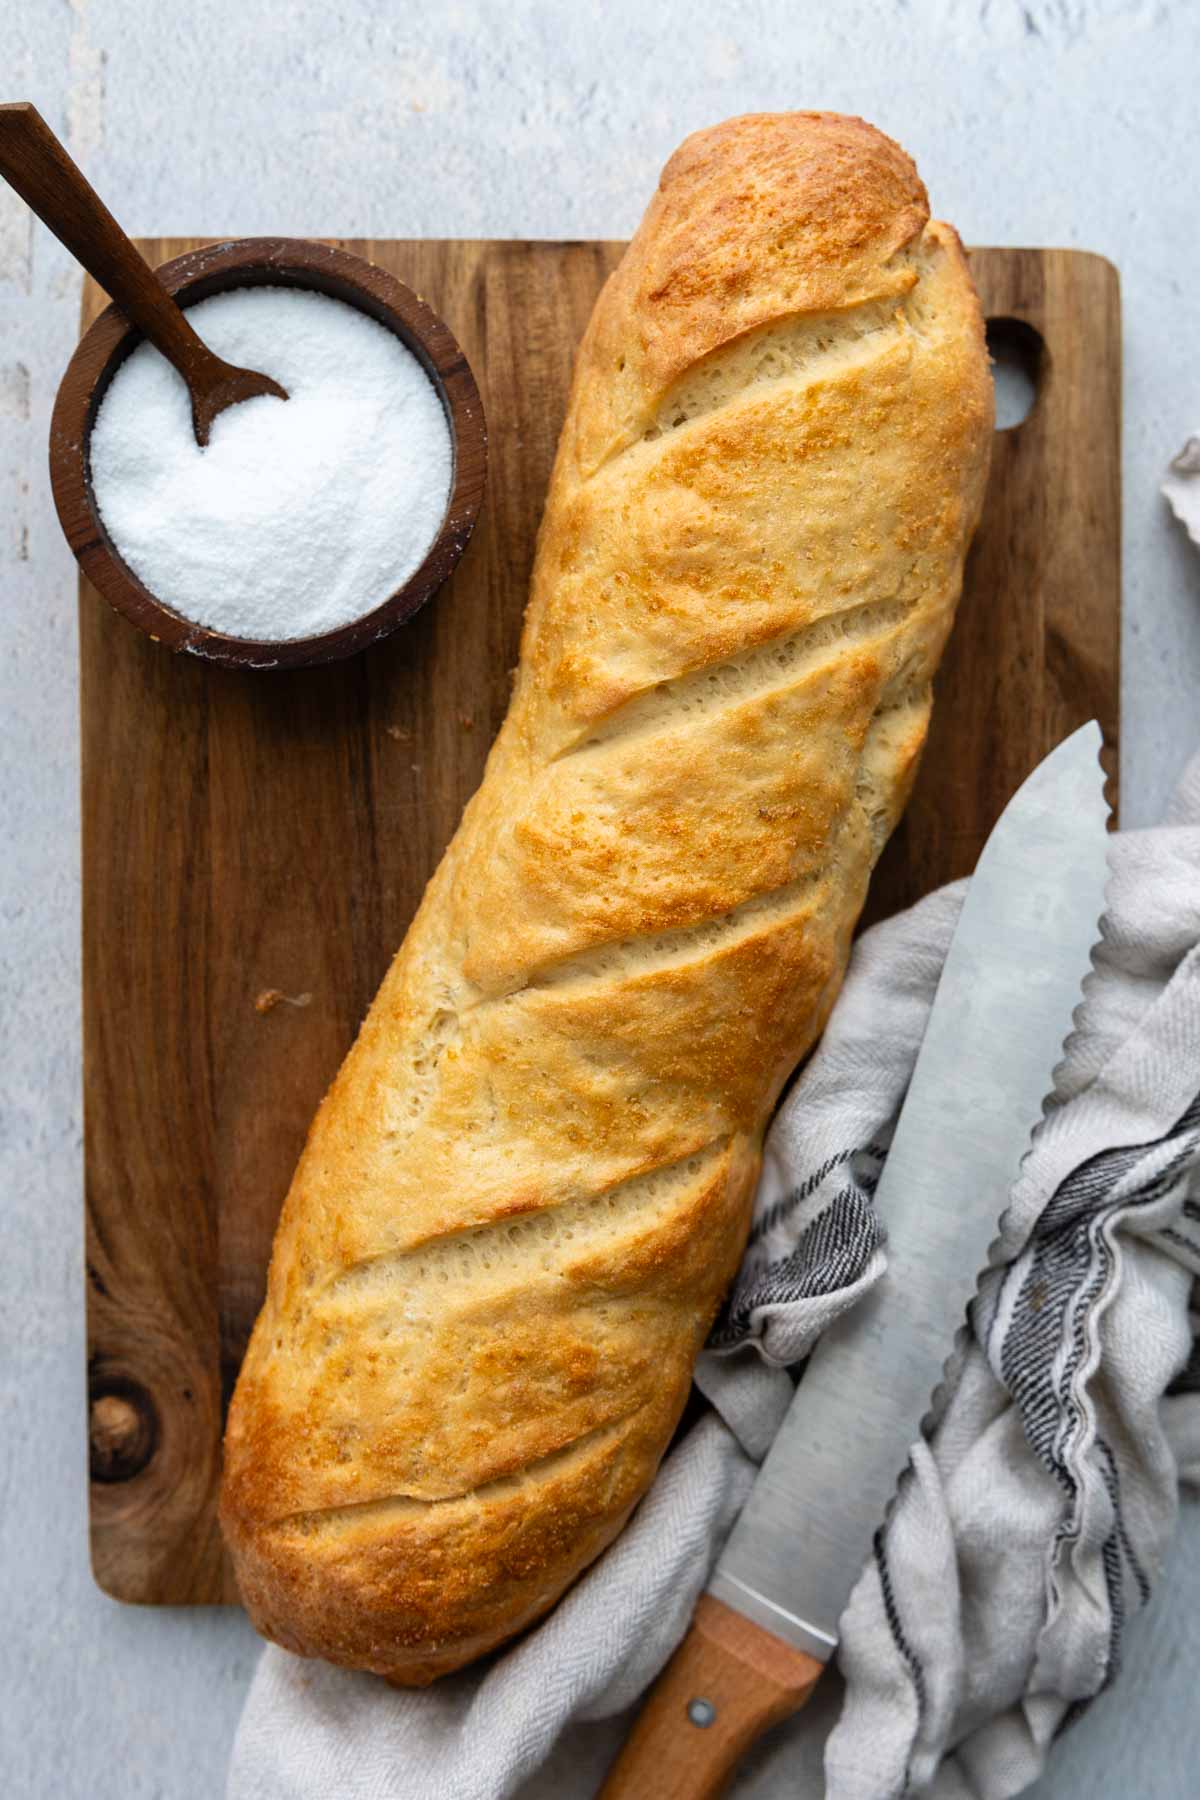
Use a sharp knife to slash 5-6 diagonal slits on top, about ¼-inch deep.


Finishing shiny touches and baking.
Cover with a piece of greased plastic wrap and let it rise for about 40 minutes. To get a nice, shiny outer crust, brush a beaten egg white over the top and sides before baking.
Throw 5-6 ice cubes at the bottom of the oven to create a steamy environment for a crisp outer crust. Bake for 15 minutes. Loosely tent a large piece of foil over the baking sheet (to prevent the bread from over-browning) and reduce the oven temp to 350℉. Bake for 20 minutes longer. Buon appetito! 🇮🇹
Tastiest Ways To Use Italian Bread
Our favorite way to enjoy an Italian loaf is sliced for sandwiches, or even better, as toasty, buttery paninis. However there are many other ways to enjoy a fresh bread, especially when you want to turn traditionally hands-off recipes into miraculously gluten-free. If you have leftovers and want to put them to good use, you can also whip up a batch of these zesty seasoned gluten-free croutons.
- Bread pudding
- French toast or this make-ahead French toast casserole with cream cheese filling
- Paninis
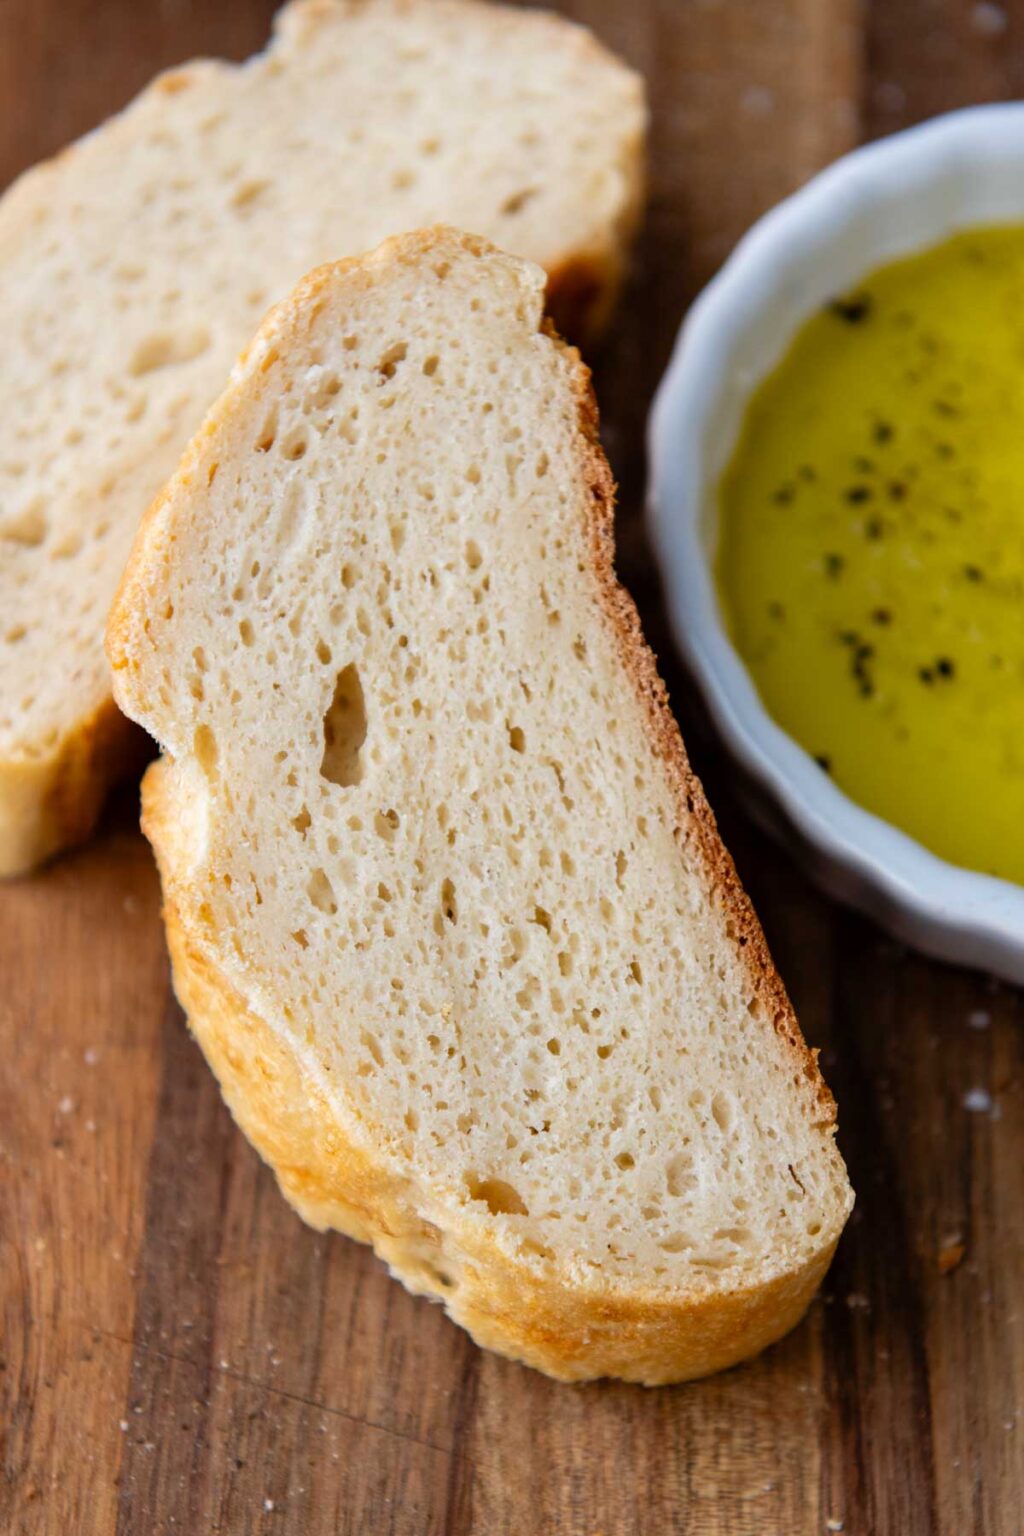
- Dipping in flavored olive oil – My favorite combo – olive oil, kosher salt, ground pepper, fresh rosemary, sun dried tomatoes, balsamic, and freshly grated parmesan
- Cubed and toasted for salad or soup croutons or make a panzanella salad with toasty garlic bread cubes.
- Our most popular choice – The world’s best homemade gluten-free garlic bread
Save this recipe to your pinterest board!
Let’s be friends on Pinterest! I’m always sharing great recipes!
Did you make this recipe? I love hearing from you! Leave a star rating and comment below the recipe card. It helps others when searching for recipes and I appreciate feedback from our community. You will always hear back from me! -Melissa

Easy, Homemade Gluten-Free Italian Bread (Failproof)
Ingredients
- 1 ½ cup (213 g) gluten free all purpose flour, I highly recommend Cup4Cup gluten-free flour blend
- 3 tablespoons (31 g) potato starch, see recipe notes for substitution
- 2 tablespoons (20 g) psyllium husk powder, helps with bread moisture & structure (what is psyllium husk?)
- 1 (9 g) packet (2 ¼ tsp) instant rapid rise yeast
- 1 teaspoon (5 g) baking powder
- 1 ½ teaspoon (6 g) salt
- ½-¾* cup (180 g) warm water (112°F), *see recipe notes for amount
- 2 large eggs, room temperature
- 1 tablespoon (16 g) apple cider vinegar
- 1 tablespoon (21 g) honey
- 1 tablespoon (15 g) olive oil
- egg white, for brushing on before baking
Instructions
- Using a stand mixer with paddle attachment, mix together gluten free flour, potato starch, yeast, psyllium husk powder, baking powder, and salt on low speed until combined.1 ½ cup gluten free all purpose flour, 3 tablespoons potato starch, 2 tablespoons psyllium husk powder, 1 packet (2 ¼ tsp) instant rapid rise yeast, 1 teaspoon baking powder, 1 ½ teaspoon salt
- Add warm water (see recipe note below), eggs, apple cider vinegar, honey, and oil. Mix on low speed to let the dough come together, about 1 minute. Increase the speed to medium and beat for 5 minutes (this helps thicken the batter), scraping down paddle and bowl halfway through. The batter will be thick and stiff, but still slightly sticky.½-¾* cup warm water (112°F), 2 large eggs, 1 tablespoon apple cider vinegar, 1 tablespoon honey, 1 tablespoon olive oil
- Place a large sheet of parchment paper on a baking sheet and grease lightly with olive oil. Transfer the dough onto the parchment. Use greased hands (spray nonstick cooking spray on them or rub with a little bit of olive oil) to knead and shape into a smooth ball.
- Shape the ball into a smooth 12 X 2 ½-inch log using greased hands. (See images in the recipe post.) Use a sharp knife to slash 5-6 diagonal slits on top, about ¼-inch deep.
- Place a large piece of greased plastic wrap over the shaped bread and let rise in warm, draft free place for 40 minutes. The bread will not be fully risen, but will rise more as it bakes due to the baking powder. Meanwhile, preheat the oven to 400℉.
- When ready to bake, remove the plastic wrap. Whisk the egg white in a small bowl until frothy. Brush all over the exterior of the bread.egg white
- Throw 5-6 ice cubes at the bottom of the oven (this creates a steamy environment for a crisp outer crust) and place the baking sheet on the middle rack. Bake for 15 minutes. Loosely tent a large piece of foil over the baking sheet (to prevent the bread from over-browning) and reduce the oven temp to 350℉. Bake for 20 minutes longer. The internal temperature should be 210℉.
- Transfer to a wire rack to cool slightly before slicing, about 30-45 minutes.
Notes
*Water Amount
Some readers have written in saying their batter has been too thin. As to not risk the recipe potentially not turning out, I would recommend starting with 1/2 cup water and gradually adding more until the dough looks like the image in the recipe post. My bread always takes the full 3/4 cup. It should be stiff, yet still be able to be moved around by the paddle attachment, and a little sticky. Also make sure it mixes for a couple minutes before determining if the water needs to be adjusted. It thickens as it mixes. I also tested the recipe with Caputo gluten-free flour and that required a little less water, about 1/2 cup + 2 tbsp.Potato Starch Substitution
Use potato starch for best results, but additional GF flour may be substituted.Storing, Freezing, and Reheating
Gluten-free breads lose moisture quickly, so I recommend serving the day they are made. To make ahead of time, cool the bread completely then wrap in plastic wrap and transfer to a ziplock freezer bag or a double wrapping of foil. Freeze up to 2 months. When ready to enjoy again make sure the bread is at room temperature and not chilled. If the bread is cold it will not be soft and have a drier texture. For best taste and texture, warm briefly before serving. Either wrap in paper towel and microwave for a few seconds or Italian bread can also be warmed in the oven. Wrap it completely in foil and place in a 350ºF oven for 10-15 minutes.This post contains affiliate links. My opinions are always my own. If you purchase a product through an affiliate link, I make a small commission – at no cost to you. Read full disclosure policy here.


Would this work to bake as a dough ball and in a bread oven? Like artisan bread style?
Yes, for sure, Ruthie! I based my gluten-free sourdough recipe off of this one. You could use those baking instructions if you’d like.
Best,
Melissa
I have a question regarding the amount of water if using king arthur measure 4 measure flour. The recipe calls for 1/2 – 3/4 cup total and in a reply to a similar concern you stated use less water and said 1 cup and add another 1/4 if necessary. I am confused and don’t want to mess up this bread that I’m anxious to make per the reviews. I love your other recipes so I follow your site. Thank you so much
Hi Sandra,
Good catch! Looking back on that response, I must have accidentally opened up another recipe and was referring to that water amount. Follow my directions in the recipe card. I’m glad you asked!
Best,
Melissa
I am now making this absolutely perfectly delicious full proof Italian bread! Thanks so very much!!!
This is wonderful, Genora! Thank you for sharing!
Best,
Melissa
Can I use this recipe to make a artisan style boule?
Hi Keagen,
Yes, that shouldn’t be a problem. You can bake it in a dutch oven for a crispier outer crust.
Best,
Melissa
I normally substitute psyllium for the gums
Hi Gina,
If that normally works for you, then I suggest adding additional psyllium, perhaps 1/2 tablespoon more?
Best,
Melissa
Is there another flour that you can suggest without the gums in it as I stay away from Amy gums
Hi Gina,
I’m sorry I wish I could help with this. For this recipe it would need some sort of binding, which the gums help with. What do you usually substitute for gums? I do have an oat flour bread that would work if you want to stay away from gums.
Best,
Melissa
Can the Italian bread be baked on a pizza stone? Thank you
Yes, that’s a great idea!
Can regular vinegar be used in place of apple cider vinegar?
Yes, that won’t be a problem.
Best,
Melissa
Thank you!
I recently tried making this as a sourdough bread and it came out pretty good! Do you happen to have a specific recipe for sourdough? Or should I just stick with adapting this one?
Hi Kaitlin,
I do not, but it’s on my list of recipes to develop. If you try it with this recipe I’d love to hear your experience with it! It will help me get started on the recipe testing process.
Best,
Melissa
I made it very close to your recipe, I just excluded the yeast and baking powder, and used 124g of gf sourdough starter. Then cuz I was using a bread oven I baked it covered at 450*f for 30 minutes then lowered the temp to 375*f until outside was golden and internal temp was 200*f (was maybe another 15 min?)
I didn’t use the ice cubes cuz I used the bread oven
My mom and I liked it though it might have been slightly denser than non gluten? But I’m not sure cuz it’s been a while. Oh! I used cup4cup flour (the 213g) and added 15g of milk powder
This is so helpful. Thank you, Kaitlin. I’ll note what you said and work from there to polish off a recipe. I need to get my starter going! I’ll see what I can do to get it less dense.
Best,
Melissa
Hi Melissa! I’ve adjusted the recipe a bit again and it came out better this time. I used 41g of starter instead of 124g and added the baking powder back in. I also baked it covered at 400 for 40 min and then uncovered for 15.
Thanks Kailin, I’ve been experimenting with this too. I should have the recipe up soon! When you are making it are you reactivating your starter from the fridge or putting it in cold?
Best,
Melissa
Yay! I’m excited! I reactivated it first.
This is in the oven right now. It looks beautiful but it hasn’t come up to 210 no matter what I do. Ive left it in an additional 30 minutes and 10 more at 375 still 208 Any idea why or suggestions? Im afraid it won’t be cooked and be gummy in the middle
TIA
Cyd
Hi Cyd,
Hmm, I would take it out. I don’t want you to burn it!
Best,
Melissa
I don’t have a stand mixer, can I mix this by hand and will it be okay??
Hi Chris,
I haven’t tried it with a hand mixer, but people have used one with my other bread recipes and it has worked. The dough will be pretty stiff, so it won’t be as easy, but I think you can get away with it.
Best,
Melissa
Do you think this would do well with King Arthur Measure for Measure flour? I have that and their GF bread flour. I hate to buy another gluten free flour.
Hi Mary,
I think you would be fine with either of those! I would start of with a touch less water, maybe 1 cup total, and then add the extra 1/4 cup as needed to get a workable, stiffer, yet still slightly sticky dough (see image in post).
Best,
Melissa
Thank you, Melissa!
The seems very similar to your squishy gluten free bread recipe however I like the taste better. Could I basically double this and use a small pullman pan to basically make a traditional loaf? Am I missing something fundamental between this and the squishy gluten free loaf recipe?
Hi Harvey,
I use similar ratios of dry to wet ingredients for both, but the sandwich loaf has more sugar in it. To answer your question, you could definitely double the recipe and bake in the pullman pan. Great idea!
Best,
Melissa
Easy and delicious! Non-celiac said it tasted like bread so there you have it. I mixed the 1/2 cup water with the yeast along with a drop of honey and let it sit for 5 minutes before adding. Thanks for the recipe!
Love this, Liz! Thank you so much for taking the time to share!
Best,
Melissa
This was my second attempt at making this bread as my first attempt was an epic fail. I’m pretty sure I got a bad batch of GF flour and it was not the recommended brand. This time around I got the recommended GF flour and it turned out tasty…and sort of purple. lol. Which I am reading is due to the psyllium husk. I am not bothered by the color so it’s all good. I may try the recommended brand but for now I’m ok using what I have. It was very tasty.
Yes, that is definitely from the psyllium. And yes, it doesn’t affect the taste, just looks a little weird. The brand linked in the recipe is the one I recommend when you feel like buying another bag. Glad you enjoyed the recipe!
Best,
Melissa
This first attempt didn’t come out too well. I can taste the vinegar and the bread is a funny color, even though I used the same psyllium husk that I used in the sandwich bread. It also didn’t quite rise as much as it should have.
Hi Amanda,
I’m sorry to hear this. That’s surprising it turned the bread a different color, but not the sandwich bread. Perhaps because there’s more flour to psyllium ratio in the sandwich bread. You could leave the vinegar out if you taste it. It’s to produce open holes in the bread.
Best,
Melissa
Hi, I agree it’s strange. I used all the same ingredients. I’ll try it with a different flour and report back!
Very easy recipe!! I’m baking it right now, it smells amazing!! Making it for a special dinner, for my daughter. Gluten free Lasagna and a gluten free Almond cake, looking forward to it all coming together! Can’t wait to taste it😊!
Oh, love this, Susan! Thank you so much for taking the time to share. It’s appreciated and makes me so happy!
Best,
Melissa
Looked for substitute for potato starch in “notes” as suggested…Didn’t find it! Used corn starch and it did not work out well at all! Did not rise. Not sure on flavor yet but it surely does not look like “ Italian bread “ more like a bagget. Will certainly purchase some potato starch and try again.
Oh my gosh, Winston. My apologies! I wrote it in the post, but forgot to actually add it to the recipe card. It’s added to the recipe notes now. Yes, it sounds like the cornstarch absorbed too much of the moisture. I’m sorry for the time and money spent. I know that’s very frustrating.
Best,
Melissa
It is what it is! 😊 Still learning how to cook for my wife who about 2 years ago was diagnosed with celiac. I’ve figured out a bunch and learned another lesson! I will certainly try it again with the potato starch.
Hi! I haven’t tried the recipe yet, but I was planning on using it to make crusty Italian rolls for thanksgiving instead of a loaf. Would you suggest any changes to baking time of anything else for this?
Ooh, I like this idea Kaitlin. I would use a metal 8X8 baking pan. Also, to make them “crustier” I would add a shallow pan of water in the shelf underneath. Let me know how they turn out!
Best,
Melissa
Delish flavor and nice and soft.
I agree about the husk as the type I used caused the bread to be brown. Now I get why.
Thanks!
Thanks Laura! Glad you enjoyed the recipe. I always appreciate the time people take to let me know!
Best,
Melissa
This was the best GF bread I’ve made in the 20 years of trying. Thank you so much. I added garlic powder, parm cheese and some Italian seasoning. I’m pretty sure I’m going to eat the whole loaf by myself, by the end of the night. Thank you! I can’t wait to try more of your recipes.
Thank you immensely, Emily! This was such a heart-warming comment that made my day!
Best,
Melissa
Hello! Do you think this could work in a bread machine? Mine does not have a gluten free setting, but I’m tempted to try….
I apologize if this was already covered here in the comments, and I missed it!
No worries, Robin. You can use the bread mixer to mix the dough and then transfer it to the pan to shape, rise, and bake. Hope this helps!
Best,
Melissa
I have not made this yet, but was wondering if the recipe may be doubled?
Hi Donna,
Yes, that wouldn’t be a problem. Just shape them into 2 loaves. Enjoy!
Best,
Melissa
I was reading this recipe for probably the 4th time over the last few weeks. Since becoming a GF household I MISS fresh BREAD
my hubby can’t have gluten so I’ve eliminated 95% from our house save a few pre packaged snacks flour tortillas & bread (all for kids lunches) I’ve tried so many recipes that failed. Because my kids are freaked out by purple bread I tried to order your suggested psyllium husk but it is unavailable Do you have a runner up?
Hey Cyd,
Gosh that’s a bummer about that psyllium being out of stock. I will say, it has happened before and they do replenish it, so I would just keep checking. As a stand in, I would try “It’s Just Psyllium” also on amazon. It will cause a darker color than the one I recommend, but shouldn’t make baked goods purple. Some readers also replace the psyllium with ground flaxseed (equal amount) or Expandex Modified Tapioca Starch (that wouldn’t be the same amount – I haven’t done much research on it myself). I hear you about missing the bread! Hopefully we can get this figured out to make you all happy!
Best,
Melissa
Didn’t get the rise I was expecting and the moderate rise I did get flattened out after taking it out of the oven. Internal temp was 205, and the outside was really dark. Gummy texture on the inside. This experiment didn’t go well. It’s probably something I did, but I don’t think I’ll try this version again.
Hi Walt,
Sorry to hear this was a frustrating experience for you. The dark color would be from the type of psyllium husk used. It doesn’t affect the taste, but some brands are a lot darker in color and can give baked goods an almost purplish hue. The brand linked in the recipe card would give you a lighter color. As far as the texture and gumminess, it sounds like there was an imbalance with the liquid. Which brand of GF flour did you use? If it was different from Cup4Cup, did you weigh the flour or measure? Hopefully we can figure this out!
Best,
Melissa
I used the Better than Cup 4 Cup flour blend. Thanks for your reply. I hope we can make this recipe work.
Thank you SO much for this recipe!! It is VERY quick to assemble (no separate mixing of any of the ingredients…LOVE it!) and even the rising and baking times are less than any other gf breads I’ve made! Of course, the loaf is smaller, but that’s OK; next time I’m going to double or triple the recipe so the bread lasts longer in our home! Everyone loved it, but because I’m totally gluten-free, it’s an essential!
Thanks again! Looking forward to trying more of your recipes!
Oh! And by the way, I replaced the eggs with flax eggs and the egg white wash with milk with good results!
Great feedback, thanks!
I made this with good results. But I used Bob’s Red mill 1 to 1, corn starch subbed for potato starch (since it’s what I had on hand), and acacia powder (Heather’s) instead of psyllium husk, also because it was on hand. I used my round dutch oven and made this as a round shape, rather than the baking sheet method. Also – I love the ice cube technique for crispy exterior… neat!
Thank you, Izzy! I appreciate all the notes added. So helpful for others!
Best,
Melissa
This makes me so happy, Michele! My goal is always to simplify the method as much as possible, without affecting results. So, yeah!
Best,
Melissa
Hello. I have tried using psyllium husk in a few different bread recipes and every time it causes the bread to turn a very unappealing purple brown. According to Google, this is a fairly common chemical reaction that happens during baking that originates with the natural outer coating of the psyllium husk. What should be a beautiful white bread turns this aweful color. I am curious if you have experienced this and if something in the recipe combats that reaction?
Hi Debbie,
I know exactly what you are talking about and have bought MANY different brands of psyllium. The brand I have linked in the recipe card is the brand I absolutely love and produces light colored bread, exactly as pictured. It’s a little more expensive, but I do A LOT of baking / testing recipes and the bag lasts me about 2 months. The change in color doesn’t affect the taste and texture, but it is just a little unsettling looking.
Best,
Melissa
The bread turned out just as you described. It was very easy. Thank you!!
Love hearing this! Thanks for sharing, Stacie!
Best,
Melissa