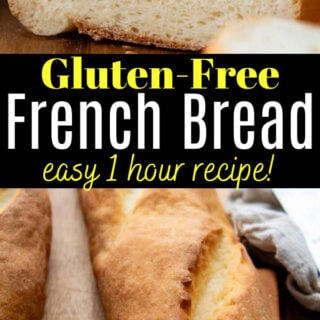
Learn how to make the best gluten-free french bread with an easy and well-tested recipe. As an experienced gluten-free baker, I’ve perfected simple techniques to make a crusty baguette with a soft, airy crumb. This homemade loaf mixes together in minutes, requires one short rise, a quick bake, and ready to enjoy in less than 1 hour!
Want to Save This Recipe?
Enter your email below & we'll send it straight to your inbox. Plus you’ll get affordable and easy gluten-free recipes delivered each week!
Easy Gluten-Free French Baguettes
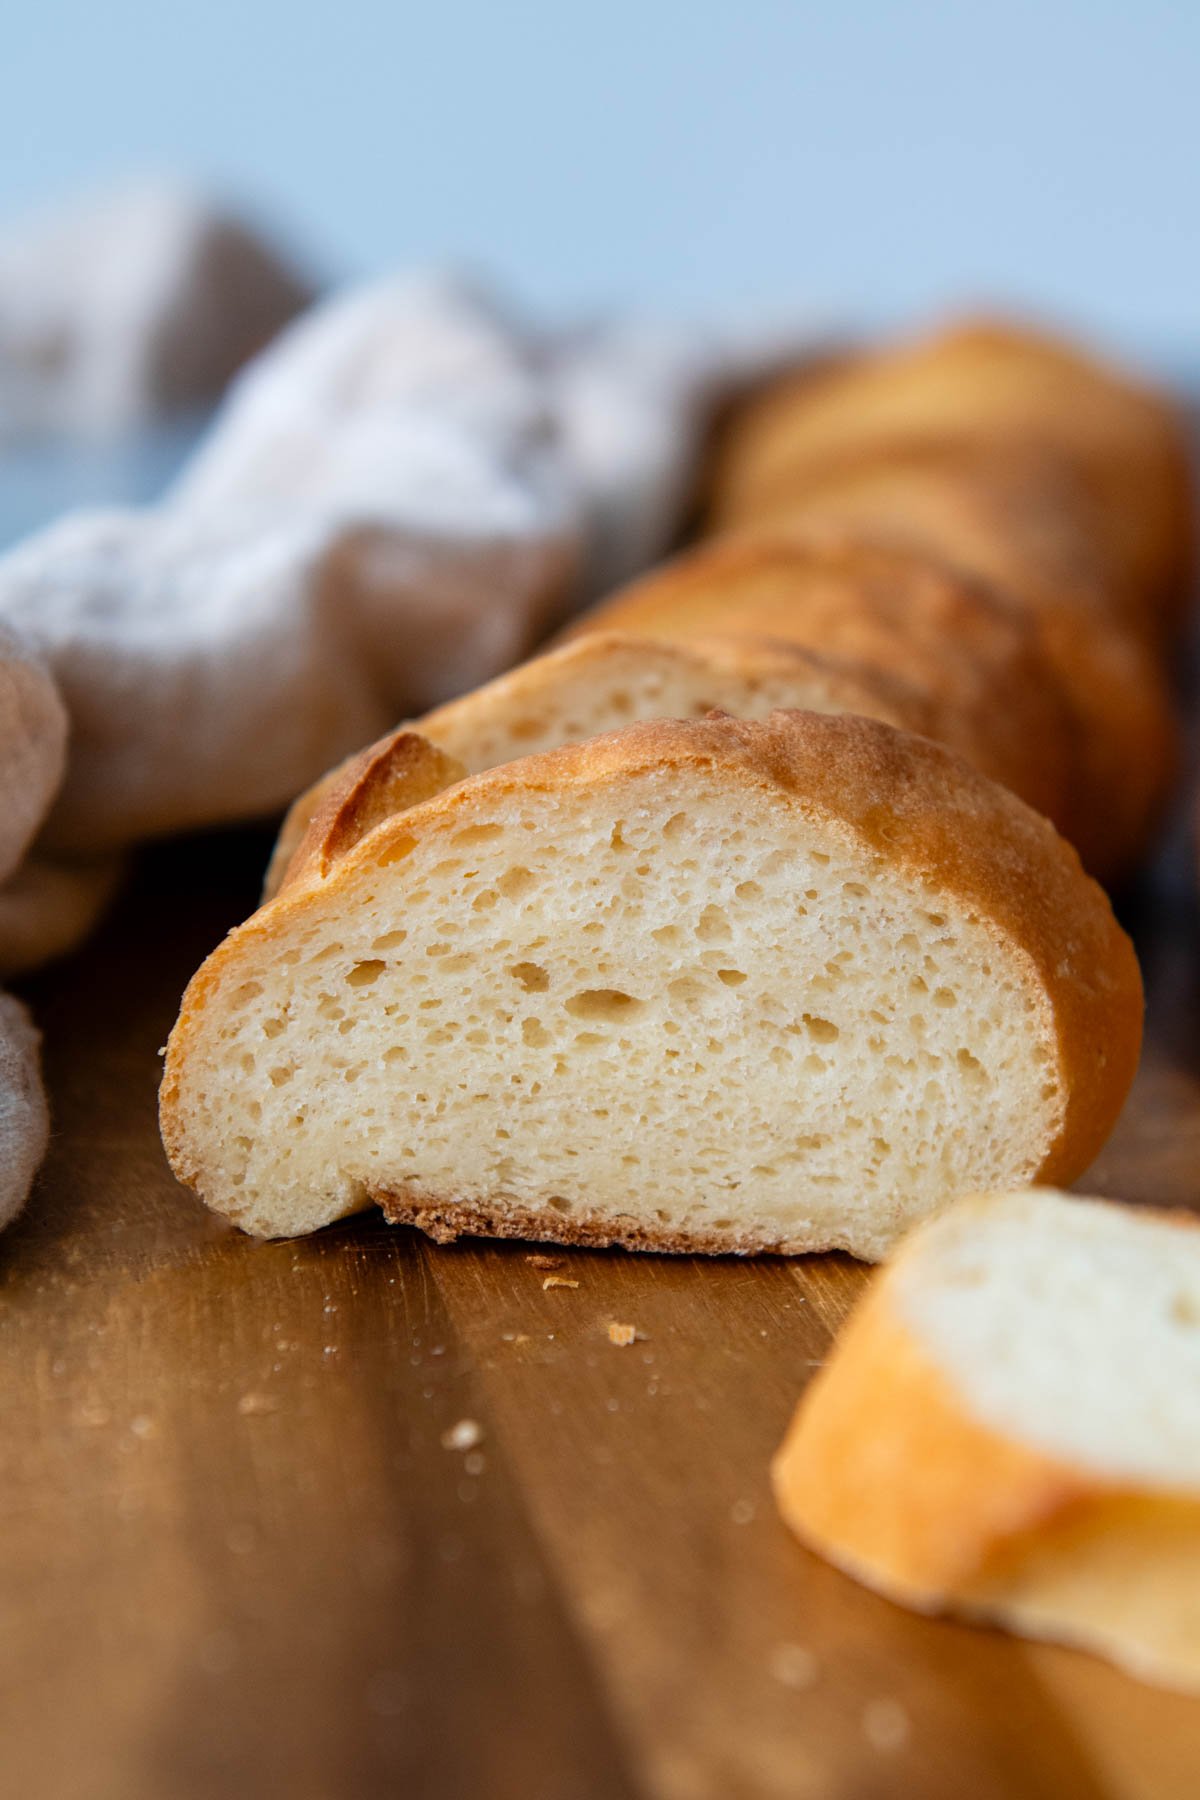
Wow. This homemade recipe for GF French bread really threw me! I did not expect so many trials to reach the quintessential baguette components – a crusty outer crust with a soft, airy open crumb.
Several readers wrote in saying they used this easy gluten-free breadsticks recipe and adapted it to French bread by baking as a single large loaf. I loved how they repurposed the recipe and it inspired me to create an authentic, yet still easy, baguette.
While my initial tests using the breadstick recipe yielded a pleasing taste, texture, and had a crisp outer crust (thanks to throwing ice cubes at the bottom of the oven – more on that later), I felt as if the crumb didn’t replicate French bread’s signature openness.
After doing some research with traditional wheat recipes, I discovered baguettes’ holes come from using a high-protein flour, which unfortunately is not characteristic of gluten-free flour blends. So, I continued the recipe testing by incorporating an ingredient that adds protein, helps with binding and moisture – eggs.
Adding two whole eggs definitely helped, but it still needed an additional boost. Typically my go-to GF bread recipes don’t use apple cider vinegar because I’ve found it’s just another ingredient to add and doesn’t make a notable difference. But adding a full tablespoon to this dough makes a big difference opening the crumb.
Lastly, I used an easy trick borrowed from these soft gluten-free rolls – replace some of the gluten-free all purpose flour with potato starch. Baguettes need to be shaped, which requires a stiffer dough. Instead of adding additional flour, which leads to drier bread, potato starch absorbs moisture, but maintains a soft texture.
Now this that this recipe is finally perfected, we have been enjoying it countless ways – as crusty baguettes slathered with butter and dunked into soup, easy gluten-free garlic bread, cheesy french bread pizzas, french toast, toasty garlic GF crostini, sandwiches, dipping in Swiss cheese fondue, and if you haven’t enjoyed a fresh panzanella salad in a while, now is the time!
Free Guide! 5 easy tips for baking like a gluten-free pro!
Simple hacks for fail-proof gluten-free dishes every time!
Other Ingredient Tid Bits
- Gluten-Free Flour – Using a good gluten free flour makes or breaks the quality of GF baked goods. I highly recommend Cup4Cup gluten-free flour for the best texture. However, it does contain milk powder, so if you need a dairy-free recipe choose a dairy-free gluten-free flour blend. Also be sure to use a blend containing xanthan gum.
- Psyllium Husk Powder – Helps maintain moisture and prevents the baguettes from becoming dry. It also mimics gluten, allowing the dough to be shaped.
- Apple cider vinegar – For an open, airy crumb, the dough also needs an acidic environment. Although other vinegars could be substituted, apple cider vinegar really does work the best.
- Baking powder – I like to couple baking powder with yeast to assist the rise and make a light, airy texture, which is harder to achieve in gluten-free breads.
- Olive oil – For added flavor and incorporates a little fat to coat the gluten-free starches.
Let’s Make This Together!
(Below shows step-by-step photos and modified instructions. For the complete recipe, along with ingredient amounts, scroll down to the recipe card.)
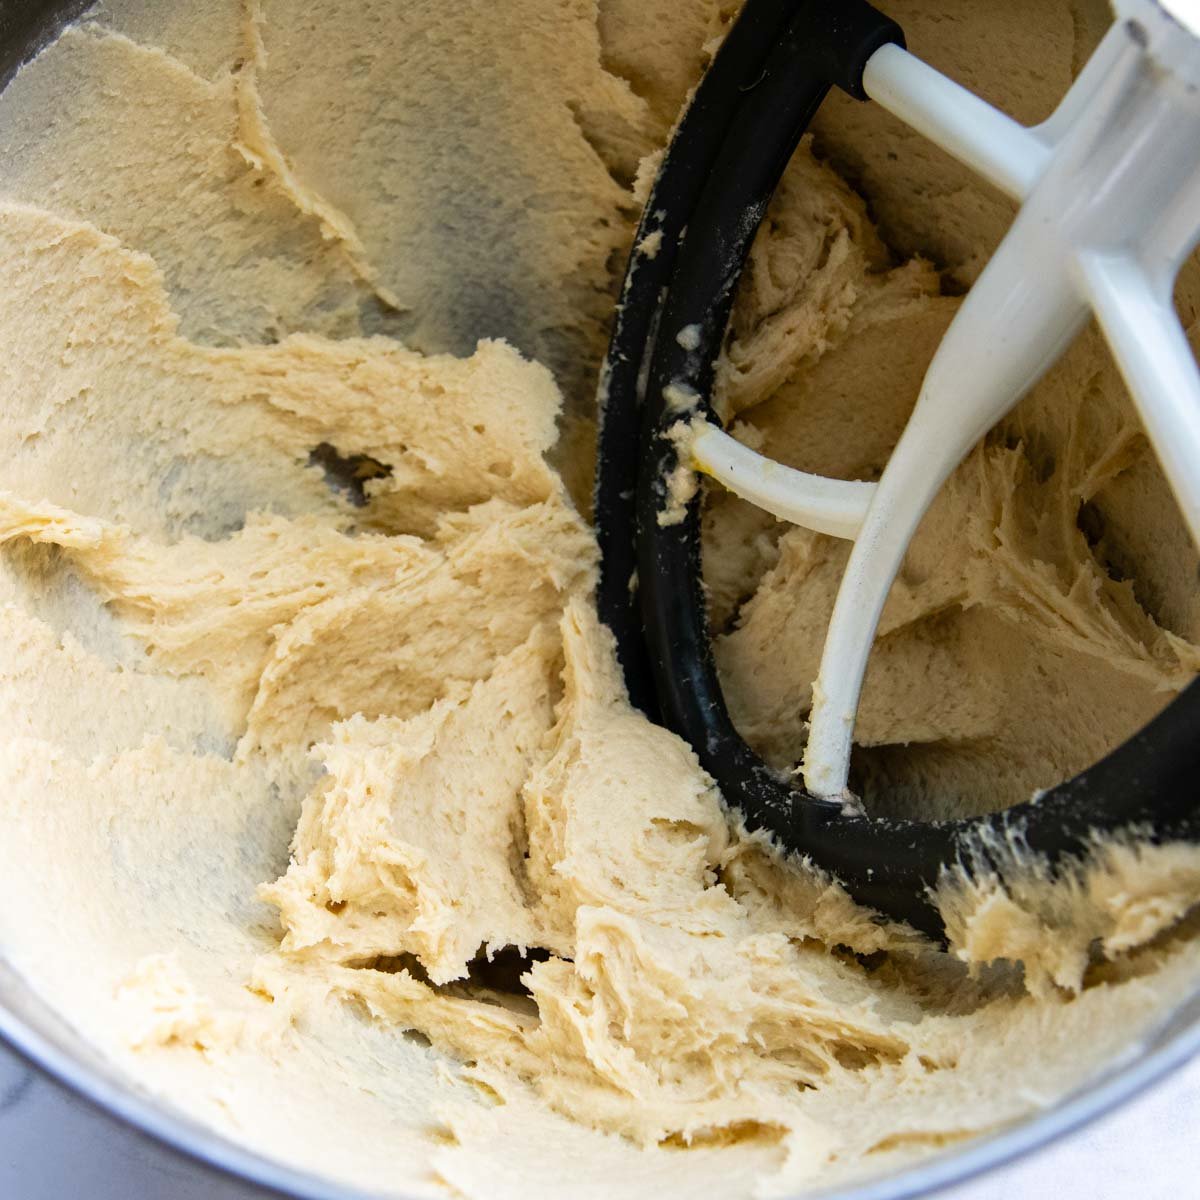
Whip up the easy dough.
In a bowl of a stand mixer, first blend together the dry ingredients, then add the wet. Beat it together to combine and then bump up the speed a little. Mix for 5 minutes. The batter will be very stiff, but still sticky and clinging to the sides of the bowl. Dough is done. That was easy, wasn’t it??
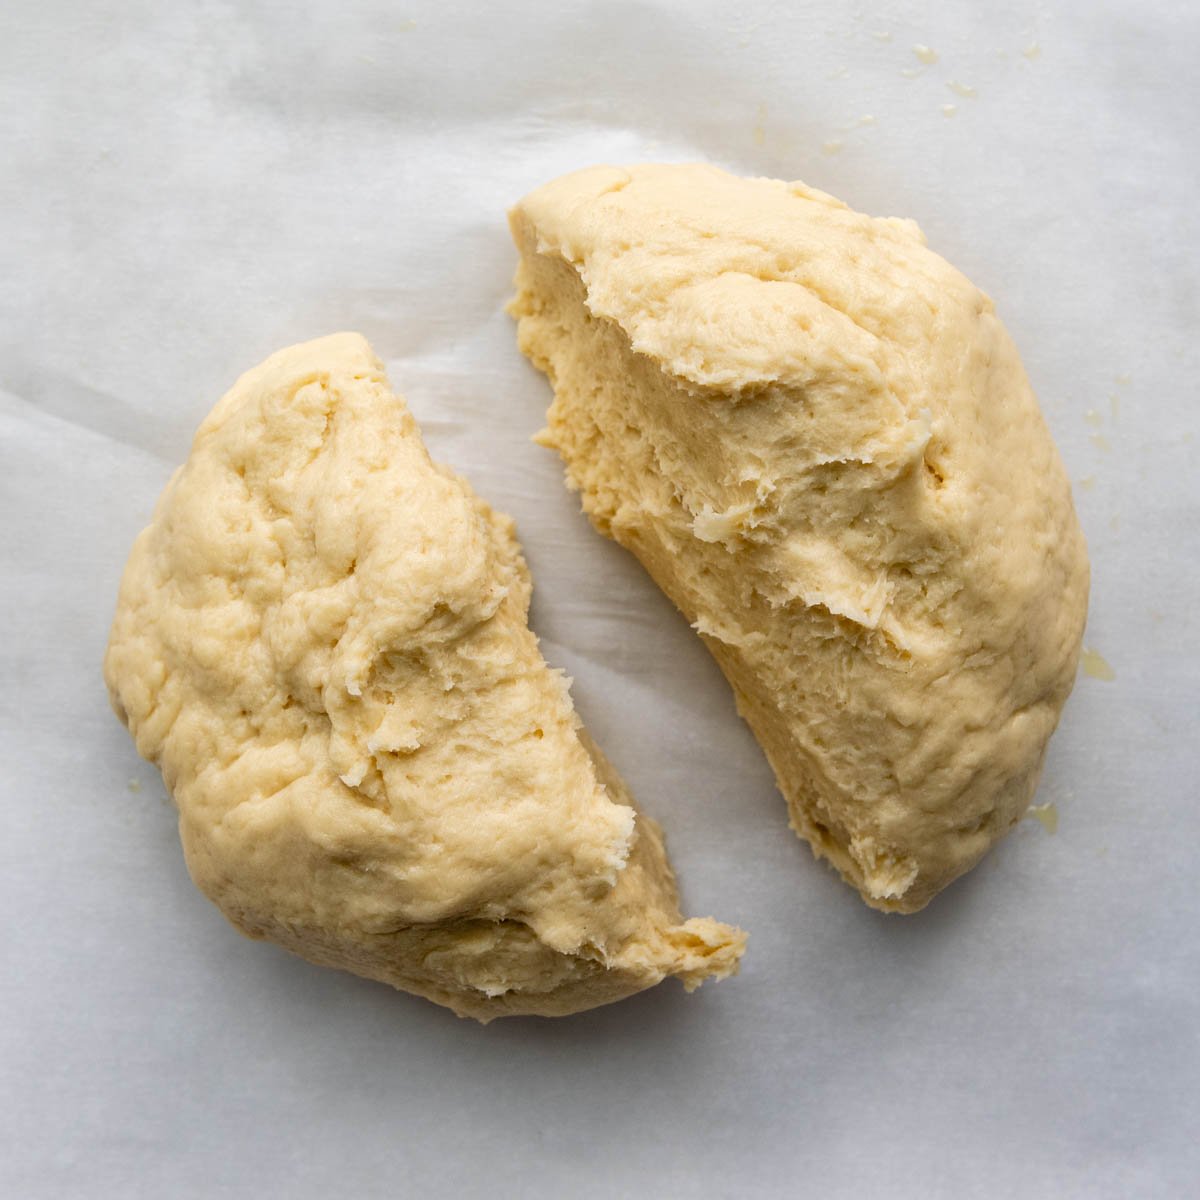
Time to shape the baguettes.
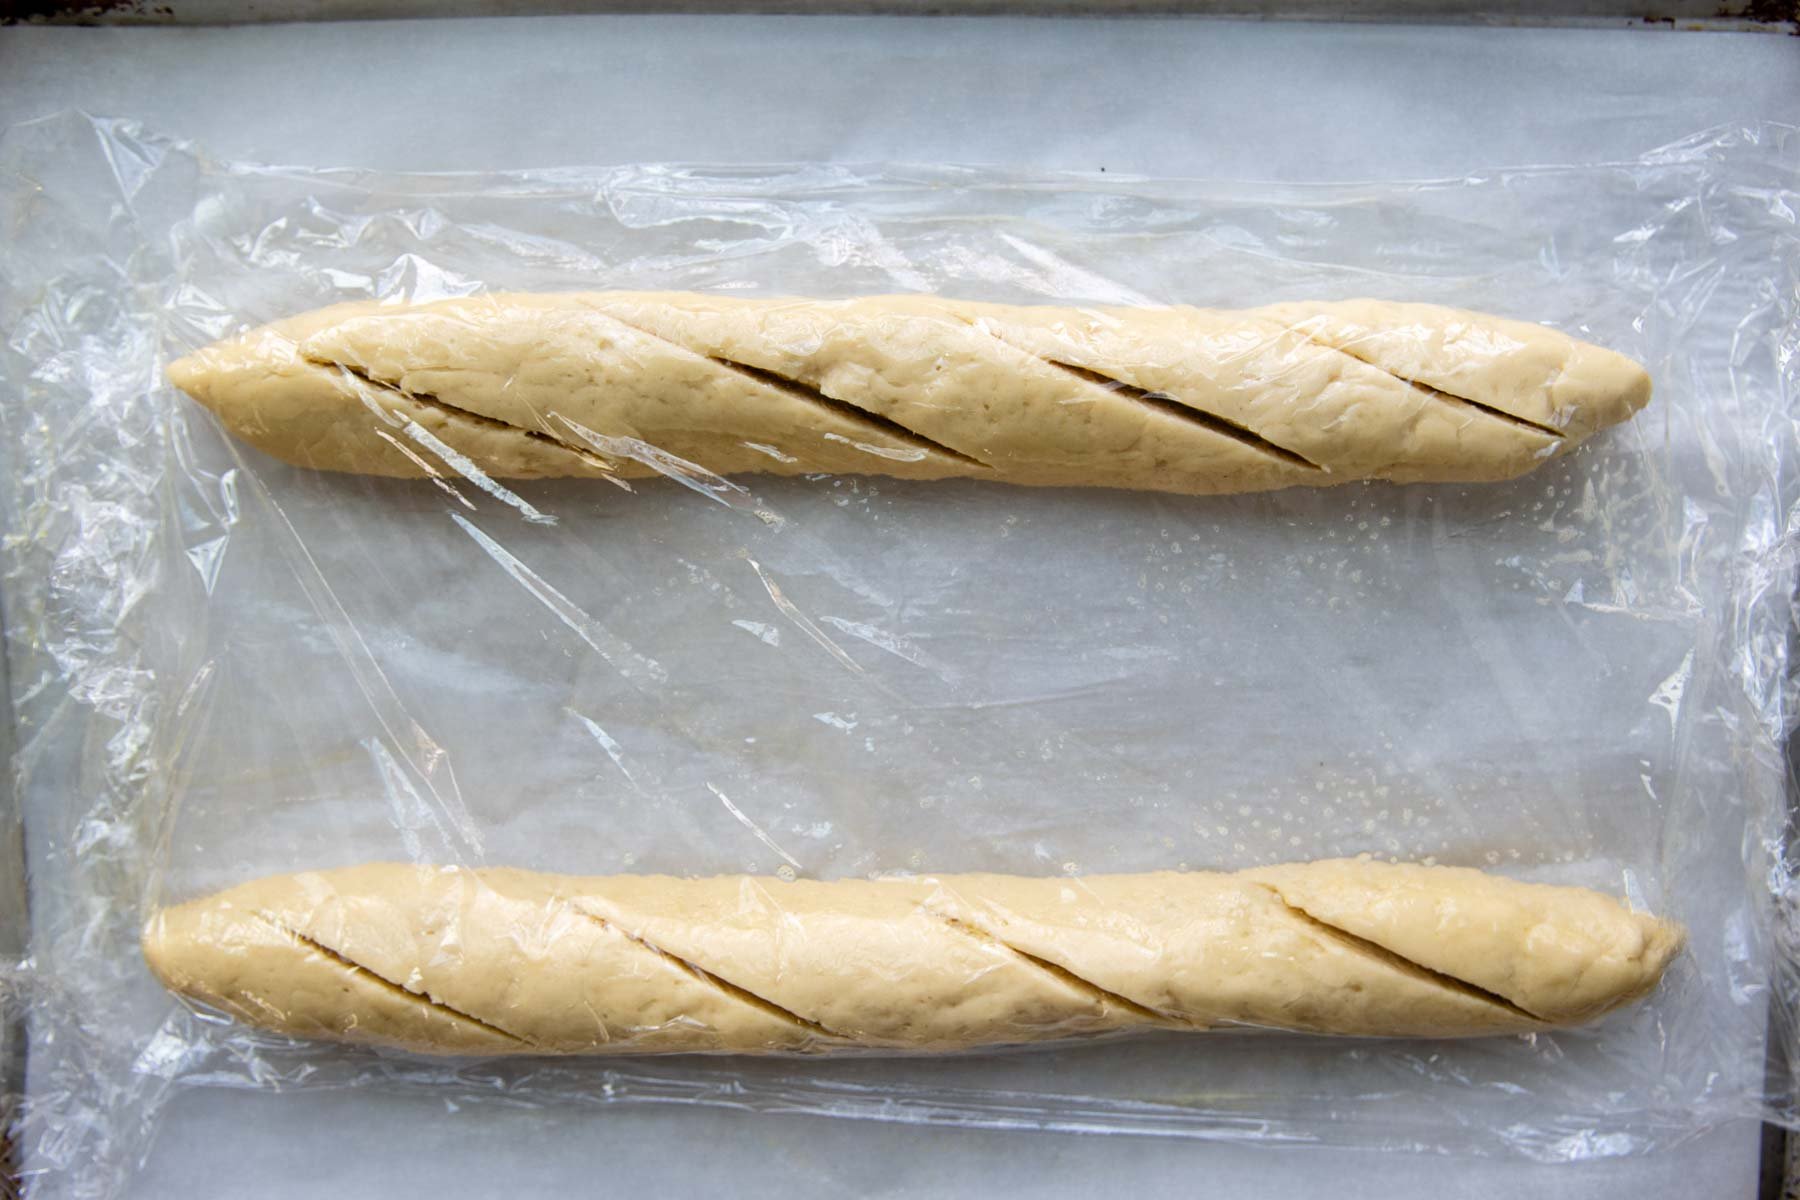
For a work surface I like to use a piece of parchment on a baking sheet. Spread a little olive oil on the paper to prevent sticking.
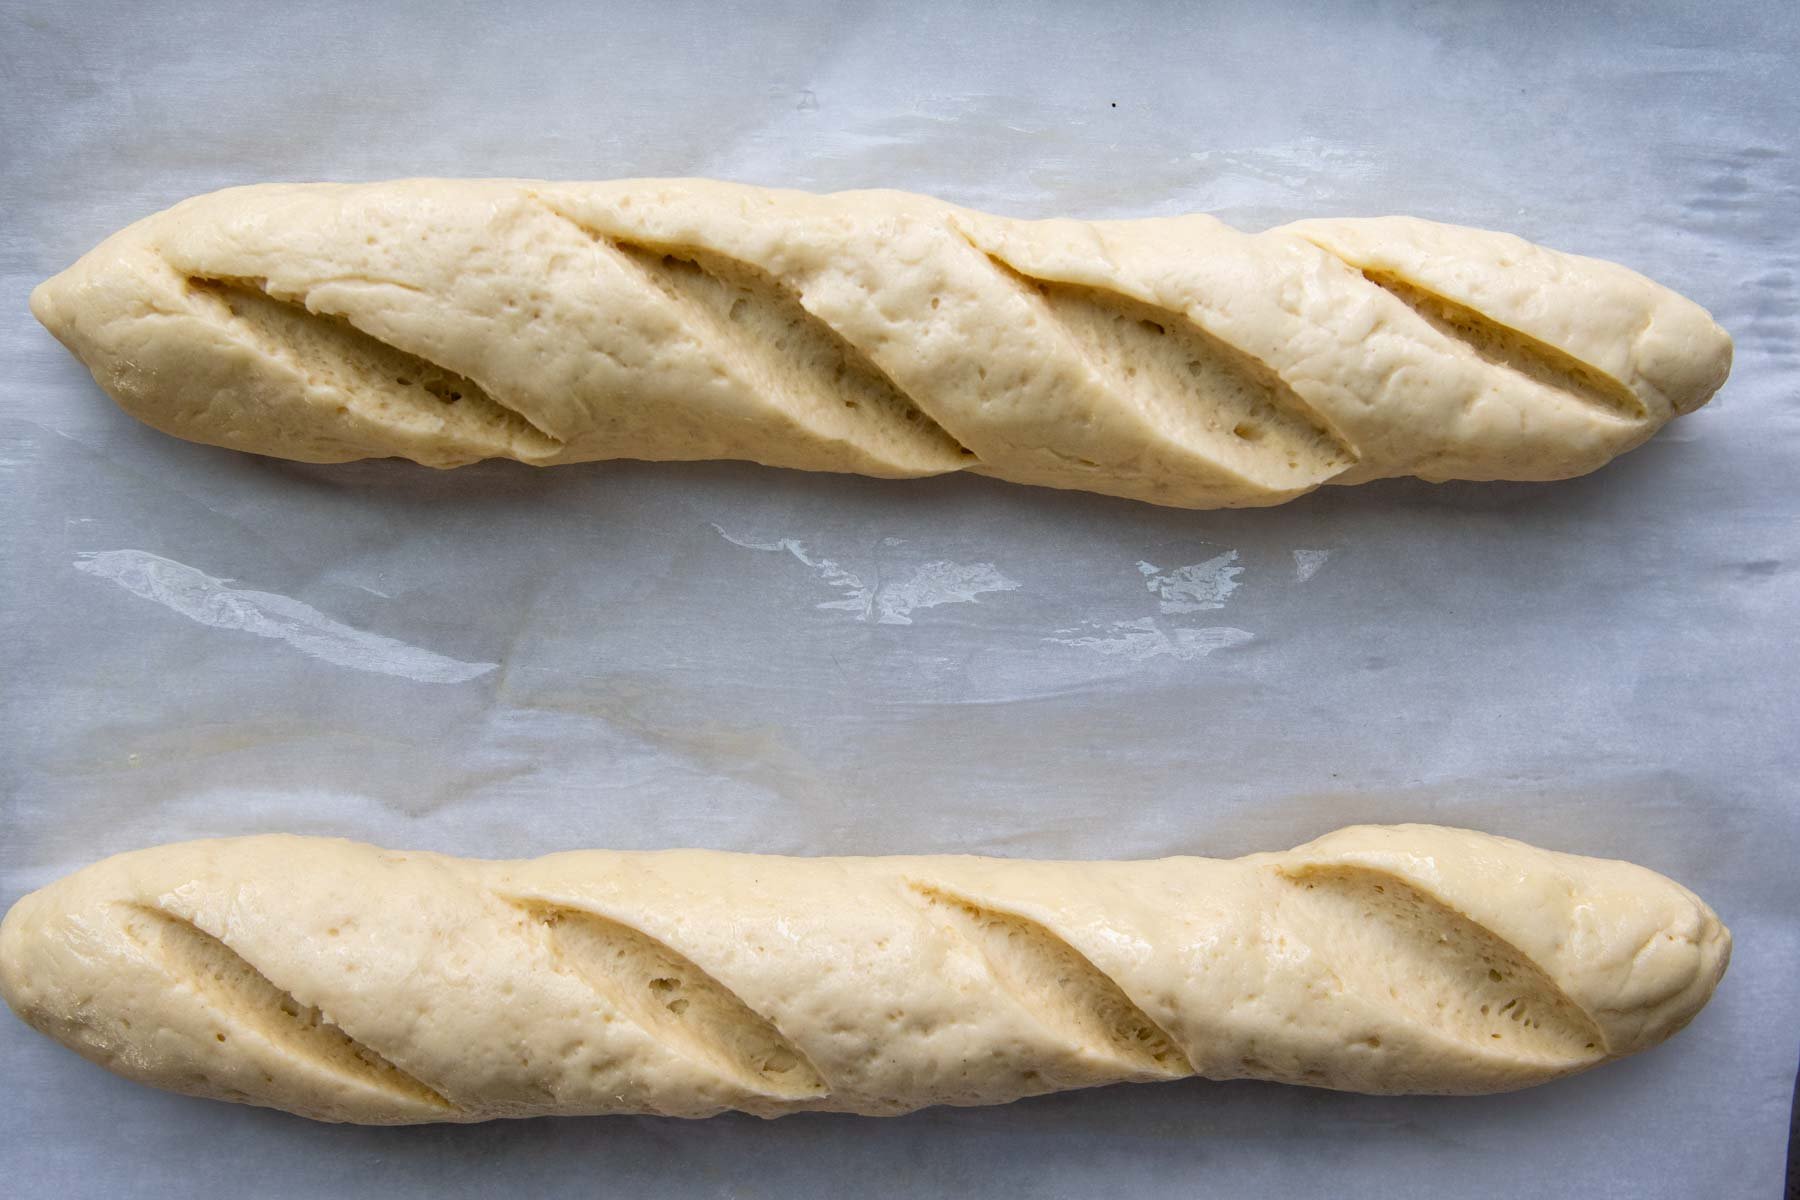
Scrape the the dough out and divide into two equal parts. Roll each section into a smooth 12-inch log, using greased hands if the dough sticks at all. Take a knife and slash about 3-4 shallow diagonal slits on top.
Rise and bake.
Lay a piece of greased plastic wrap over the top and let rise for 30 minutes. It won’t be all the way risen at this point, but it will expand more in the oven because of the baking powder.
Meanwhile preheat the oven nice and hot to get that crusty outside texture – 450℉. When you’re ready to bake throw 5-6 ice cubes at the bottom of the oven. This creates a steamy environment for a crisp crust and chewy inside.
Bake for 10 minutes. Loosely tent a large piece of foil over the baking sheet (to prevent the bread from over-browning) and reduce the oven temp to 350℉. Bake for 15 minutes longer. Oui, Oui! Bon Appetit!

No Baguette Pans? No Problem! (And Other Shaping Tips)
I don’t have french-bread pans on hand, so I used what’s available – parchment paper and a baking sheet. Baguette pans are helpful if the dough is very loose, but these GF French baguettes are easy to shape without needing one.
Since the dough is slightly sticky, grease your hands with a little olive oil or nonstick cooking spray to shape. I prefer doing this rather than adding more flour to work surface, which can dry out the bread.
For a smooth, lump free surface, lightly wet your fingers and smooth out any ridges or visible seams before rising.

Save this recipe to your pinterest board!
Let’s be friends on Pinterest! I’m always sharing great recipes!
Did you make this recipe? I love hearing from you! Leave a star rating and comment below the recipe card. It helps others when searching for recipes and I appreciate feedback from our community. You will always hear back from me! -Melissa

Crusty, Airy Gluten-Free French Bread (1 Hour)
Ingredients
- 1 ½ cup (213 g) gluten free all purpose flour, I highly recommend Cup4Cup gluten-free flour blend
- 3 tablespoons (31 g) potato starch, see recipe notes for substitution
- 2 tablespoons (20 g) psyllium husk powder, helps with bread moisture & structure (what is psyllium husk?)
- 1 (9 g) packet (2 ¼ tsp) instant rapid rise yeast
- 1 teaspoon (5 g) baking powder
- 1 ½ teaspoon (9 g) salt
- ½-¾* cup (180 g) warm water (112°F), *see recipe notes for amount
- 2 large eggs, room temperature
- 1 tablespoon (16 g) apple cider vinegar
- 1 tablespoon (21 g) honey
- 1 tablespoon (15 g) olive oil
Instructions
- Using a stand mixer with paddle attachment, mix together gluten free flour, potato starch, yeast, psyllium husk powder, baking powder, and salt on low speed until combined.1 ½ cup gluten free all purpose flour, 3 tablespoons potato starch, 2 tablespoons psyllium husk powder, 1 packet (2 ¼ tsp) instant rapid rise yeast, 1 teaspoon baking powder, 1 ½ teaspoon salt
- Add warm water (see recipe note below), eggs, apple cider vinegar, honey, and oil. Mix on low speed to let the dough come together, about 1 minute. Increase the speed to medium and beat for 5 minutes (this helps thicken the batter), scraping down paddle and bowl halfway through. The batter will be thick and stiff, but still slightly sticky.½-¾* cup warm water (112°F), 2 large eggs, 1 tablespoon apple cider vinegar, 1 tablespoon honey, 1 tablespoon olive oil
- On a greased large sheet of parchment paper shape the dough into a large ball, using greased hands. (Spray nonstick cooking spray on them or rub with a little bit of olive oil.) Use a sharp knife to evenly divide the dough in half.
- Move one half to the side and roll one into a smooth 12-inch log using greased hands. Repeat with the second log and position about 3-4 inches apart. For an authentic look, pinch the ends so they are tapered. Use a sharp knife to slash 3 diagonal slits on top, about ¼-inch deep. (See how-to images in the recipe post.)
- Move the parchment with bread to a baking sheet. Place a large piece of greased plastic wrap over the shaped bread and let rise in warm, draft free place for 30 minutes. After 30 mins, the bread will not be fully risen, but will rise more as it bakes due to the baking powder. Meanwhile, preheat the oven to 450℉.
- When ready to bake, remove the plastic wrap. Throw 5-6 ice cubes at the bottom of the oven (this creates a steamy environment for a crisp outer crust) and place the bread on the middle rack. Bake for 10 minutes. Loosely tent a large piece of foil over the baking sheet (to prevent the bread from over-browning) and reduce the oven temp to 350℉. Bake for 15 minutes longer.
- Transfer to a wire rack to cool slightly before slicing, about 30 minutes.
Notes
*Update about water
Some readers have written in saying their batter has been too thin. I’ve done several more rounds of testing to try to figure out why, but haven’t landed on an exact reason. As to not risk another recipe potentially not turning out, I would recommend starting with 1/2 cup water and gradually adding more until the dough looks like the image in the recipe post. My bread always takes the full 3/4 cup. It should be stiff, yet still be able to be moved around by the paddle attachment, and a little sticky. Also make sure it mixes for a couple minutes before determining if the water needs to be adjusted. It thickens as it mixes. I also tested the recipe with Caputo gluten-free flour and that required a little less water, about 1/2 cup + 2 tbsp.Storing, Freezing, and Reheating
Gluten-free breads lose moisture quickly, so I recommend serving the day they are made. To make ahead of time, cool the bread completely then wrap in plastic wrap and transfer to a ziplock freezer bag or a double wrapping of foil. Freeze up to 2 months. When ready to enjoy again make sure the baguettes are at room temperature and not chilled. If the bread is cold it will not be soft and have a drier texture. For best taste and texture, warm briefly before serving. Either wrap in paper towel and microwave for a few seconds or French bread can also be warmed in the oven. Wrap it completely in foil and place in a 350ºF oven for 10-15 minutes.This post contains affiliate links. My opinions are always my own. If you purchase a product through an affiliate link, I make a small commission – at no cost to you. Read full disclosure policy here.


I almost never leave a review, but this bread definitely deserves the time for one. I have had to eat gluten free for 13 years now, and finding a good, crusty, tasty bread recipe…..one that is fluffy and moist on the inside…..crusty on the outside……has a delicious flavor……and doesn’t crumble, no matter how thin you slice it…..and this bread recipe hits the mark on all levels!!!! And the cherry on top is how quickly it all comes together……you are eating fresh bread in less than 2 hours from start to cooling and slicing!!! And the recipe is VERY forgiving!!!! We had a few *oops* moments while making it (not sure we did the math right for using active dry yeast instead of rapid instant yeast, accidentally turned the beaters on too high and the dry ingredients flew out of the bowl, used an extra egg since our eggs were not large, but was probably too much, added random amounts of flour to thicken the batter up that was too thin likely due to the extra egg we added, formed one runny baguette on a tray and one in a stone loaf pan, the one appeared too dark upon removal from the oven, the bread stuck in the loaf pan that we forgot to grease)……and with ALL the mistakes……both loaves came out AMAZING!!!!! This recipe seems like you could play around with all different spices and ways to use it, such as perhaps as a pizza crust, which we intend to experiment with soon! THANK YOU SO VERY VERY MUCH for this recipe!!!! You have definitely changed our world!!!
Gosh, thank you so much for these kinds words and stamp of approval. I hope you try my GF sourdough recipe next! Or if you don’t have a GF sourdough starter you can bake this bread the same way the sourdough describes for a really artisanal crust. Let me know if you try it!
Best,
Melissa
Can you substitute the psyllium husk with zantham gum
Hi Tony,
If your flour blend has xanthan, I would try ground flaxseed instead.
Best,
Melissa
Hi Melissa! I’ve been baking gf just for myself and on occasion for friends for 20 years. I learn from all my gf professionals like you! Thank you. I’m going to make this bread today. I am anxious and excited as I have not really explored gf bread baking yet. Too intimidating. I do mostly pastry or cinnamon rolls and cakes. But in the comments I’m noticing the struggle with moisture content. I’m wondering if it’s because some are using psyllium husks and others psyllium husk powder. They perform differently with absorption. Powder absorbs more and faster than whole. Whole husk will look almost like soup at first mix. Some recommend using twice the amount if using whole over powder. Others recommend waiting 10 to 15 minutes before adding more flour if it’s too wet. The extra time allows for more absorption. Also one recommended dissolving first. (Using psyllium as a binding agent can render the kind of elasticity and chew that is perfect for gluten-free breads. If you’re utilizing those unique binding properties, mix psyllium with water to form a gel before adding to your recipe.
To make the gel: aim for a 10-to-1 ratio of water to psyllium. Use 1 Teaspoon of Whole Husk Psyllium per cup of flour.)
As I said, I’m no expert or even close, just researching as all I have on hand at the moment is whole husks. It also appears powder will give a higher rise and whole husk will take a couple of extra turns with the hands. I will come back after I have baked my bread and let you know my results. I am expecting it to be great. Your recipe looks amazing. Thank you for all of your work. GF is always a love bake. (I gave it 5 stars as the recipe looks absolutely dead on and it’s not right to give a low rating when I haven’t even tried it. I wanted to keep your percentages in their proper positive rating.)
Hello Sandy,
Thank you for your kind and thoughtful comments. You raise a good point. I always use psyllium powder because I like to simplify things as much as possible, especially if it yields just as good as a result in the end. I hadn’t considered the possibility some people might be using whole husk. I do know from my own recipe experimentations, though, that different GF flours also absorb liquids at different rates. It makes it hard to develop recipes with continuity, but I try the best I can and try to explain any possible adjustments.
I think you should be just fine with the world of gluten-free breads! In fact, I find them easier than traditional wheat flour breads. There’s not many that require two rises and the process is simpler. Let me know how it turns out!
Best,
Melissa
Where are the images of the process? I only see 2 pics of completed bread. Id love to see the consistency of the dough and how to shape it. I keep coming back to this recipe and then skipping since I dont have any reference pics.
TIA
Cyd
Hi Cyd,
Can you try refreshing your page? I see all the process shots on my end. I have every step photographed in the post.
Best,
Melissa
Oh my. I made it for a friend who is GF and it was amazing. I loved it too. I am not GF but I will continuing making it!!!
That’s awesome, Lois! Thank you.
Best,
Melissa
My daughter is gluten intolerant and missed our homemade pizza dough. I used this dough to shape two 9-inch crusts and let rise as directed. Then I topped with her favorite toppings, popped them onto the hot cookie sheet, and baked for 15-minutes. Her comment: “Mom, are you sure you gave me the right pizza? This is too good to be safe for me.” Kudos to you for a recipe that truly made her day, and mine.
Incredible, Shannon! Makes my day when I read comments like this! I appreciate you taking the time to share.
Best,
Melissa
I just made this for my husband.I did not have physillium husk powder or potato starch. Since the flour I used has physillium husk as an ingredient, I added an additional 5 Tbsp of King Arthur’s gluten free bread flour. It looks and smells delicious! I only gave it 4 stars as I have not tasted it yet.
Hi Sheryl,
Hopefully it earns the five stars after tasting!
Best,
Melissa
I have used my own flour blend that I found online. It has worked every time. I’ve made baguettes 2x & successfully. After dinner I slice the baguettes & bake for toasted crispy bread bites.
Thank you so much, Dianne! I appreciate the time you took to let me know! 🙂
Best,
Melissa
Wow! We haven’t found a truly good baguette style bread since having to go gf and this was a treat. I followed the recipe exactly as listed, using 1/2 cup of water. It came out so soft! This was a big hit with our kids. We will definitely be adding this to our rotation. Thanks for another great recipe.
Reading comments like this never gets old! Thank you!
Best,
Melisa
Hi Melissa,
Thank you so much for the details and all your testing for the best GF French bread. Do you know if your recipe will work in a bread machine with a GF setting?
Michelle
Hi Michelle,
Yes, I believe it will! Many readers use a GF bread machine to mix up the dough for other bread recipes and then just transfer it to the pan or loaf pan to bake. Enjoy!
Best,
Melissa
I do not have a stand mixer; just a hand held, but no paddle attachment. There is a metal, spiral “bread mixer” attachment. Will that work? If not, other options?
Yes, that would be perfect! I believe the dough would get caught in the whisk style attachment, but spiral one should be good!
Best,
Melissa
Melissa, thanks for getting back to me. I’ll give your suggestion a try & let you know how it came out.
Melissa, I’m making this baguette recipe again tomorrow. I’ve been using Caputo Fioreglut flour. It’s easy to work with & there’s no gumminess inside. It tastes good with a lot of crumb. The only problem I have in making these baguettes is that I cannot get a crispy crust. I spritz them with water before & during the baking time and put ice cubes on the bottom and they still come out soft. Any recommendations? Thanks, Charles
Hey Charles,
I did make them last weekend with the Caputo and really liked it! The only difference I saw was Caputo required a tad less water, like 1/3 cup. As for the crust, I did notice it was a little soft when I made them with Caputo. I haven’t tried this, but here’s what I would do next.
1. Instead of ice cubes at the bottom, put a small pan of water on the shelf below it.
2. Bake it on a stone with parchment.
3. When its done baking, open the oven door slightly and let it cool in the oven. The exposed heat will continue to dry out the outer crust.
Hope this helps!
Best,
Melissa
I used Bob Red Mill Flour, psyllium and tapioca flour. I weighed all ingredients. I used half cup of water. It turned out great! I think next time I will proof it a bit longer in a warming drawer as it didn’t really grow until in the oven. Thanks for recipe!
Glad you enjoyed the recipe, Sheldene. And it’s always helpful to know which flour brands people use. There are so many out there!
Best,
Melissa
Hi Mellissa. Charles again. I just purchased the blonde psyllium husk powder. But I’m confused on the gluten free cup 4 cup flour that you used. I was going to order the flour on line but read the the makers of cup 4 cup DO NOT recommend it for yeast recipes. What’s your thought.
Hi Charles,
I use it for all my yeast recipes, so I can’t really say the same. I do know some GF bakers really like Italian Caputo GF flour for yeast breads. I haven’t tried this yet, but I plan to! For my recipes, though, they are tested with C4C, so that is what the other ingredient ratios are based around and what I recommend for best results.
Best,
Melissa
I just made the gluten free baguette as per your recipe. Am I the only one whose bread turned out purple? What kind of psyllium husk powder do you use? A blonde type ? Also I baked it per your instructions & then 15 minutes more and could not get the internal temperature above 130 degrees. I used pillsbury all purpose gluten free flour. The good part is that it’s not gummy like all of the other baguetts that I have made. Looking forward to your reply.
I just made the gluten free baguette as per your recipe. Am I the only one whose bread turned out purple? What kind of psyllium husk powder do you use? A blonde type ? Also I baked it per your instructions & then 15 minutes more and could not get the internal temperature above 130 degrees. I used pillsbury all purpose gluten free flour. The good part is that it’s not gummy like all of the other baguetts that I have made. Looking forward to your reply.
Hi Charles,
The purple is an easy fix! Even though your psyllium probably looked light brown, if it’s not a very light colored psyllium it will do that. If the brand linked in the recipe post isn’t available, this psyllium is available right now on Amazon and I’ve had equally great results with it!
So, after 30 minutes, it still didn’t reach that internal temp, but the bread was done and crumb was good? Have you checked your thermometer to make sure it’s calibrated correctly? Either put it in a pot of boiling water (should read 212ºF) or fill a glass with ice and put just a little water in it (32ºF).
Best,
Melissa
thanks for getting back to me. I used Pillsbury all purpose gluten free flour & Fleischmann’s instant dry yeast. Although the internal temperature registered only registered 130 degrees, the bread seemed cooked. And as I said in my comment yesterday, this is the first time that the bread was not gummy inside — and I have made lots of baguettes. Should the temp. be around 210 degrees ? I will check my thermometer for accuracy. Also, I will buy a blonde psyllium husk powder.
If you can, please respond via e-mail.
thanks so much.
Sure, will do!
I have tried to make gluten free baguettes three times and failed each time. This was going to be my last attempt. Success!! Thank you for an amazing recipe. I can now make baguettes. I normally never comment on things, but I just had to say how happy I am.
Thanks for making my day, Earl! This makes me so happy!
Best,
Melissa
Hi, I wanted to make this recipe for my son who has celiac but I couldn’t find potato starch and I was wondering what the substitute would be. I read the recipe notes and didn’t see anything. Thanks.
Hi Stacey,
You could order it online. The one I use is Bob’s Red Mill. If you don’t want to do that, you could just replace it with an equal amount of GF flour. They texture will not be quite as airy, but you will be almost there!
Best,
Melissa
Hey Melissa!
This is the third time I’ve made The recipe but my bread isn’t rising! I used good active yeast and yet it still came out flat! Does it need to cook longer?
Hi Kari Ann,
Hmm, I would love to help you figure this out! So suggestions would be to try active yeast and let it activate in the warm water instead of instant. The other thing would be to warm an oven to 150 degrees before you start the recipe, then turn it off. Once it’s off then start the recipe. By the time you put the bread in to rise it will be higher than room temp. Let it rise in the higher oven for 10-15 minutes, pull it out to finish rising on the counter while you preheat the oven to baking temp. If that doesn’t do the trick, I would say we need to adjust the amount of flour you are using, but let’s try this first!
Best,
Melissa
Has anyone made this as one large loaf? wondering what the bake time would be for a single large loaf?
Yes I did. I prefer Batards to baguetts. It looked small in my French bread pan. I used 1/2 c water.
I let it raise as high as it would go, about an hour then baked it. Perfect.
Yes, you can. I would start in a 425 oven for 15 minutes (with ice cubes at bottom), lower to 350 and bake for 20-25 minutes more. You’ll want to bake it long enough to allow the moisture to evaporate. Even if the internal temp reads 200F, cover loosely with foil and bake for the longer time. Hope this helps!
Best,
Melissa
Bread turned out great, easy to follow instructions made it easy! Looking forward to using this recipe over and over throughout the years!
Yay! Thanks so much, LoriAnn! I have plans to turn this recipe into an Italian loaf as well. Stay tuned!
Best,
Melissa
I just made these. I used traditional yeast and bloomed in the 105 degree water. I do r know how much these are supposed to rise, bu mine did not rise more in the oven. I followed recipe exactly. I have not cut them. So will see after.
Melissa,
I would like to try this recipe with a more affordable flour. What brands do you recommend other than Cup4Cup?
Hi Lisa,
I made the bread this past weekend with King Arthur Measure-for-Measure, which is more affordable than C4C and dairy-free as well.
Enjoy!
Melissa
Nicole Hunn from GFOASS has a copy cat c4c that is perfect.
Thanks for sharing! I’ve always wondered how that version turned out. I’ll have to try it!
Best,
Melissa
I’m a big fan of your white bread recipe, so I was excited when I saw the recipe for French bread. It did not disappoint. The bread was delicious and so easy to make. I’m so happy to be able to eat bread again!
Thanks Murry! So glad you enjoyed the recipe!
Best,
Melissa
Update: I made this recipe again today, but I used the metric measurements and weighed all of the dry ingredients. It came out better. The dough was stiffer and easier to form the loaves. By the way, today and yesterday I used large eggs. I notice that the recipe does not specify egg size. I also used instant yeast today and yesterday that I added with the other dry ingredients. This bread is easy to make, bakes nice, and tastes good.
Hi Laura,
I appreciate the update. I will specify the egg size. That was an oversight by me, but large is right. When I made it the other day I measured in cups, but then weighed. It was off by a few grams, but I just went with it for testing purposes. It didn’t make a difference in the stiffness of the dough. I appreciate coming back to the recipe again and your follow up. It’s so, so helpful!
Best,
Melissa
I made this recipe yesterday exactly as written, and with the exact ingredients that were recommended. I also used my Kitchen Aid stand mixer. I definitely got more of a batter than a dough. I added two tablespoons of additional flour to make it a little more workable. I should have added more, however, I did form it using a lot of olive oil on my hands. I used a baguette pan lined with parchment paper and let the dough rise for 45 minutes. It did rise somewhat. It baked nicely, but it was quite flat and not very large. The bread is very soft and tasted very good. It does seem that the wet to dry ratio is off a bit. I think the recipe will be excellent if I make some minor adjustments. I’m sure you have checked to make certain there is no typo in the recipe that was posted.
Hi Laura,
Yes, after the recipe was posted I just made it from the actual recipe card, not my notes. Another thought I had was increasing the temperature of the water. When I bake yeast breads I have a tendency to use very hot water because I often forget to set out my eggs and figure it will balance out in the end. I know from other recipes I have developed, though, that psyllium activates more in warmer water, absorbing moisture. Thanks for inspiring some more troubleshooting!
Best,
Melissa
I was so excited for this recipe. Used recommended Cup 4 Cup gf flour, psyllium , and potato starch. Measured exactwith spooning flour into measuring cups. Best i got was pancake batter. I kneaded in extra potato starch and flour to get something workable. Did not proof much. In all your testing did you happen to get weights? I would love to try this again. I have the best luck weighing vs measuring gf flour.
Oh my gosh, Wendy, this is driving me crazy! I tested the recipe again this weekend, this time using a different flour. I got the same exact result as pictured. It completely turned out and was delicious. I served it to guests and they had no idea it was GF. I am totally stumped, especially since you used all the ingredients listed. If you click over to the “metric” tab under the ingredients I did figure out the weights as well. When I tested it this weekend I weighed the ingredients. I’m going to reach out to my email community and see if I can get more input because I don’t know what else to do. Would love any ideas from others!
Best,
Melissa
Possibly the problem with “batter” dough vs stiff dough is that 3/4 c water is used.
I used 1/2c and my dough was quite stiff and sticky as it should be.
Thanks for sharing, Cheryl. What GF flour did you use? Perhaps that makes quite a difference with the amount of water required too.
Best,
Melissa
I had another idea! What did you use to mix the dough in? Did you do it by hand, mixer or stand mixer. I use a stand mixer with a paddle attachment, would ingredient the ingredients together more (especially the psyllium) than by hand or a mixer.
Best,
Melissa
Dough was like pancake batter. Added extra flour to get it more workable but would not recommend this dry to wet ratio
Hi Scott,
I’d really like to troubleshoot this. Can you please tell me what GF flour you used and if you added the potato starch and psyllium. I tested this recipe so many times and I never had that result. However, I tested with Cup4Cup. There are so many GF flours out there and they are all made up of different starches. I will test it today with King Arthur, but when I usually test with Cup4Cup and KA the dough consistency is similar.
Best,
Melissa
I tried making this and my dough was sooo wet and would not proof. Any ideas what I did wrong?
Hi Chanda,
I’m so sorry to hear that. Can you tell me what GF flour you used? Also, did you add the psyllium and potato starch?
Best,
Melissa