
Learn how to make Instant Pot yogurt and discover all the tips and tricks behind that magic button. Once you try ultra creamy, smooth homemade yogurt made in an electric pressure cooker, you’ll never go back to store bought. It tastes heavenly and decadent, like eating a bowl of smooth, creamy whipped cream!

Want to Save This Recipe?
Enter your email below & we'll send it straight to your inbox. Plus you’ll get affordable and easy gluten-free recipes delivered each week!
Ultra Creamy, Homemade Instant Pot Yogurt
Making yogurt in an electric pressure cooker was an absolute GAME CHANGER for me. Yogurt used to be just a vehicle for toppings, such fresh fruit, my legendary homemade chocolate granola clusters, or swirled with 5-minute blueberry maple syrup.
Then I finally entered the world of Instant Pot…and completely ignored that yogurt button on it. Evidently Instant Pot doesn’t know you can buy store bought yogurt already made.
But I got to thinking…I spend a lot of money on fancy organic yogurt every week. Even with the organic label, some of it still has a lot of added sugars and unfamiliar ingredients. So I asked my au naturale sister about it because if she finds the time to make absolutely everything homemade, I’m sure she’s tried her hand at homemade yogurt.
I was right. But she was also right about how simple it is.
Not only this yogurt ridiculously easy and way more economical, but it’s hands down THE BEST YOGURT YOU’LL EVER TASTE. Legit. 😎
I know what you’re thinking… How Can You Be That Gaga Over The Taste of Yogurt?
Because it doesn’t even taste like yogurt! It’s INFINITELY more creamy, less pungent, and insanely smooth tasting. It’s like eating a bowl of whipped cream without the empty promises of starting a juice cleanse after.
AMAZING!!❤️ I spent months pouring over yogurt recipes and yesterday I became brave and tried your recipe. I followed the instructions and tips and my two-ingredient yogurt turned out better than the expensive starter I bought a few days ago! Creamy, smooth, and rich like whipped cream with a delicate flavour! I will probably never purchase yogurt for the family again! I wish I hadn’t been so afraid to try it long ago! Thanks for the great tips Melissa❤️!
—Lana
So What Do I Need?
- Instant Pot – Some have a simplified yogurt button, like my preferred electric pressure cooker. It will countdown the time and make sure it stays at the correct incubation temperature. The Lux Instant Pot doesn’t have a yogurt button. If you have a Lux Instant Pot without the yogurt button, you can still make yogurt! Scroll down and I show you how step-by-step.
- Thermometer – An inexpensive one will definitely do the trick. If holding a thermometer is a little too taxing for you (no judgment here), you can also the creme a la creme Mac Daddy of them all – a Thermapen that reads in 2 seconds (LOOOOOVVVEEEE mine).
- Cheesecloth – You can buy cheesecloth at a grocery store, but I absolutely love these ones from amazon. You get a ton more for the price and they are washable and reusable.
- Strainer – Any kind will do. Just set strainer lined with cheesecloth over a bowl to catch the whey (watery part separated from yogurt) and you are good to go.
- UPDATE – Since I make yogurt weekly now, I did away with the cheesecloth and strainer method and instead use a yogurt strainer. I make 1 gallon
Free Guide! Receive a Free Gluten Free Breakfasts Cookbook
TOP 5 Highest Rated Recipes!
Let’s Make This Together! (Boil Method)
(Below shows step-by-step photos and modified instructions. For the complete recipe, along with ingredient amounts, scroll down to the recipe card.)
Pour and boil
Pour the cold milk in the pressure cooker. You can use whole, 2%, or skim. Press “yogurt” button until “boil” shows on screen. After about 30 minutes it will start to beep loudly, which means boiling is “done.” But it usually isn’t. I always double check the temperature with a thermometer. If it hasn’t reached 180ºF yet, turn on SAUTE to heat and stir milk until it reaches the correct temperature.

Cool and add starter
Now it’s time to bring the yogurt from 180ºF (82ºC) down to 110-115ºF (43ºC-46ºC). You can simply remove the insert and let it sit on the counter for about 45 minutes, stirring occasionally (make sure to keep checking temperature when you stir).
Alternatively, place the insert into a bowl of ice water, stirring for about 5 minutes, or until temperature reaches 110-115ºF (43ºC-46ºC).
Then whisk in the yogurt starter (“Starter” is a fancy term for store bought plain yogurt. Scroll down for the best brand to use.)

Cook for 8 hours
Press “yogurt” button until timer reads 08:00 and that’s it. It will start the countdown at 0:00 and count up to 8 hours. You’ll know when it’s done because it will be thick and gelatinous. If it isn’t, process for another 1-3 hours.
Time to strain
When yogurt is done fermenting pour into a cheesecloth-lined strainer with a bowl underneath to catch the whey. (Or use my favorite yogurt strainer if you don’t want to mess around with cheesecloth.) Put in the fridge and strain for 2-3 hours for standard yogurt or 4-5 hours for greek yogurt.


Cold Start No Boil Method (Fairlife Milk)
The cold start method simply uses ultra filtered milk and a couple tablespoons of plain yogurt (also known as yogurt starter). No boil yogurt can only be done with ultra filtered milk, such as Fairlife brand.
Although most organic milk brands are labeled “ultra pasteurized,” the results don’t match up to Fairlife ultra filtered milk. This means Fairlife has more protein and less sugar.
The other bonus of cold start yogurt is no straining! After the yogurt cooks for 8-10 hours, it is so thick a spoon can stand straight up in it!
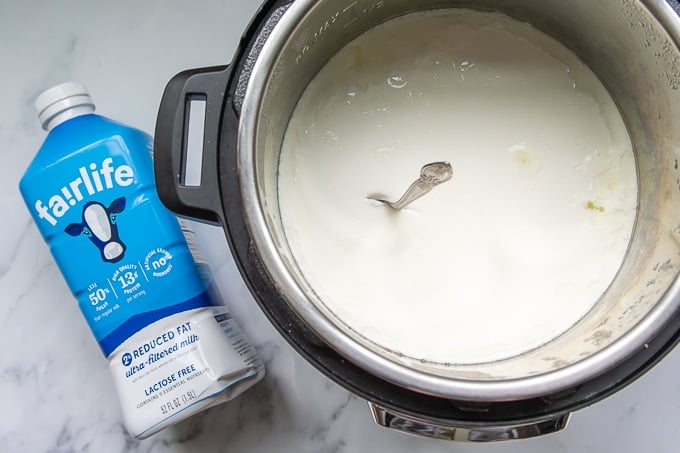
- Pour in cold ultra filtered milk, such as Fairlife into clean pot.
- Whisk in 2 tablespoons plain yogurt starter.
- Place lid on pressure cooker and press yogurt button. It will read 8:00 hours.
- Let yogurt incubate for cook time.
- When it is finished the yogurt may be eaten immediately. However, if you wish for the whey to separate, cover pot with plastic wrap and let sit for 4-8 hours in the refrigerator.
- Spoon out whey liquid, if desired, for thicker yogurt. Store in an airtight container.
What’s The Best Starter To Use?
When I initially experimented with making this, I noticed I would occasionally get a grainy texture. The taste was still spot on, but the texture threw me off.
Some research brought me to a great article explaining why my yogurt was grainy. When additives are in your commercial yogurt starters, such as pectin, inulin, cornstarch, and gelatin, it can yield a grainy yogurt.
To avoid this do one of two things:
- Read the labels when using a commercial yogurt as a starter. Only use one without additives, such as Fage (even some organic brands have additives).
- Or, use your own starter from previously made homemade yogurt.
When you’re done making yogurt, freeze a couple tablespoons straight away for your next batch. You won’t have to try to remember to save some before you finish all your yogurt. Plus, it will save you from buying commercial yogurt each time.
Freezing homemade yogurt starter also insures the bacteria and cultures stay fresh and alive until you are ready to make yogurt again. Sounds kind of creepy, but it’s true.


Help! My Yogurt Is Runny!
Even with making homemade yogurt every week, there are still times now and again it doesn’t set. I used to just throw out the batch, shed a little tear, and start again. However, I’ve now figured out how to avoid it in the first place and a possible way to fix it!
- It starts with the starter. First of all, make sure the cultures are at their peak. The cultures loose their oomph after a while, so either use recently opened or made yogurt. When I make a batch of homemade yogurt, I scoop out a few tablespoons and freeze it so I always have a fresh starter on hand for the next batch. (It will be runny as it thaws, but that is okay!)
- Make sure you are using enough starter. For every half gallon of milk whisk in 2-3 tablespoons of starter yogurt.
- Did you add the starter? Quite a few times 🤦♀️I have boiled the milk, cooled it down, and started to cook the yogurt with completely spacing adding the starter.
- The milk shouldn’t read ULTRA PASTEURIZED on the label. For instant, Aldi brand organic and Horizon organic milk are ultra pasteurized so avoid using these.
- Take a temperature to make sure milk reaches 180ºF during BOIL stage. Unfortunately pressure cookers aren’t consistent with boiling the milk to 180ºF. If it hasn’t reached the proper temp, hit CANCEL, and press the SAUTE LOW / SIMMER. Cook and stir, checking the temperature until it reaches 180ºF.
- Sometimes it can be salvaged. If the milk still smells fine, just let it cook again for a few hours, opening the lid to check consistency every 1 ½ hours or so. When it’s done there might be a lot more separated whey, but after straining you’ll have a perfectly good batch of yogurt.
- Sometimes it’s nothing you did wrong at all, you’re just at the mercy of the live cultures. They can be temperamental and unpredictable every once in awhile, and you’ll just be forced to move on.

Save this recipe to your pinterest board!
Let’s be friends on Pinterest! I’m always sharing great recipes!
Did you make this recipe? I love hearing from you! Leave a star rating and comment below the recipe card. It helps others when searching for recipes and I appreciate feedback from our community. You will always hear back from me! -Melissa

Easy How To Make Instant Pot Yogurt (So Creamy!)
Ingredients
- ½ gallon milk, any percentage (make sure carton isn't labeled ULTRA PASTEURIZED)
- 2 tablespoons plain yogurt, (for best yogurt starters see recipe notes)
Instructions
- Pour milk into Instant Pot and make sure valve is sealed. Press "yogurt" button until it reads "boil." It takes about 30-45 minutes for milk to come to correct temperature, 180ºF (82ºC). Once it's reached 180ºF, the Instant Pot will start beeping. After boiling is completely I usually double check the temperature with a thermometer. If it hasn't reached 180ºF yet, turn on SAUTE to heat and stir until it reaches the correct temperature.
- Remove the lid and carefully remove insert. Set insert with milk on the counter for about 45 minutes to come to 110-115ºF (43ºC-46ºC), stirring occasionally. Alternatively, set insert in an ice bath and stir for 5 minutes, or until milk reaches 115ºF.
- Whisk yogurt starter into the 115ºF milk. Place insert back into the Instant Pot and press "yogurt" button again until time reads 08:00. The pot will then change to 0:00 and count up until it reaches 8 hours.
- Line a colander with one layer of cheesecloth and set over a bowl to catch the whey. (This is what I used to do, but now that I make it weekly I use this handy dandy yogurt strainer.) Pour yogurt into the lined strainer. Place everything in the refrigerator to continue to strain for 2-3 hours for regular yogurt and 4-5 hours for "Greek" style.
- TIP: If you accidentally left the yogurt straining too long and it becomes thicker than desired, simply stir some of the liquid whey drained out or additional milk back into the yogurt.
- TIP: To have a yogurt starter ready for the next batch, reserve 2 tablespoons of yogurt after straining. Freeze start in a small ziplock bag and thaw overnight in the refrigerator.
- Store yogurt in a glass jars or airtight plastic containers. Makes 1 quart (32 ounces). Yogurt will last 10-14 days in refrigerator. Each serving is ½ cup.
Notes
Best Yogurt Starter
When additives are in your commercial yogurt starters, such as pectin, inulin, cornstarch, and gelatin, it can yield a grainy yogurt. To avoid this do one of two things:- Read the labels when using a commercial yogurt as a starter. Only use one without additives, such as Fage (even some organic brands have additives).
- Or, use your own starter from a previously made batch of yogurt.
Tips and Troubleshooting
- Before making the yogurt, sanitize and clean your Instant Pot with a kettle of boiling water. This will get rid of any previous dinner smells and tastes you don’t want permeating your batch of delicious yogurt.
- You can use whole, 2%, or skim milk. Skim milk may have to strain a bit longer to thicken, but is still equally delicious!
- For the BOIL METHOD, the milk carton shouldn’t be labeled ULTRA PASTEURIZED. This will result in thin and watery yogurt.
- Some tips for timing it out: Option 1 – Boil and cool the milk before bed and let it process for the 8 hours while you sleep. Option 2 – Boil and cool the milk first thing in the morning and let it process all day. Option 3 – Start in the middle of the day and let the yogurt strain overnight in the refrigerator. It will be extremely thick when you wake up, but you can always add some of the drained whey or milk in to thin it out.
- If you like your yogurt tangier, let it process for about 10 hours.
- How to know when your yogurt is done: It will look gelatinous and some of the whey will separate and be settled on top. If it doesn’t look like this, process for 1-2 more hours.
- Whisk or beat yogurt after straining to make it extremely creamy and smooth.
- Less is more when adding the starter. Add 2 tablespoons yogurt starter to a ½ gallon of milk. Extra starter can inhibit the growth of live cultures and might make your yogurt grainy.
- Trust me, you will forget about your yogurt straining in the refrigerator. Not a biggie, but it might end up thicker than desired. Adding the drained whey works for thinning it out. Alternatively, adding a little milk, coconut milk, half and half, or cream will make it even smoother and creamier tasting.
- The recipe can be doubled. Since we go through so much yogurt I always use 1 gallon of milk and 4 tbsp yogurt starter. Cooking times don’t change.
This post contains affiliate links. My opinions are always my own. If you purchase a product through an affiliate link, I make a small commission – at no cost to you. Read full disclosure policy here.


Hello!
I absolutely love your account so much! All your recipes are amazing! Thank you!!
My question is have you ever experimented with dairy free yogurt? My grandson is allergic to milk so I’m experimenting with dairy free options – my first attempt flopped! HELP
Hi Lynn,
Appreciate this! I’m glad you are finding recipes you love. I wish I could help, but for a dairy-free instant pot yogurt you would have to use a different starter and method, so I think finding a non-dairy Instant Pot yogurt recipe would serve you better. I’m not familiar enough with it to be of much help. Sorry!
Best,
Melissa
Had great results using Fage as the starter. I used 1/2 gallon lactose free whole milk and 1/2 gallon regular whole milk- – – but both say ultra pasteurized (I saw that part after I made it). Still had good luck!
Great to hear! Thanks so much for sharing. This is helpful for others!
Best,
Melissa
Hi there 🙃
Can you use coconut milk to begin with since I steer clear of dairy to keep down inflammation?
Thanks,
Jeannie
Hi Jeannie, I did some research on this recently and it looks like to use non-dairy milk you have to use a special non dairy starter, plus a different cooking technique than what is listed. So, I would recommend finding a recipe specifically developed for non-dairy yogurt.
Best,
Melissa
Any chance on a recipe for dairy free using coconut milk?
Hi Angela,
Great question, but unfortunately, no. I did some research on this recently when I had a big thing of refrigerated milk to use up. To use non-dairy milk you have to use a special non dairy starter and it has a different cooking technique than what is listed.
Best,
Melissa
Easy and delicious. I double the recipe because I consume a lot of yogurt
Amen! Me too! I make this about once a week. I will never go back to store bought.
Best,
Melissa
Hi Melissa:) AMAZING!!❤️ I spent months pouring over yogurt recipes and yesterday I became brave and tried your recipe. I followed the instructions and tips and my two-ingredient yogurt turned out better than the expensive starter I bought a few days ago! Creamy, smooth, and rich like whipped cream with a delicate flavour! I will probably never purchase yogurt for the family again!
I’m so impressed with how easy it is. I used 3.25% MF and whole-fat probiotic organic yogurt. (And I froze some for my next starter.)
I wish I hadn’t been so afraid to try it long ago! Thanks for the great tips Melissa❤️!
First of all, what a fantastic name you have! You are welcome and I fully support everything you are saying. Homemade yogurt puts any ultra expensive store brand to shame! It’s so smooth tasting, you barely need to add sweetener to it. I’ve been making it weekly for years and years, have it every morning, and never get sick of it! It is so easy, once you just convince yourself to do it!
Best,
Melissa