
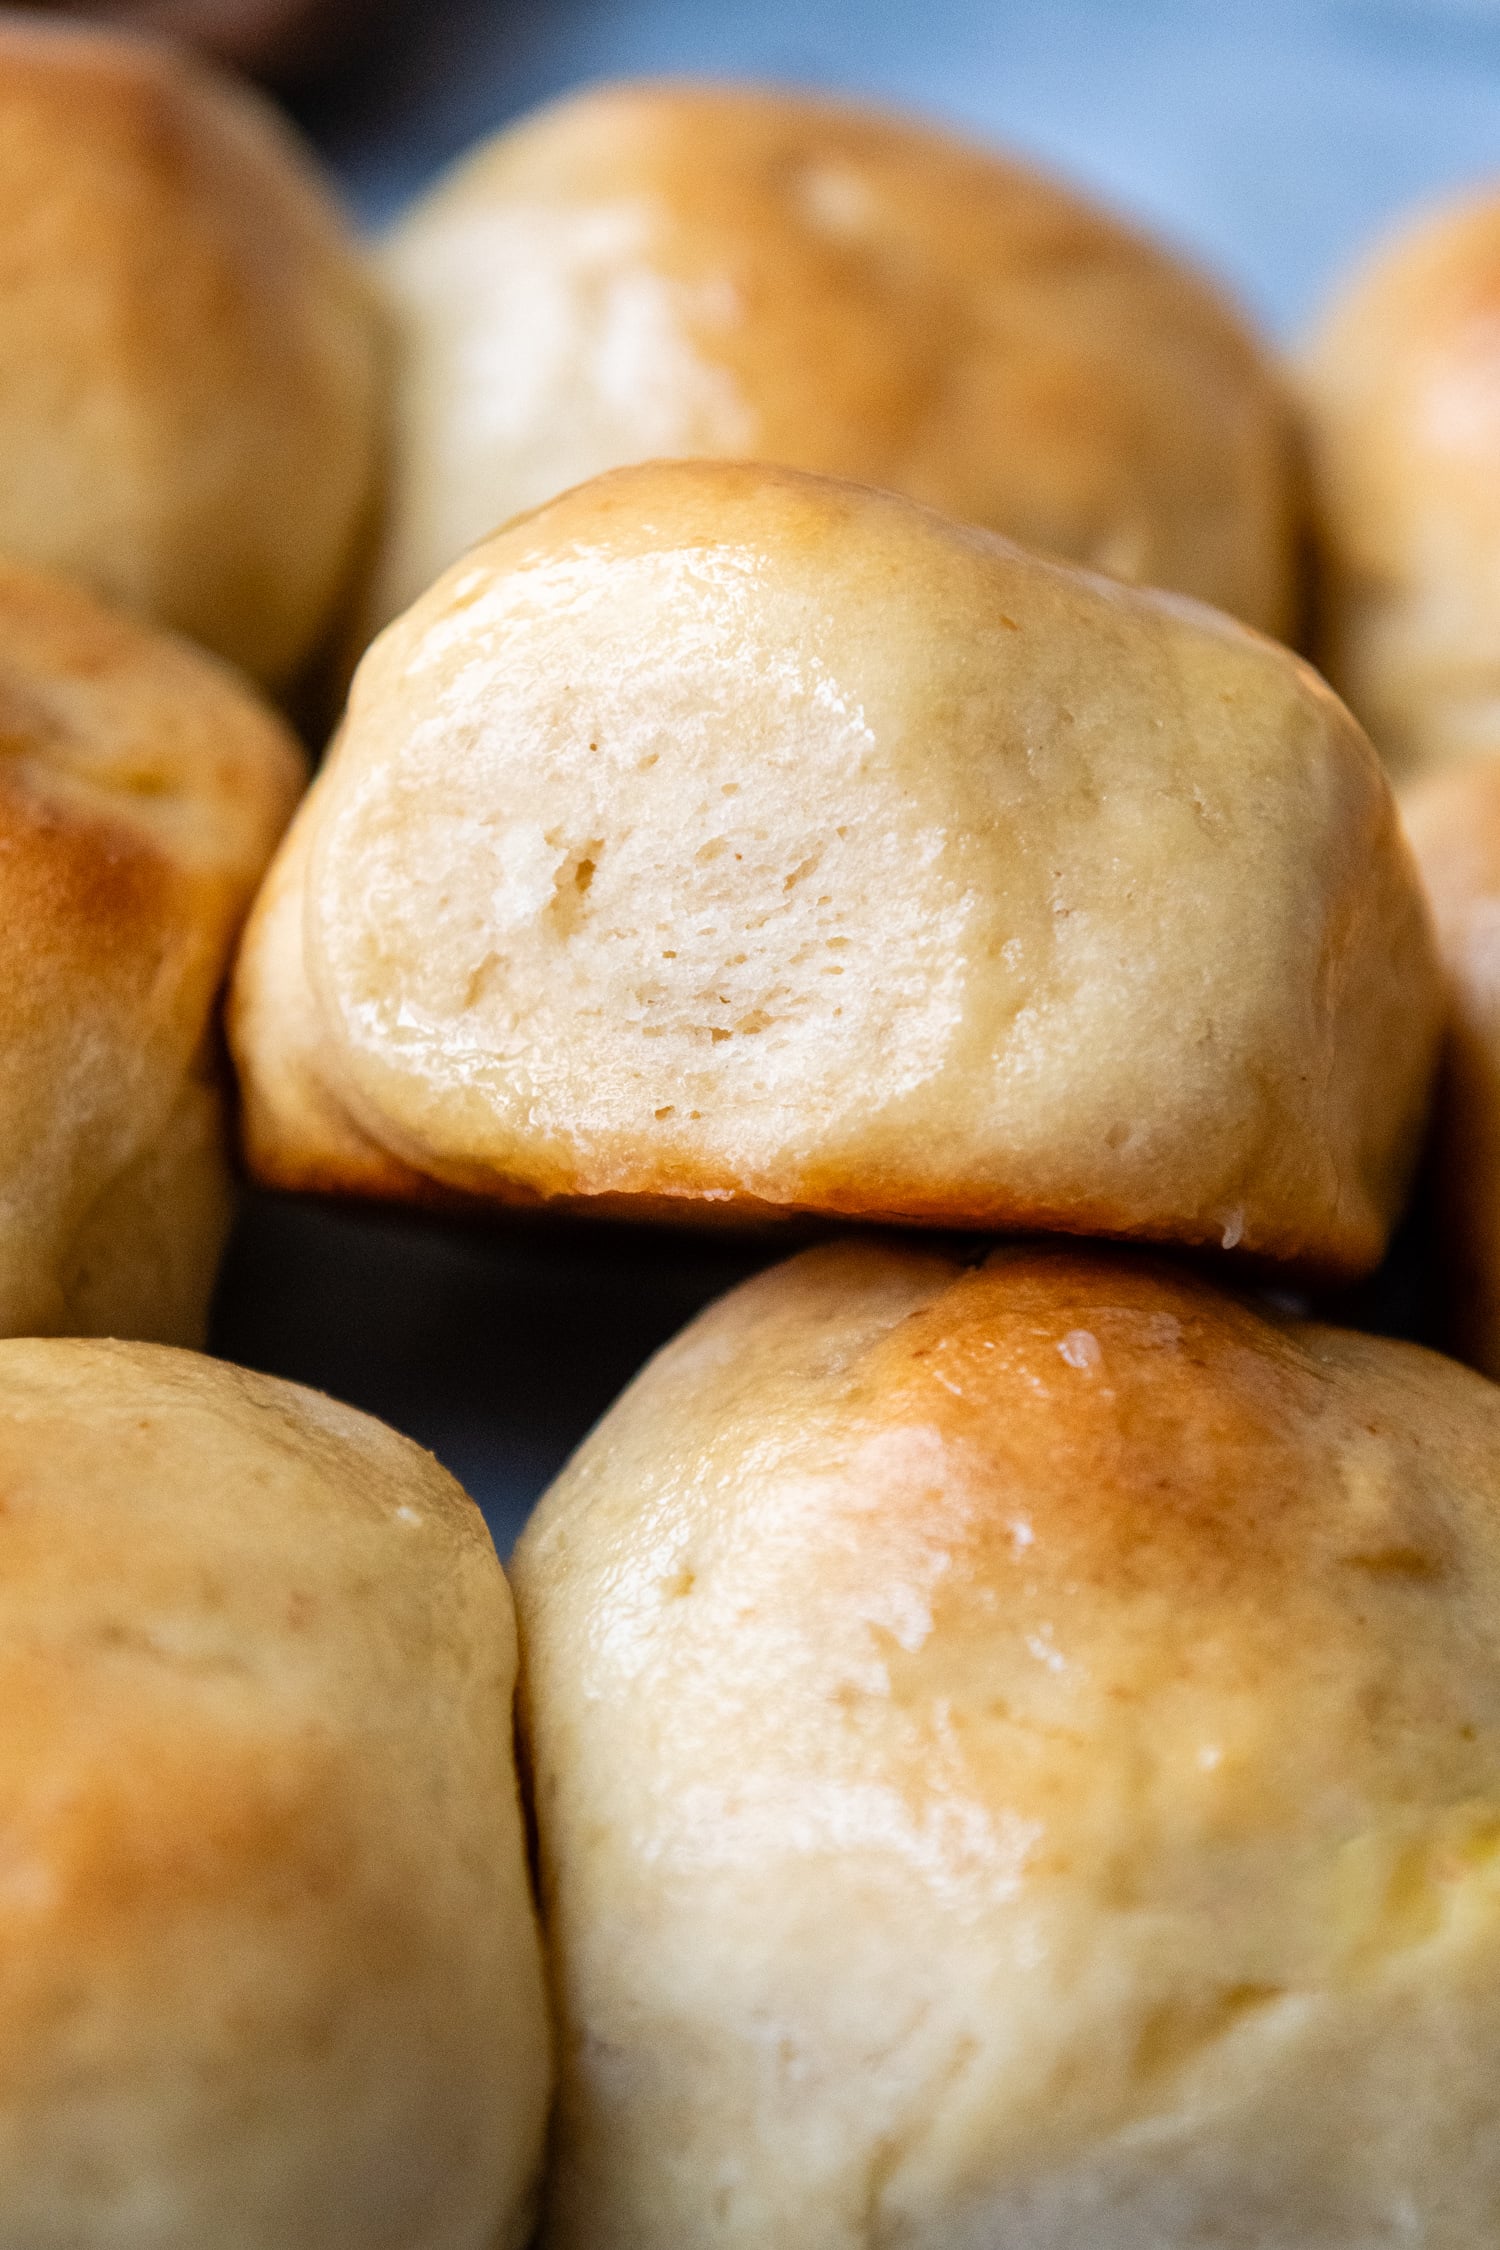
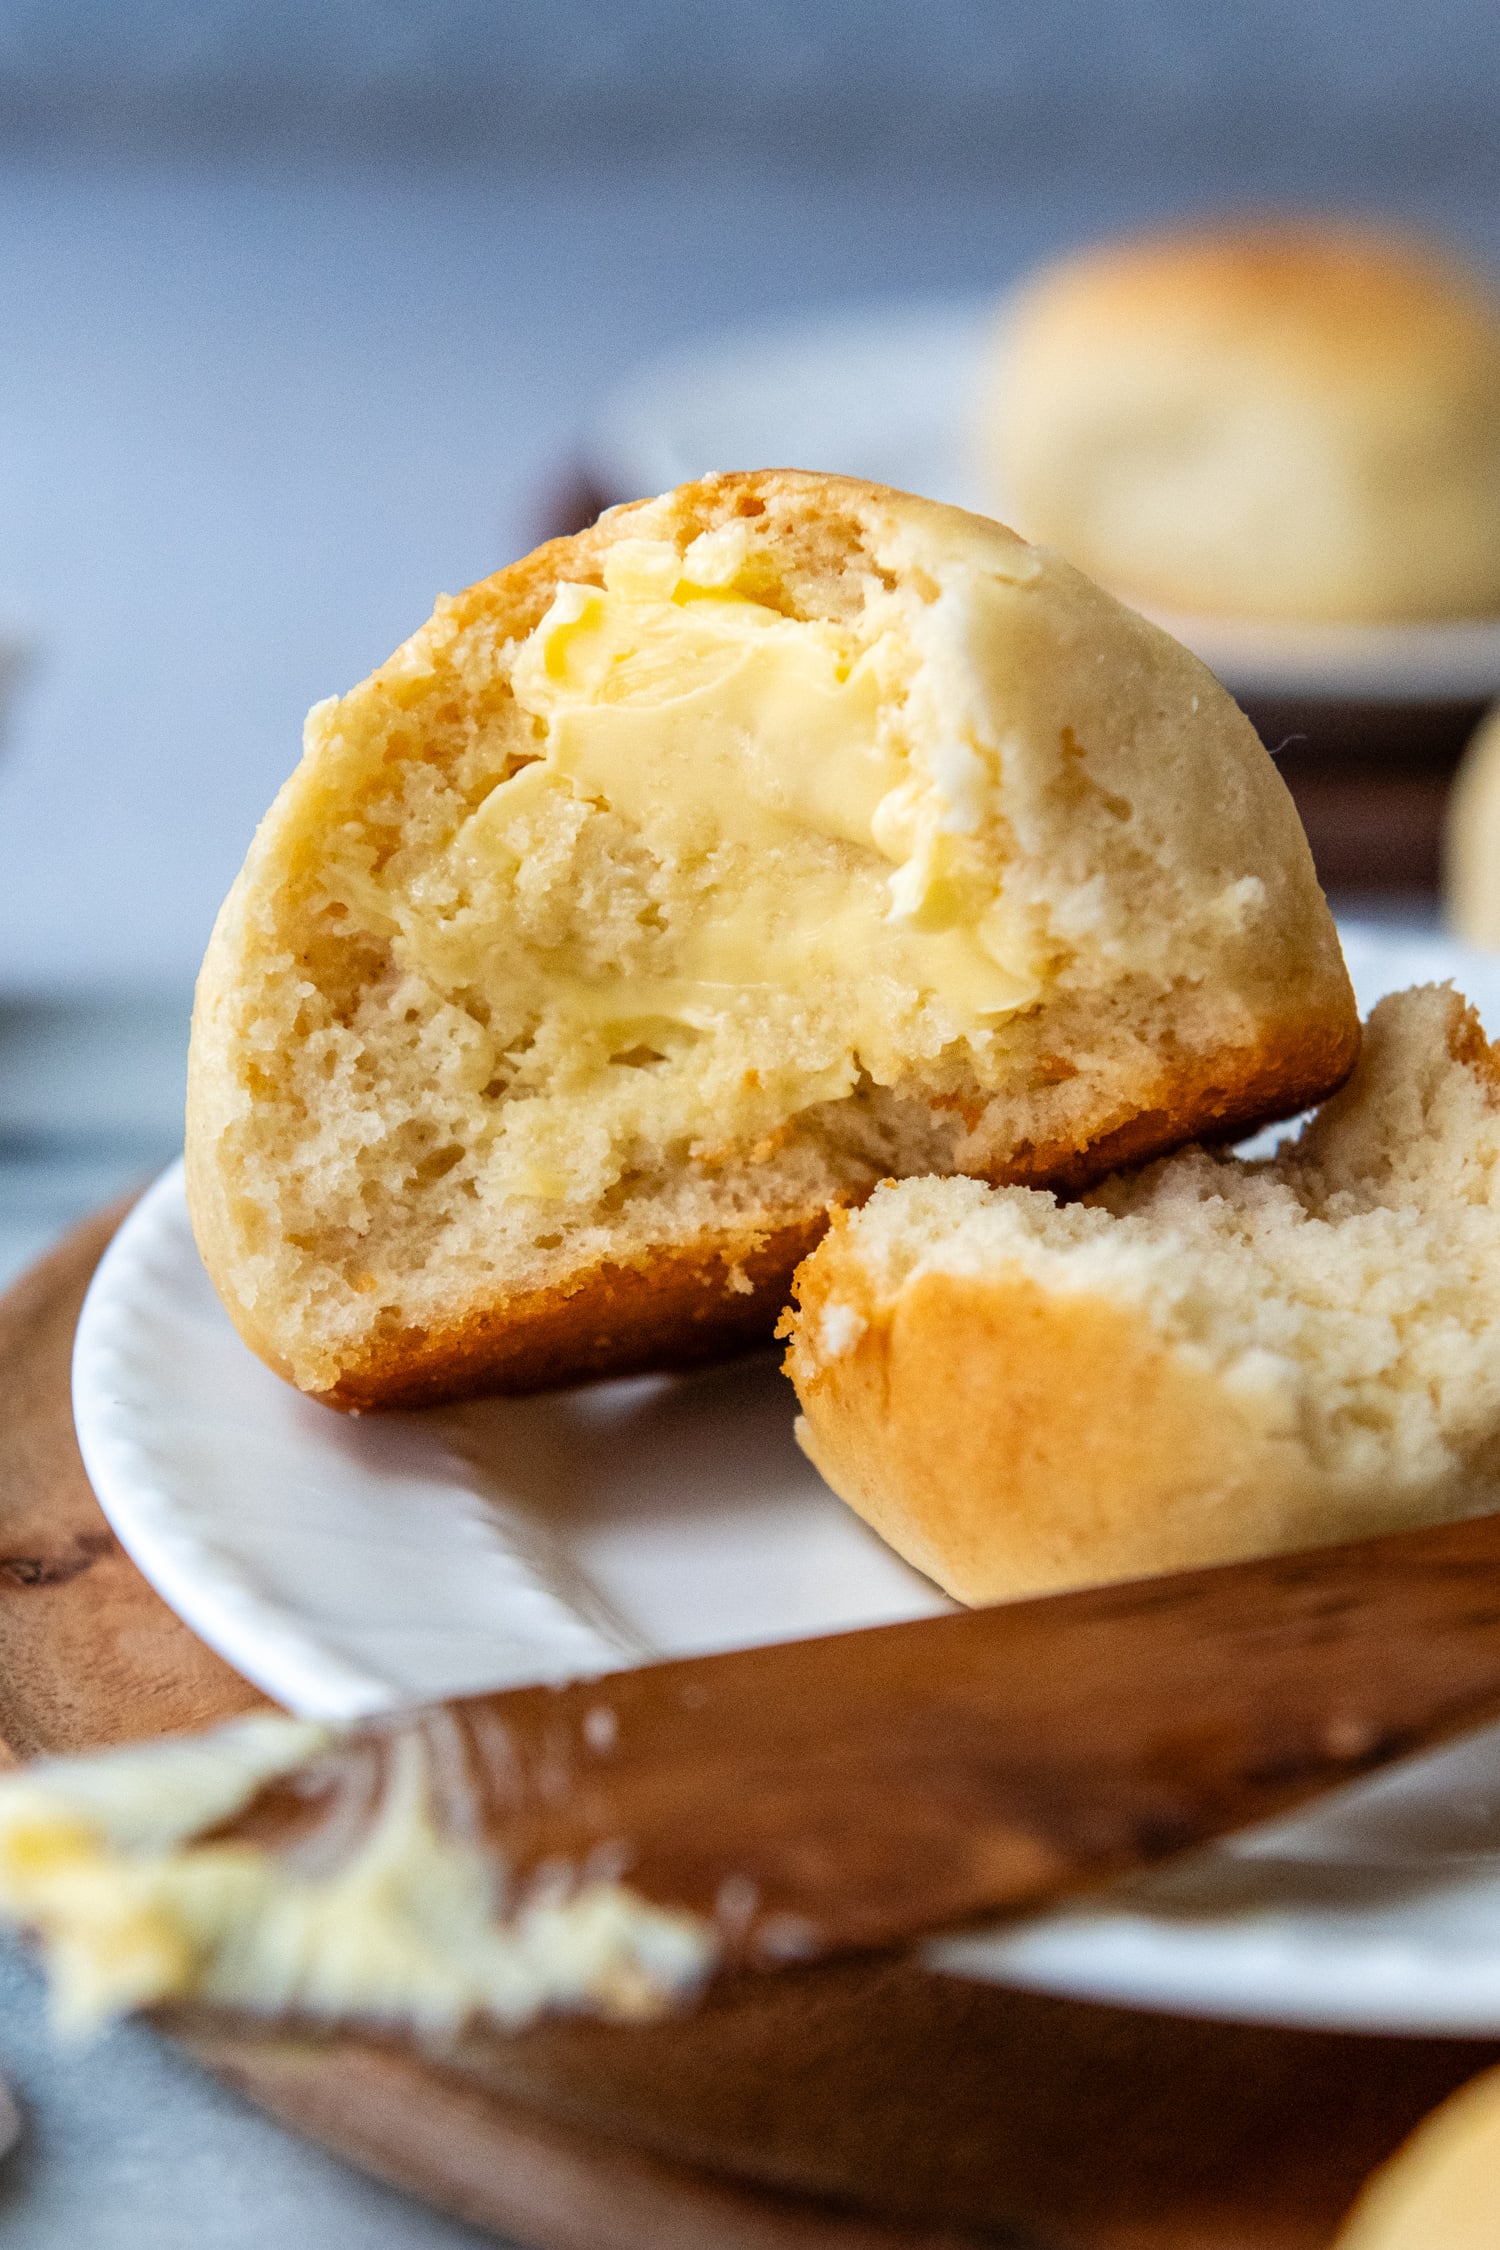
Have you lived without King’s slider buns long enough? Make a batch of these easy gluten-free Hawaiian rolls with a taste and uber soft texture just as good as your remember them. Even if you are new to gluten-free baking, anyone can make this recipe. These homemade sweet yeast buns are as simple as mix, shape and bake, with only 1 short rise. I’ll show you how!
Want to Save This Recipe?
Enter your email below & we'll send it straight to your inbox. Plus you’ll get affordable and easy gluten-free recipes delivered each week!
Soft, Sweet Gluten-Free Slider Buns – Hawaiian Style
Nothing feels better then reintroducing an oldie, yet goodie, back into my life. Whether you loved these fluffy, sweet rolls for sliders, to serve alongside holiday dinners, or as mini buns for deli meats, it’s time to enjoy again a copycat gluten-free Hawaiian rolls recipe.
To make these homemade yeast rolls with same light, fluffy texture and hint of sweetness, I started with one of my most popular recipes in my gluten-free bread recipe collection. Keeping the crumb nice and airy, similar to doughy Cinnabon-style gluten-free cinnamon rolls, requires finding the right balance of wet to dry ingredients, while still being able to shape the buns.
A lot of GF slider buns recipes use an ill-advised shortcut – add more flour so the dough is stiffer and easier to shape. While it may be easy to handle, you’ll be left with a disappointing dry, crumbly texture after baking.
Instead, I like to keep sweet rolls’ dough softer and looser, while using greased hands to shape into buns. The dough is still easy to handle, but the crumb will bake into that signature Hawaiian bread texture. The ingredient highlights below rounds out how to eleveate elasticity, moistness, and a hint of sweetness.
Ingredient Tid Bits
- Recommended gluten-free flour – The biggest deciding factor of what makes or breaks the recipe! Cup4Cup gluten-free flour is what I highly recommend for best taste and texture because the cornstarch in the blend adds a nice airiness.
- Potato Starch (not flour) – This is my go-to add for any GF breads that need to be shaped, like my famous GF burger buns recipe. Instead of relying on additional flour to structure the dough, I substitute another gluten-free starch with a softer structure.
- Psyllium Husk Powder – Helps maintain moisture and prevents the buns from becoming crumbly. It also mimics gluten, allowing pull-apart rolls to be shaped. I recommend the linked brand because it has a light color that won’t turn baked goods purple…
- Milk powder – This is a recent add to my yeast bread recipes. Since Cup4Cup changed their formula, I started removing a bit of the GF flour and adding in gluten-free milk power to replace moisture loss. Powdered buttermilk works also.
- Sugars – I did a combo of brown and granulated because all brown sugar added a little heaviness.
Free Guide! 5 easy tips for baking like a gluten-free pro!
Simple hacks for fail-proof gluten-free dishes every time!
Let’s Make This Together!
(Below shows step-by-step photos and modified instructions. For the complete recipe, along with ingredient amounts, scroll down to the recipe card.)
Simple dump and mix dough
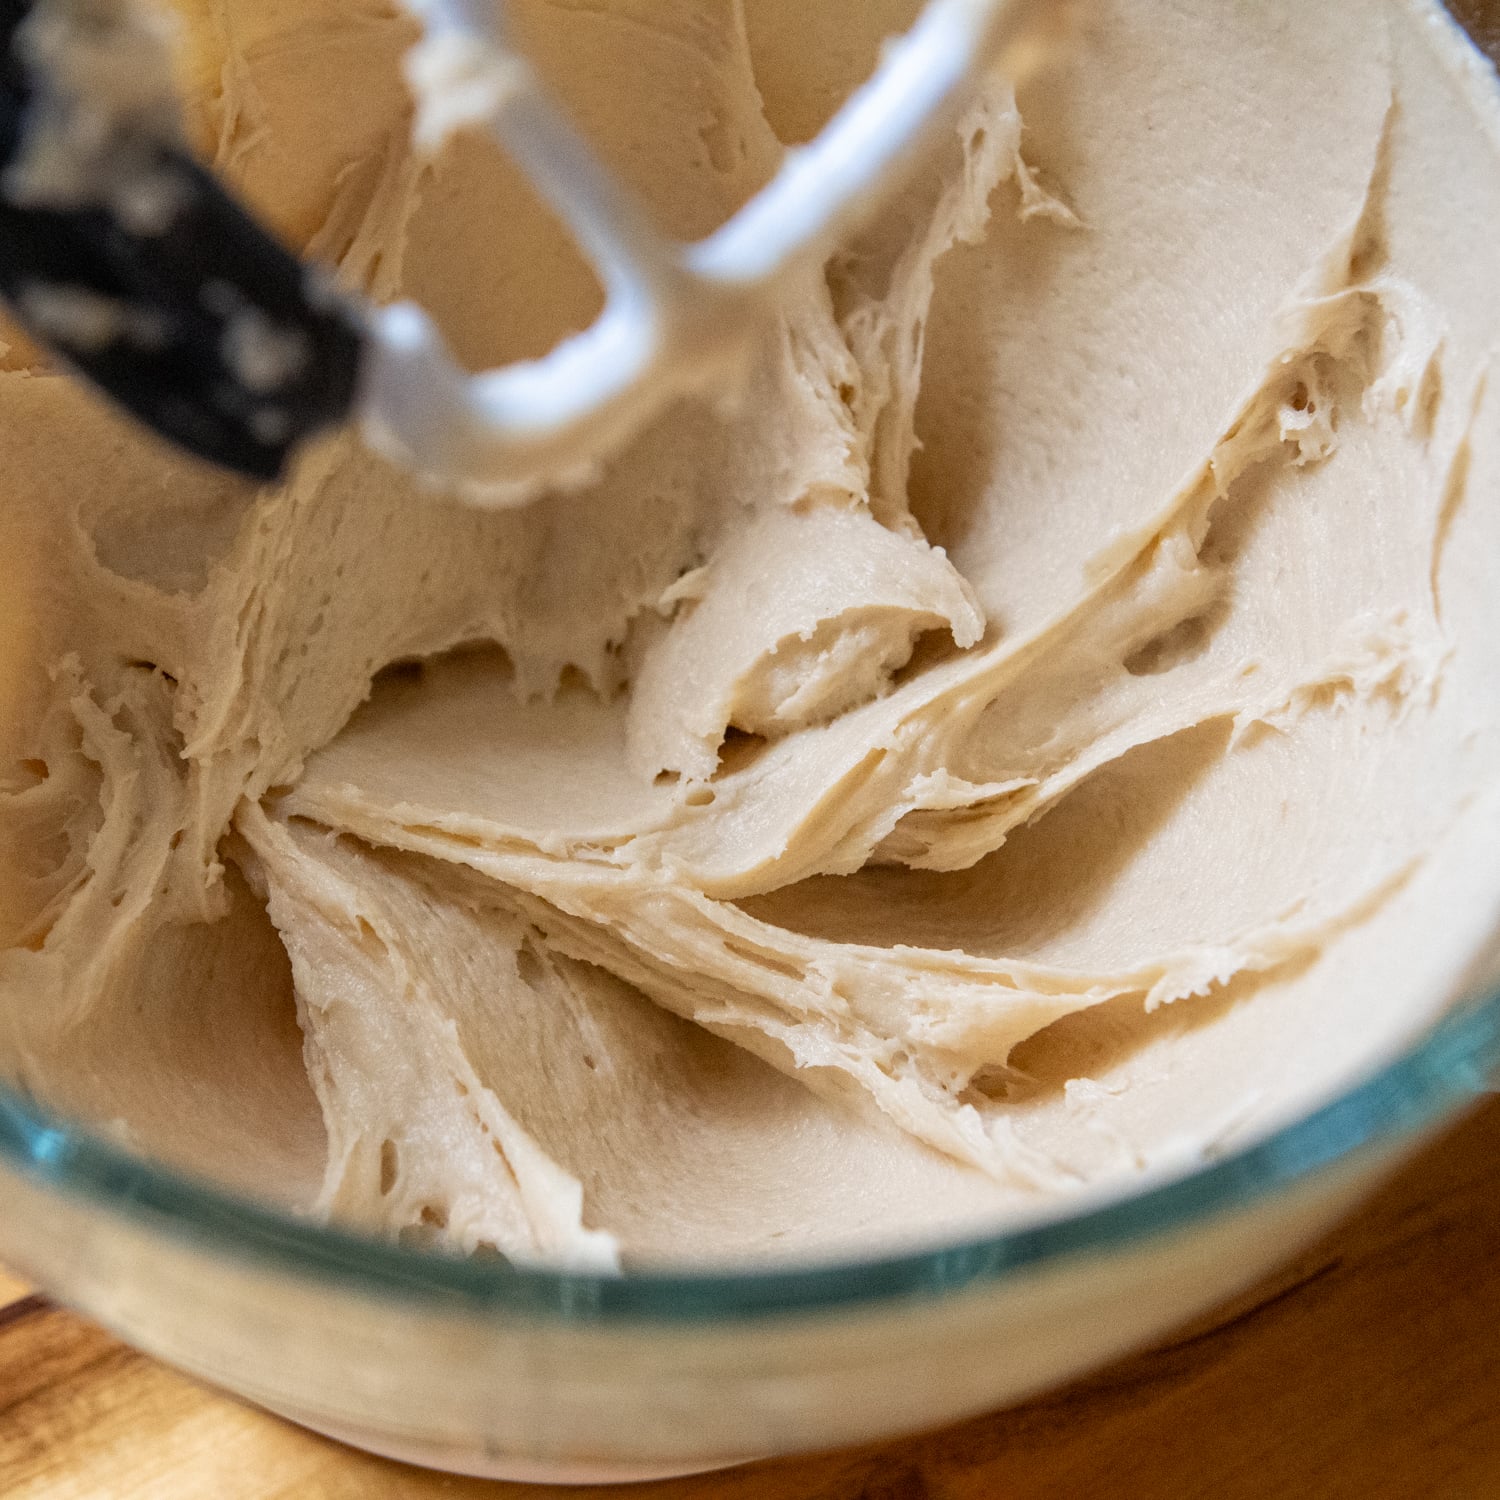
Start with combining the dry ingredients – GF flour, potato starch, sugars, psyllium, milk powder, yeast, baking powder and salt, in a large bowl of a stand mixer.
Mix in the warm milk, egg, and melted butter. After it all comes together, increase to medium-low speed and beat for 5 minutes. You’re looking for the dough to be stiff, but still slightly sticky. If the dough is too stiff, or won’t move around the mixer, add a tiny splash of warmed milk.
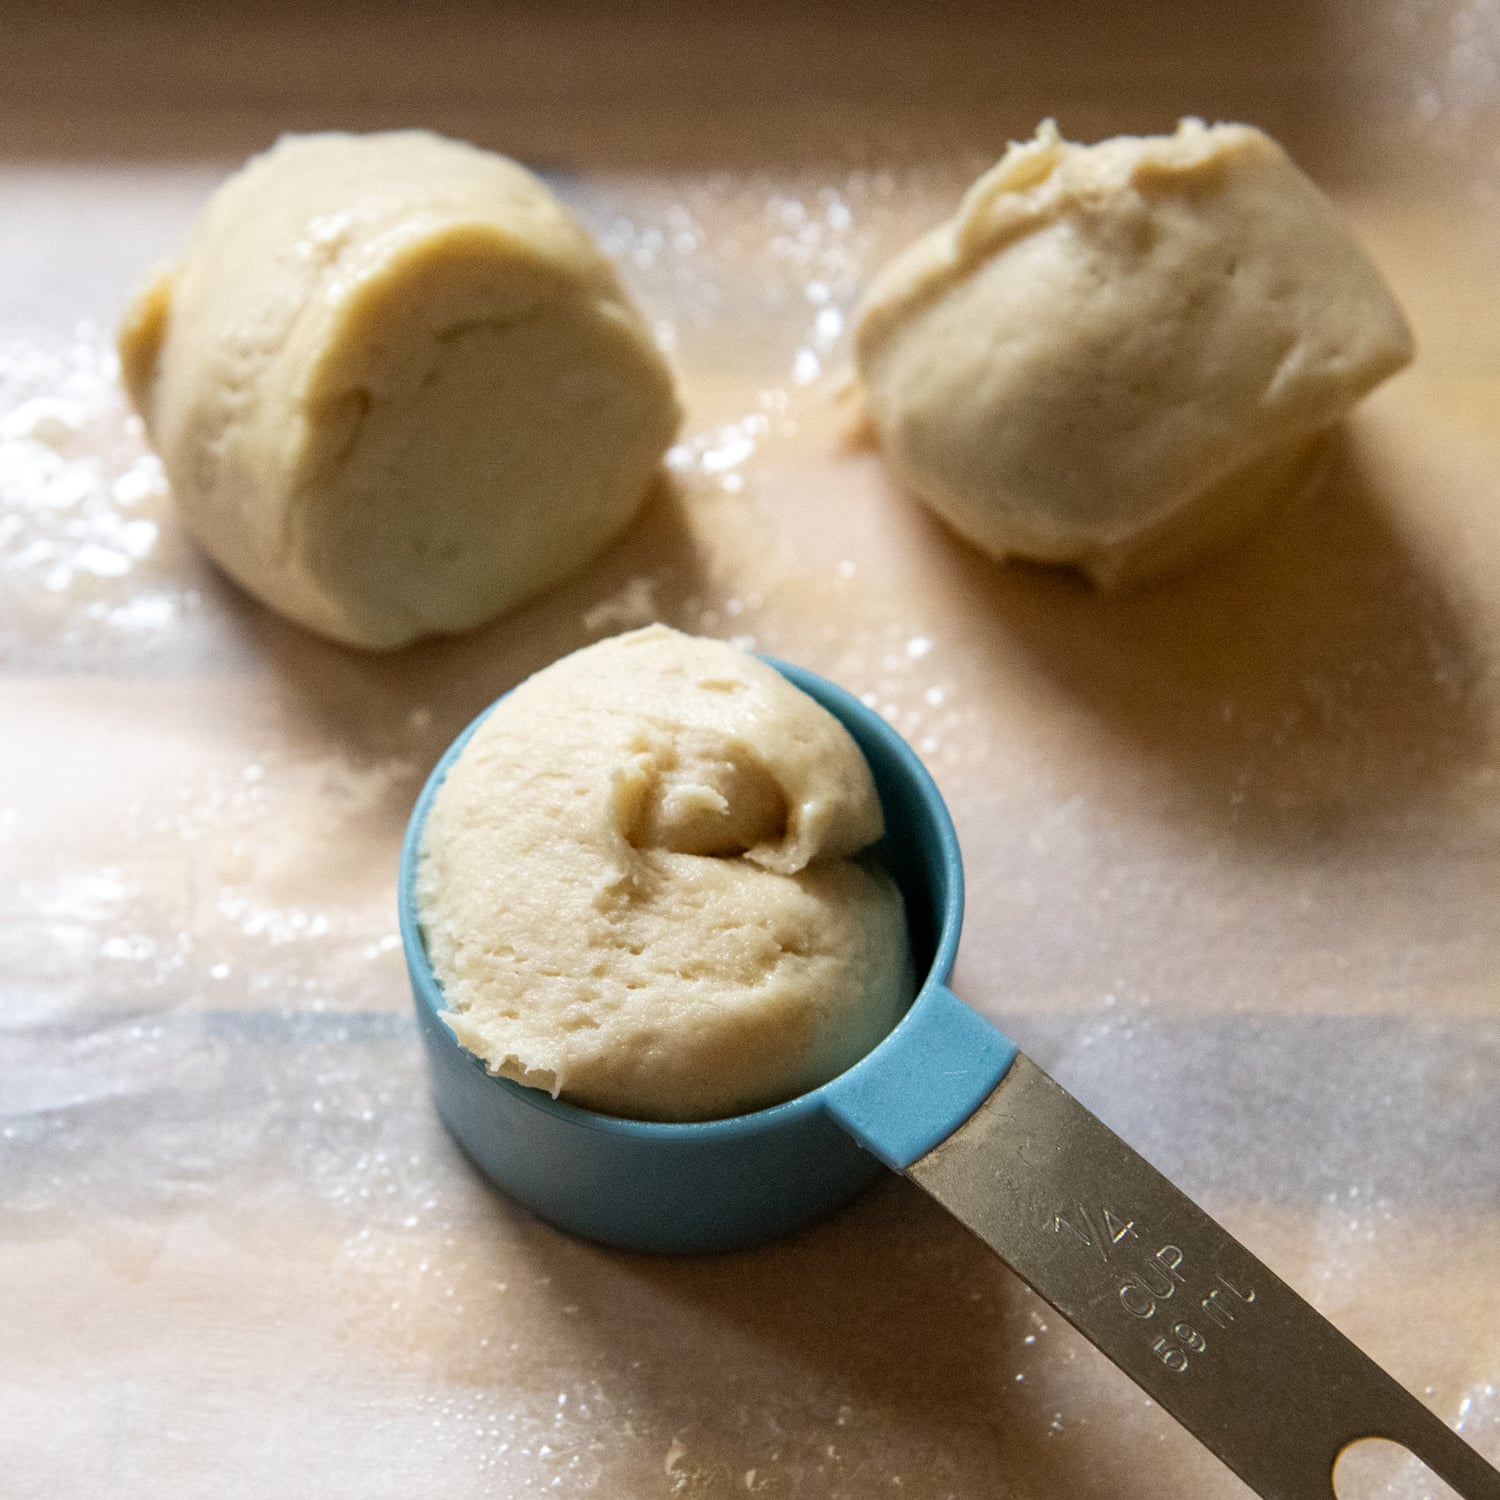
Shortcut shaping method
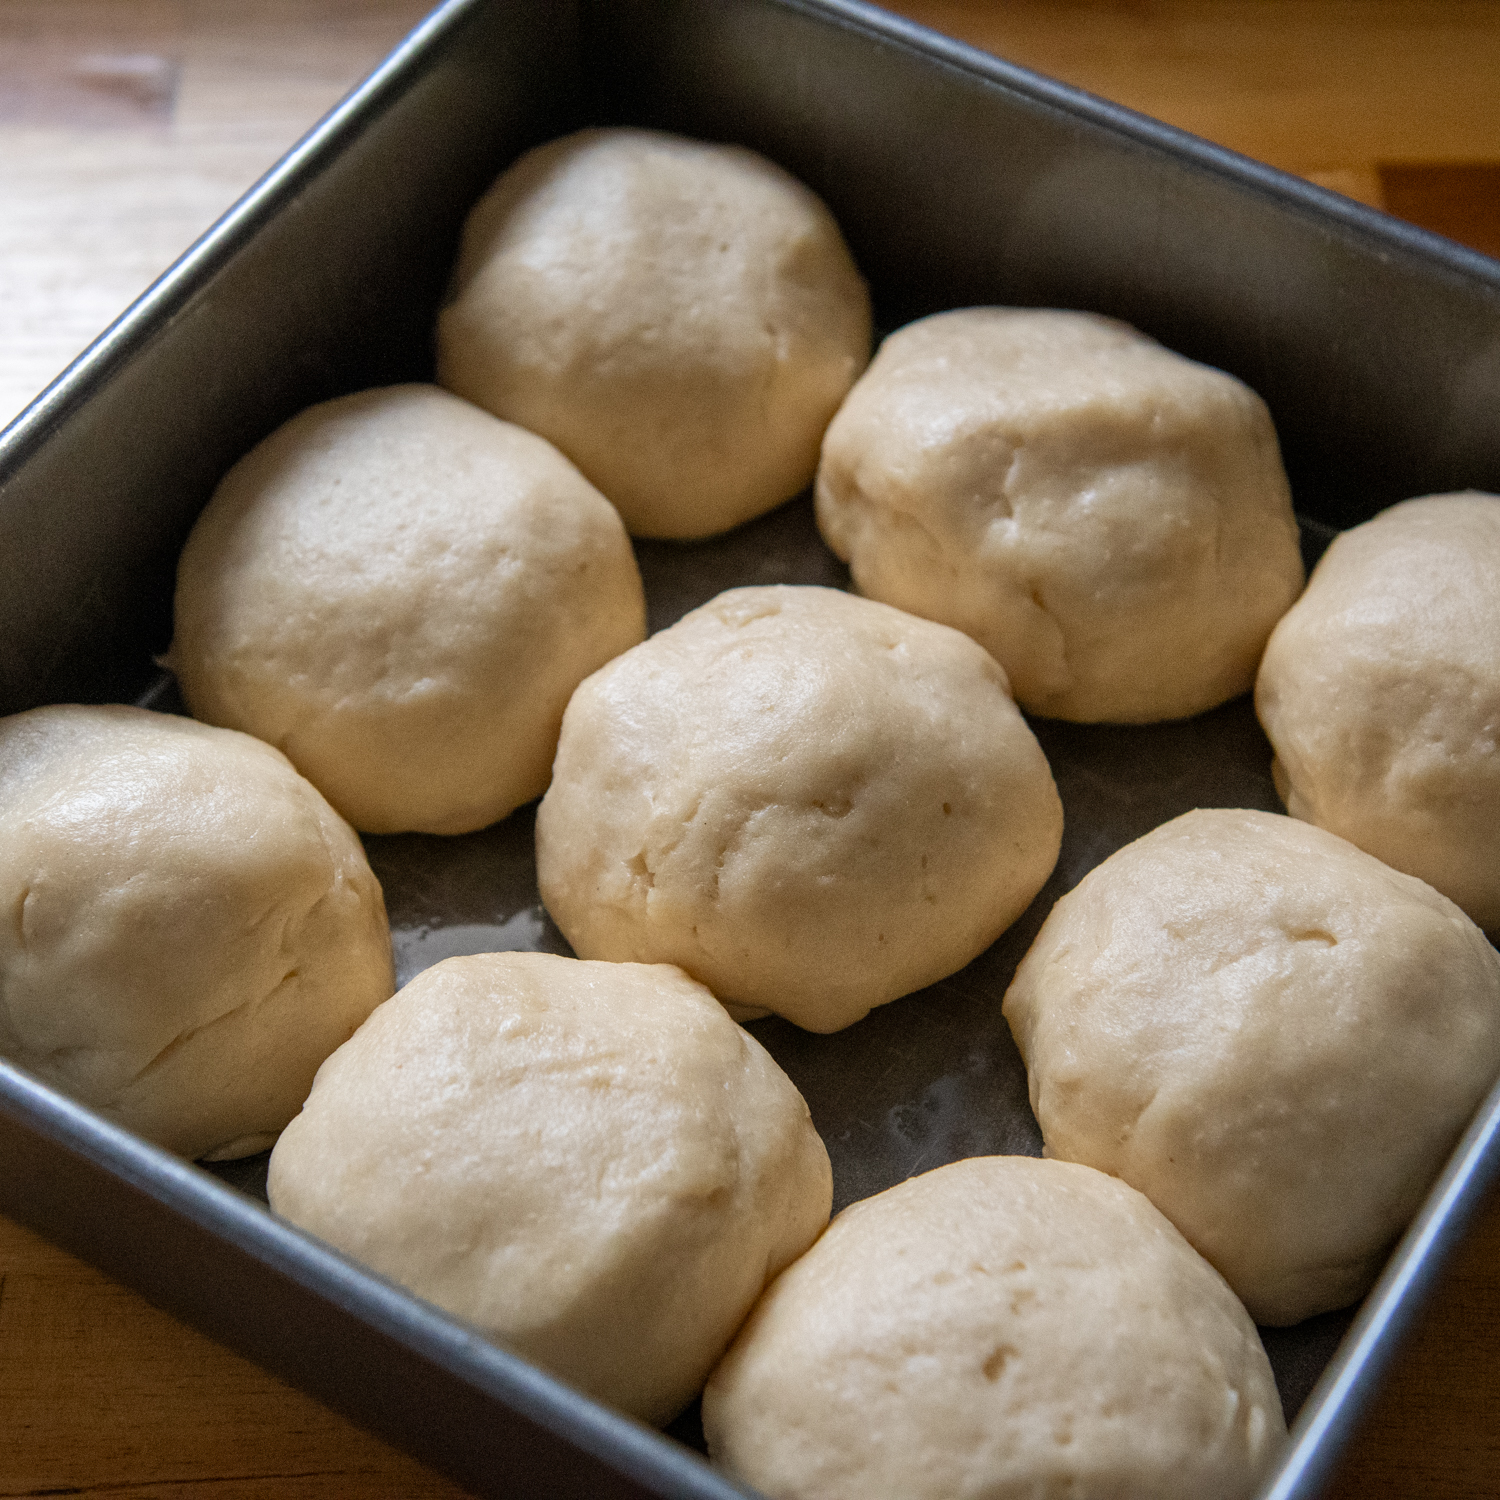
On your work surface lay a piece of parchment paper greased with nonstick cooking spray. Grease a ¼ measuring cup, along with your hands. Scoop out a little less than ¼ cup, which yields about a 2 ounce dough portion. I divide all the dough up first and leave it on the parchment.
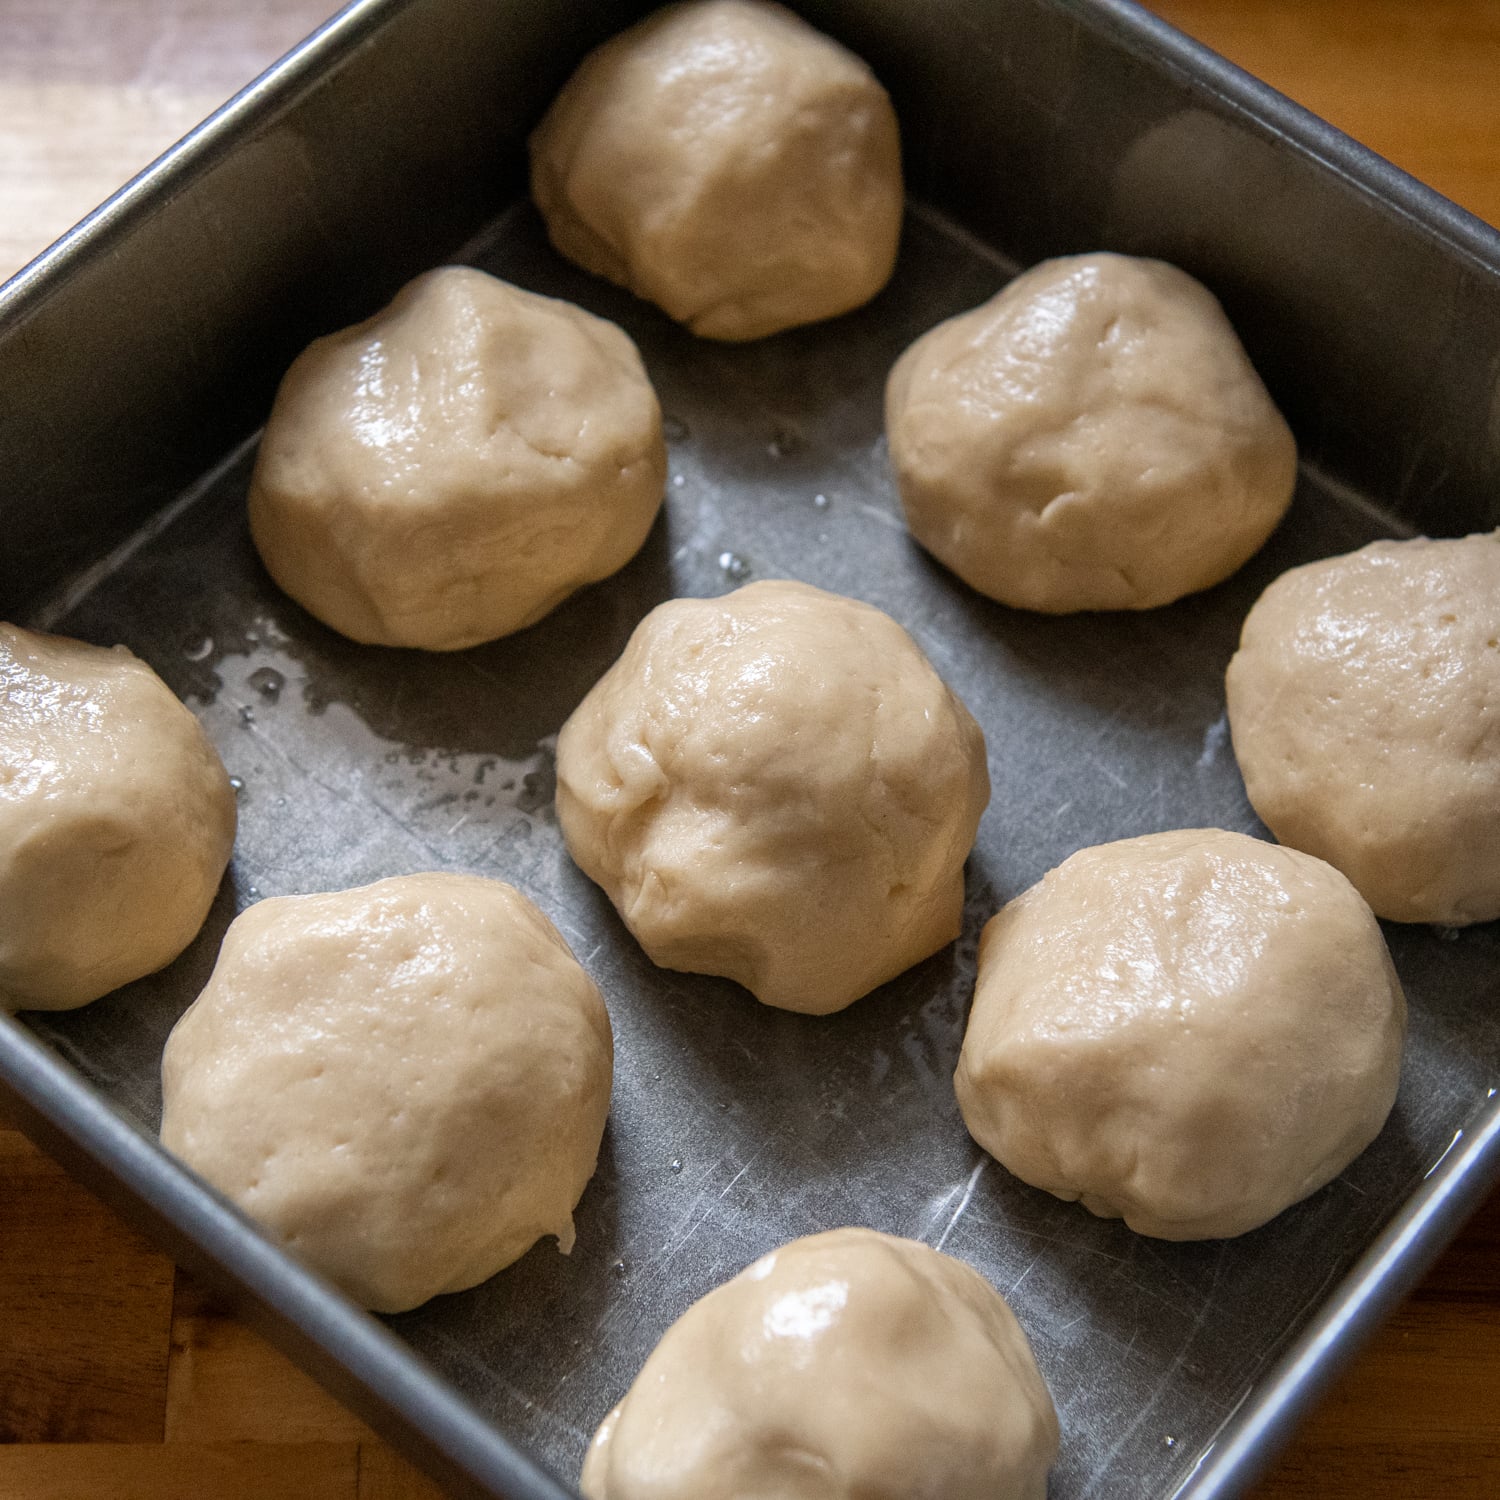
Roll and rise
Once the dough is divided up, roll into smooth-ish balls, pinching together any seams. Place in a greased 8X8-inch baking pan. I’ve found using a metal pan, instead of glass, helps with a quicker rise while baking because metal conducts heat faster.
Cover and let rise for about 30-40 minutes, depending on how warm your kitchen is. Meanwhile, preheat the oven to 350℉.
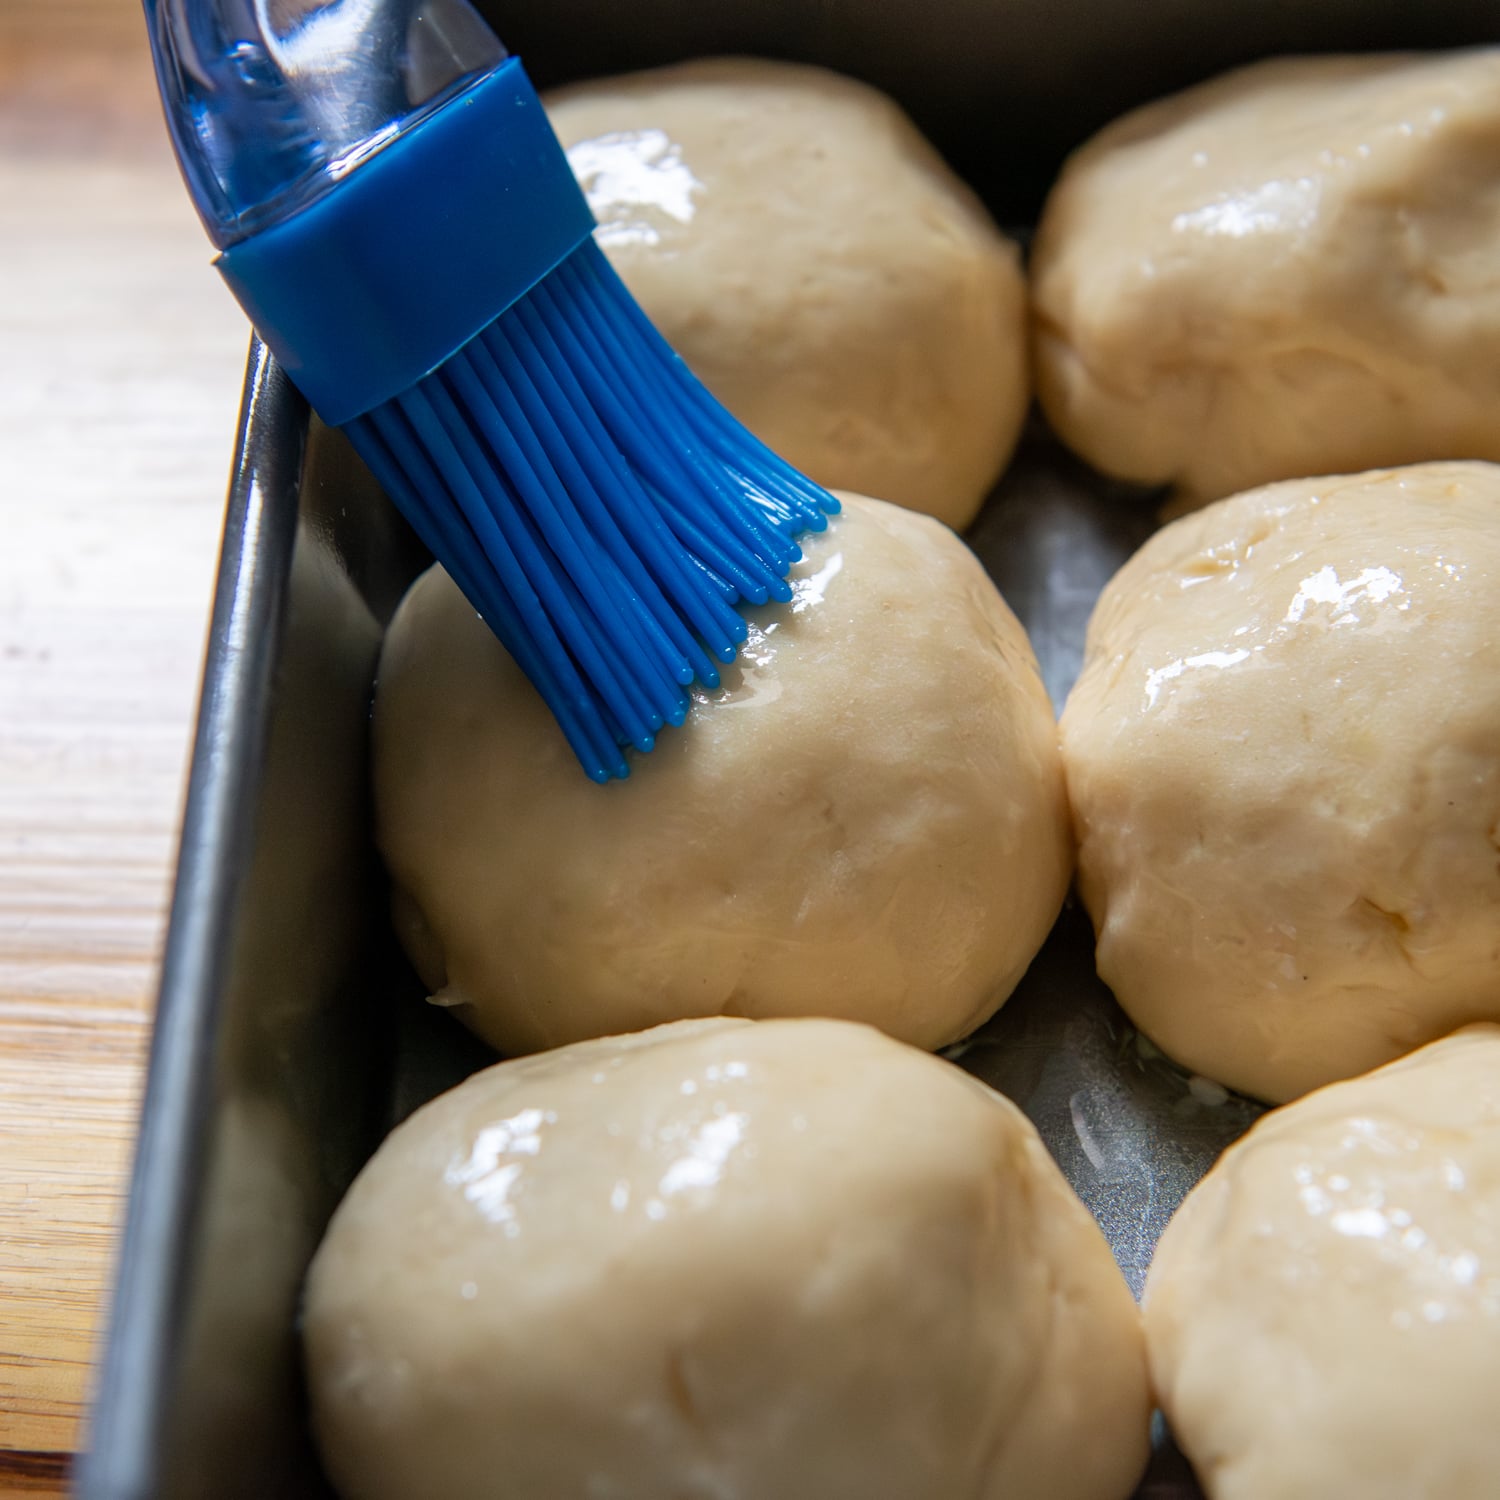
Brush and bake
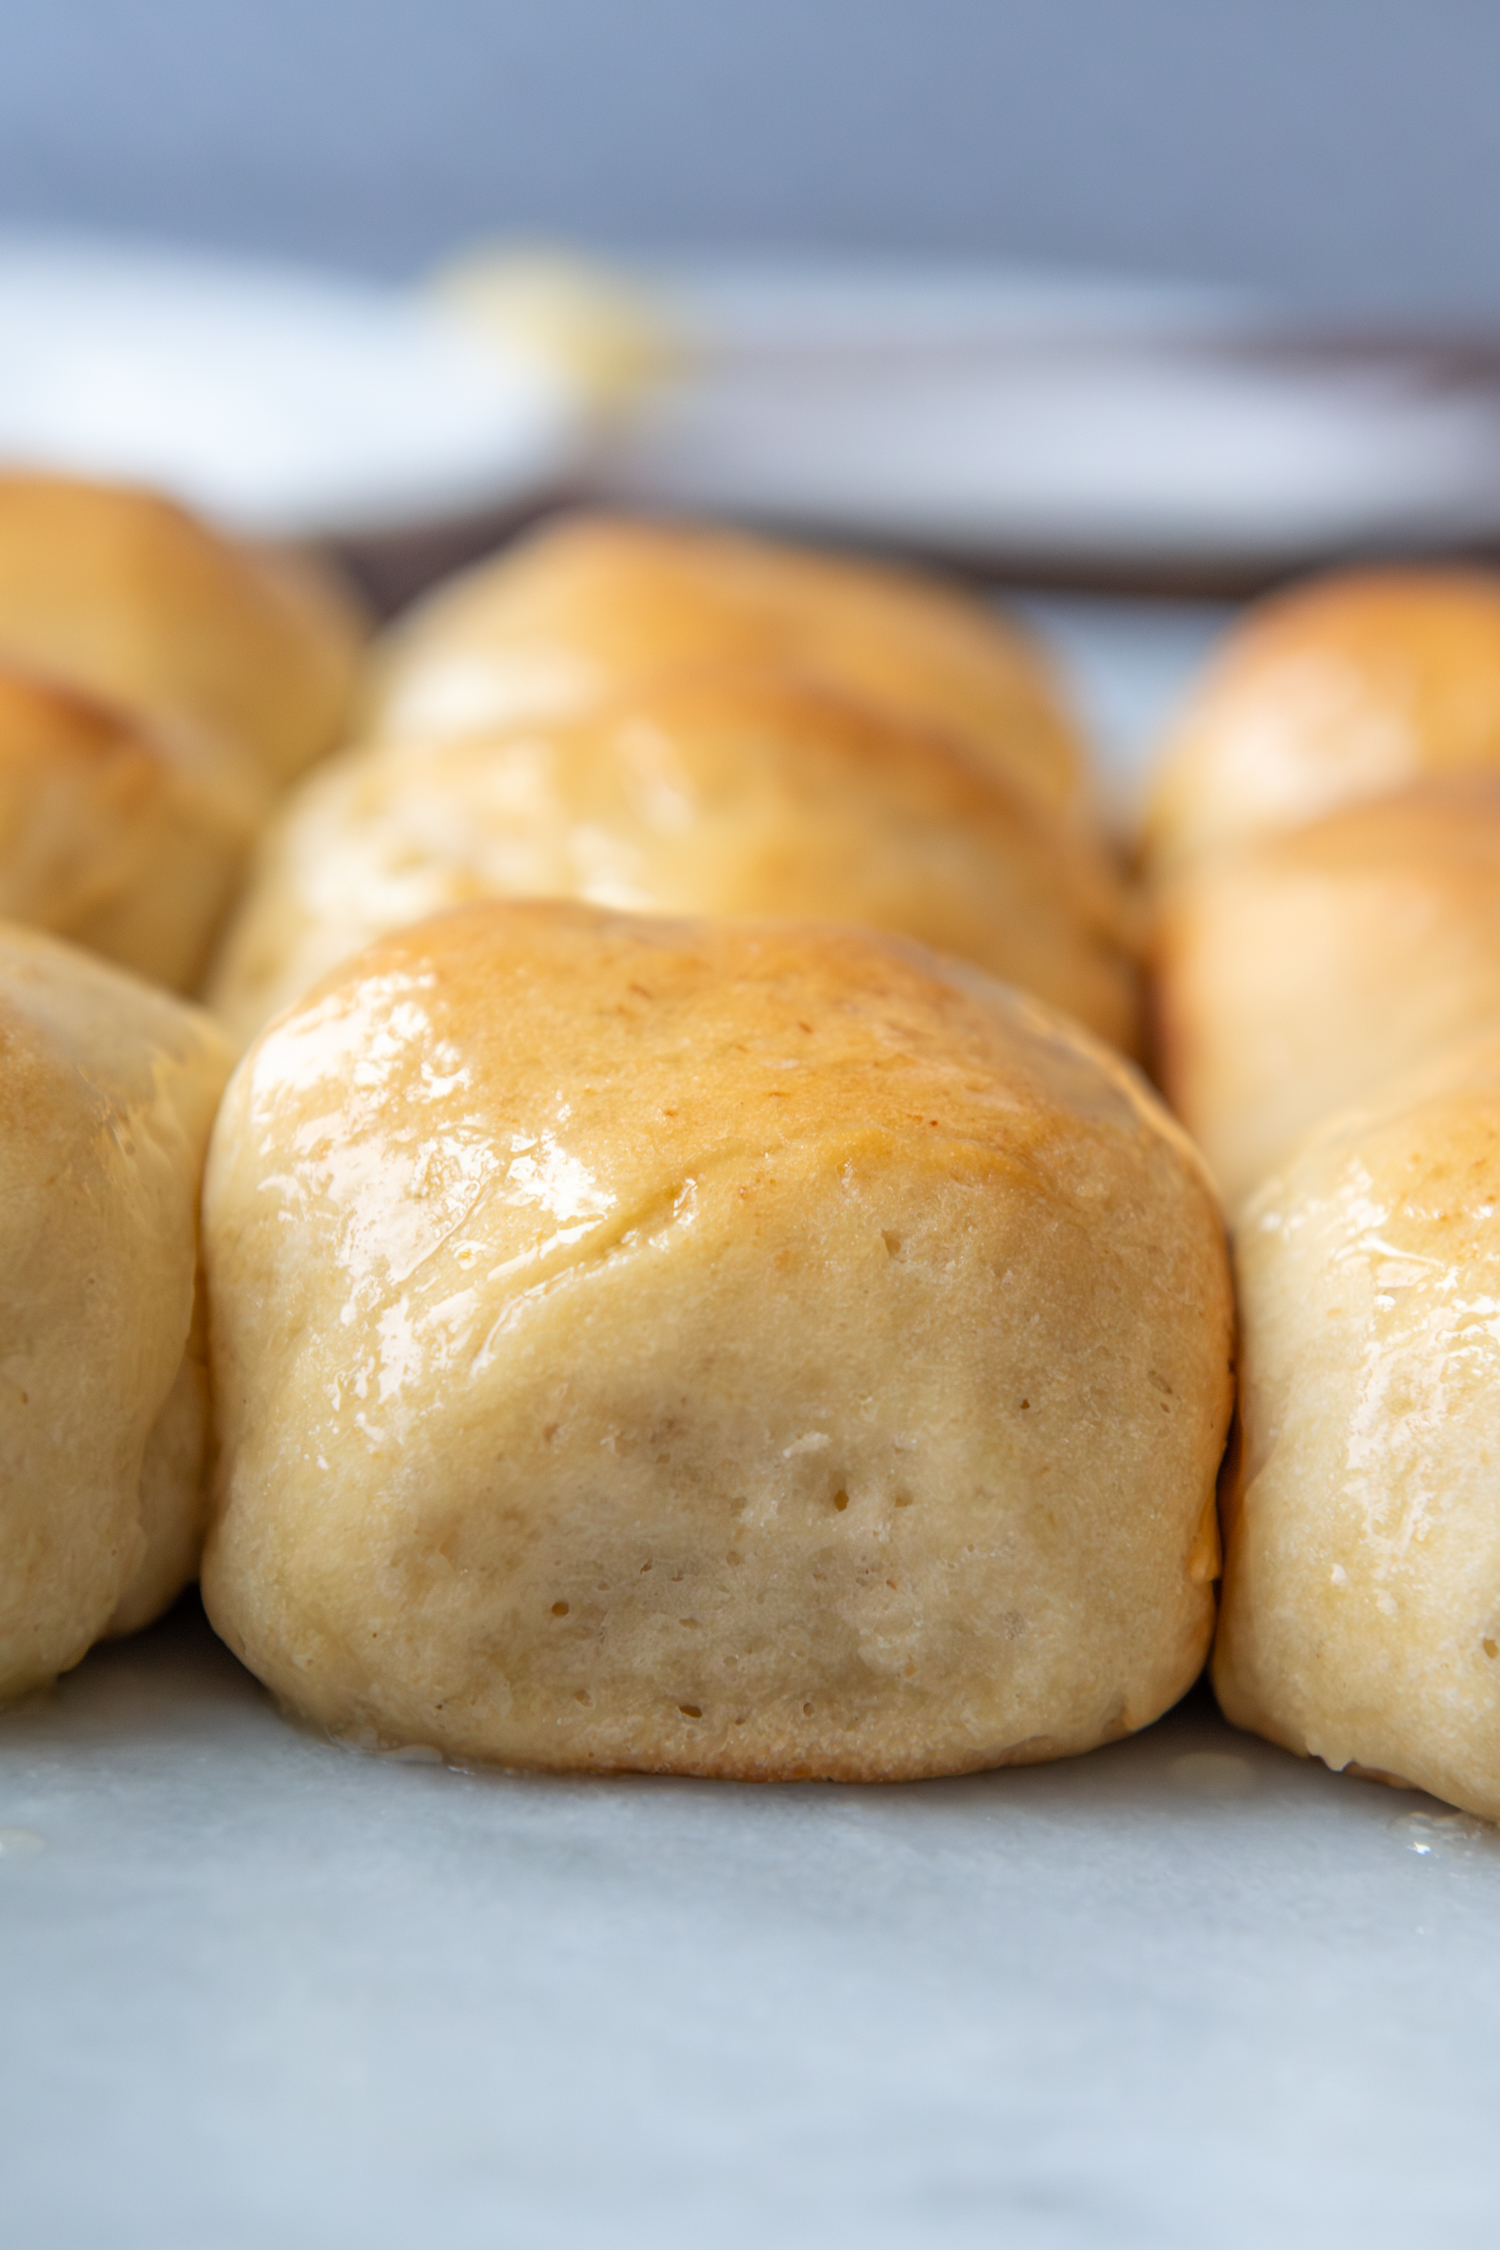
Melt about 1 ½ tablespoons additional butter to gently brush on the risen rolls. Set the leftover butter aside to use after baking. Bake for 20-25 minutes, or until the tops are lightly browned. I like to use an instant read thermometer to make sure the internal temp reaches 195-200ºF. That way you don’t risk underbaking and having the rolls deflate.
What About Making These Ahead Of Time?
I get a lot of questions about making gluten-free yeast rolls ahead of time, to freeze before baking or letting them rise overnight in the fridge. I’ve experimented with it, and it technically works, but I don’t like the results as much as baking fresh.
However, there’s a work around if you need a make-ahead option. Bake and cool completely. I lift the tray of rolls out of the pan and have them cool on a wire rack. Either wrap up the whole batch or pull apart and wrap individually to freeze. When ready to enjoy, thaw at room temp, then warm in a 300℉ oven for 5-7 minutes, covering the pan with foil. Alternatively, warm slightly in the microwave.
Since gluten-free breads lose moisture quickly, I will freeze any leftovers if not eating within a day or two of baking. After pulling from the freezer and thawing, make sure the rolls are the slightest bit warm to re-soften the crumb. They will be just as amazing as the day you made them!
Save this recipe to your pinterest board!
Let’s be friends on Pinterest! I’m always sharing great recipes!
Did you make this recipe? I love hearing from you! Leave a star rating and comment below the recipe card. It helps others when searching for recipes and I appreciate feedback from our community. You will always hear back from me! -Melissa

Squishy Soft Gluten-Free Hawaiian Rolls (1 Hour)
Ingredients
- 1 ½ cups (214 g) gluten free all purpose flour , Cup4Cup gluten free flour highly recommended (see recipe notes if using different flour)
- ¼ cup (43 g) potato starch
- 2 tablespoons (12 g) milk powder
- ¼ cup (57 g) packed light brown sugar
- ¼ cup (50 g) granulated sugar
- 1 tablespoon (11 g) psyllium husk powder, (what is psyllium husk?)
- 1 packet (7 g) packet (2 ¼ tsp) instant rapid rise yeast , see recipe notes for active dry yeast
- 1 teaspoon baking powder
- ½ teaspoon salt
- ¾ cup (184 g) warm milk (110°F) , microwaved for 30-45 seconds
- 1 large egg, room temperature
- 2 tablespoons (28 g) melted butter, slightly cooled
- for brushing 1 ½ tbsp additional melted butter
Instructions
- Before you begin turn the oven to 200ºF, but turn it off once it reaches temperature. This will serve as an extra warm place for the rolls to initially rise. Grease a 8X8-inch baking pan (metal preferred for faster rise in oven). Set aside.
- In a large mixing bowl of a stand mixer, combine the GF flour, potato starch, milk powder, brown sugar, sugar, psyllium, yeast, baking powder and salt using a paddle attachment on low speed.1 ½ cups gluten free all purpose flour , ¼ cup potato starch , 2 tablespoons milk powder, ¼ cup packed light brown sugar , ¼ cup granulated sugar , 1 tablespoon psyllium husk powder, 1 packet packet (2 ¼ tsp) instant rapid rise yeast , 1 teaspoon baking powder, ½ teaspoon salt
- Add the warm milk, egg, and melted butter. Combine on low speed until well blended. Increase to medium-low speed and beat for 5 minutes, stopping to scrape down the bowl once or twice. The dough will be stiff, but still sticky. If the dough is too stiff to move around the bowl, add a few drops of additional warm milk to loosen.¾ cup warm milk (110°F) , 1 large egg, 2 tablespoons melted butter
- On your work surface lay of a piece of parchment paper greased with nonstick cooking spray. Liberally spray ¼ measuring cup with cooking spray, along with your hands. Scoop out a little less than ¼ cup, which yields about a 2 ounce dough portion. I divide all the dough up first and leave it on the parchment.
- Once the dough is evenly divided, roll into a smooth ball, pinching together any seams or cracks. Place in the prepared baking pan in rows of 3 by 3.
- Cover with plastic wrap and place in the warmed, turned off oven for 15 minutes. Remove the pan from the oven and let sit at room temperature for 20-25 more minutes while the oven preheats to 350°F.
- Melt the additional butter. Remove the plastic and gently brush the tops with the melted butter. Reserve the remaining butter for after baking.for brushing 1 ½ tbsp additional melted butter
- Bake in the 350°F oven for 20 minutes (metal pan) 25 minutes (glass), or until the tops are lightly browned and internal temp measured with an instant read thermometer reaches 195-200ºF. Immediately brush tops with remaining butter and serve warm.
Notes
Using Alternative GF Flours
Unfortunately different GF flours absorb moisture different because of the varying starches they are made of. If you are not using Cup4Cup, I recommend holding back ¼ cup milk and adding in until the dough is the consistency in the images, which will be slightly sticky, yet shapeable with greased hands.Active Dry Yeast
Activate the yeast in the warm milk before adding to the dry ingredients. Add 1 packet to warm milk, stir, and let sit for 5 minutes, or until frothy.Serving, Storing, and Reheating
I recommend cooling and freezing any leftovers, if not enjoyed within a day or two. When ready to enjoy again, thaw at room temp or defrost in the microwave. They should be the slightest bit warm to soften the crumb again.This post contains affiliate links. My opinions are always my own. If you purchase a product through an affiliate link, I make a small commission – at no cost to you. Read full disclosure policy here.


Correction on my prior post: The Scientific American author is Dr Alessio Fasano. I don’t know where I invented Dr. Black from. I’ll blame Celiac intoxication ;>)
A note for Melissa:: If your interest in gluten-free baking is related to celiac disease, it may be worth understanding the mechanism: gluten can compromise intestinal tight junctions, allowing direct contact between the bloodstream and food particles. This is why celiac disease is often accompanied by multiple food sensitivities. (Ref: Dr. Black, Scientific American, August 2009.)
I made a few modifications and ended up with a very good approximation of Hawaiian Rolls — so thank you for a great recipe!
**A few notes that might help others:**
1. King Arthur “Bread Flour” — KA now offers a lower-cost alternative to Caputo at roughly half the price. Like Caputo, it uses de-glutened wheat starch. I’ve been pleased with how it performs.
2. Rise time — I doubled it. Studying the finished rolls, I think it should have been more.
3. Dough consistency — At the stated portions, my dough was more of a batter. I added 4 over-heaping tablespoons of flour to firm it up, though the result was slightly starchy — I may have overshot. Interestingly, KA Bread Flour normally needs extra moisture, but not here.
4. **Vanilla** — Try adding 1 tsp. I did, and it was a nice touch.
5. My rolls were done at 175-180°F
Hello,
Thank you for the notes. I have been experimenting with the KA bread flour lately too, and have really been enjoying it! When I use it I will cut the amount of psyllium by half, but I like the taste and texture so much more than KA 1to1 and you’re right, it’s a lot cheaper! Next time I’ll try them with the vanilla!
Best,
Melissa
We made these tonight for pulled pork sliders (my son has Celiac, so finding a good roll is always a bit of a gamble). These turned out really good. I was a little concerned about the lack of pineapple juice, but the brown sugar + white sugar combo absolutely delivers that classic Hawaiian roll sweetness.
Quick heads-up: my dough ended up way too liquidy—same issue another person mentioned (maybe it’s my high elevation?). I didn’t catch the note about adjusting the liquid until it was already too late. It’d be really helpful to include that tip in the main recipe, not just the comments—would’ve saved some mid-bake scrambling.
To salvage things, I added a bit more flour but didn’t want to risk drying them out. Instead of rolling them, I scooped the dough into square muffin pans—and honestly, that worked perfectly. Great texture, stayed moist, and no shaping stress.
Overall, definitely a win
Hello Erika,
I’m glad you enjoyed the recipe and the feedback is so helpful! I did add a note to the recipe so others can adjust the liquid as needed. I wish all GF flours were the same! It would make my life so much easier 🙂
Best,
Melissa
Do you recommend adding any milk powder since cup4cup reformulated.
Hi Dottie,
I didn’t find this recipe needed it since the liquid is milk. Usually if the bread is made with just water I will experiment with that and add a note in the ingredients.
Best,
Melissa
Thank you. Looking forward to trying these.
Have you tried with Caputo flour? If so, recipe adjustments? Thank you.
Substitute for potato starch using your recipe! (or even if with Caputo?)
Interestingly, here in Canada our Cup4Cup still lists powdered milk…
Hi Normand,
Oh, that’s helpful to know that Canada still has the milk powder. I wonder if they will be phasing that out. I haven’t tried Caputo with this recipe, but I have tried it with others and have found that the dough is a lot thinner with it. So, if using Caputo I would hold back about half the milk and gradually add it in until you have the right consistency (sticky, yet stiff and shapeable with greased hands). This is a looser dough than my other shaped breads, but it’s still able to rolled into balls. If you are using Caputo, I would just replace the potato starch with an equal amount of Caputo. I find their flour to be pretty soft.
Best,
Melissa
I doubled the recipe and accidentally put 6 tbsp of butter instead of 4 and so i had to add the extra flour and potato starch, what came out of my oven looked just like my grandmothers yeast rolls I use to make. My hubbie was very impressed that it was gluten free. They were huge!! Fluffy and great to eat. I freeze mine and they do exceptionally well. Thanks for a great recipe.
Love it, Glenda! Thanks for taking the time to share with me. I appreciate it.
Best,
Melissa
Hi! Made these today and absolutely loved the flavor!! I did hit a snag & I’d love your advice – the dough was way too soft, no possible way to mold so I added 3 tablespoons of flour. The rolls came out soft but too dense. Should I try adding a little less flour or instead of adding extra flour, would chilling the dough in the refrigerator help? Thanks!
Hi Elein,
It sounds like the GF flour used or your baking conditions requires less liquid. I also recommend manipulating liquid amount rather then flour, because that will dry it out. Of course, this is hard to do after the fact, but it’s a good adjustment to try in the future. Start off with 1/4 cup less milk and then you can add in any additional necessary to get the dough to come out shapeable. I will say this is a looser dough then my dinner rolls, but I liked the texture better then when I tried adding more flour.
Best,
Melissa
Made a double batch of these today and took them to our Christmas family lunch. They used them like sliders. Everyone liked them.
I added dough enhancer to the dry ingredients. My husband said they were softer then the ones I made last week (without the enhancer).
Thanks, Melissa for another delicious recipe.
Thanks so much for sharing your experience, Debbie! I appreciate you taking the time.
Best,
Melissa
has anyone made these using King Arthur? I have more access to that gf flour, thanks.,
Hi Angela,
I haven’t tried it with KA, but I’m sure you could use that. If you could make the recipe by weight, I think that would give the best results. When I’ve worked with KA before I feel like the dough is a little looser. You may have to add a tablespoon or 2 of cornstarch to mimic the same texture as C4C. Let me know how it goes!
Best,
Melissa
I’d love to try these but need to be dairy free. Any recommendation for subs for the milk powder?
Hi Jen,
The do make non-dairy milk powder, but if you don’t want to buy a bag if you don’t think you’ll use it again, I would just omit it from the recipe. It will take away from the moisture slightly, but you could also add an extra tablespoon of brown sugar.
Best,
Melissa
Hey Melissa, I made these Hawaiian buns today. They turned out wonderfully, soft and squishy just like you said they would. I’ll be making more of your GF bread recipes. My question, why do some of your bread recipes use a roux and others do not?
Thanks,
Marie Jensen
Hi Marie,
Good question and I wish I had a better answer for you. When I’m testing recipes that need to be shaped, I will always test them with a roux first, which I did for these rolls. Then I test them without. For these rolls I felt like the roux didn’t do much to enhance the texture, so I removed it because why spend time on an extra step if it’s not necessary. I believe for this recipe in particular, there is more structure in the dough from the added sugar, also adding moisture. The recipe it was based off of, my dinner rolls, doesn’t add as much sugar, so it needed something more to shape the dough without adding flour, which would dry them out.
Best,
Melissa
Hi Melissa, I loved your recipe. But, could I substitute the powdered milk with some kind of protein powder and get the same result? Thanks and Merry Christmas!
Hi Sara,
I don’t have experience with this, but from my brief research it does seem like protein powder adds moisture, so yes, I think that would be fine.
Best,
Melissa