
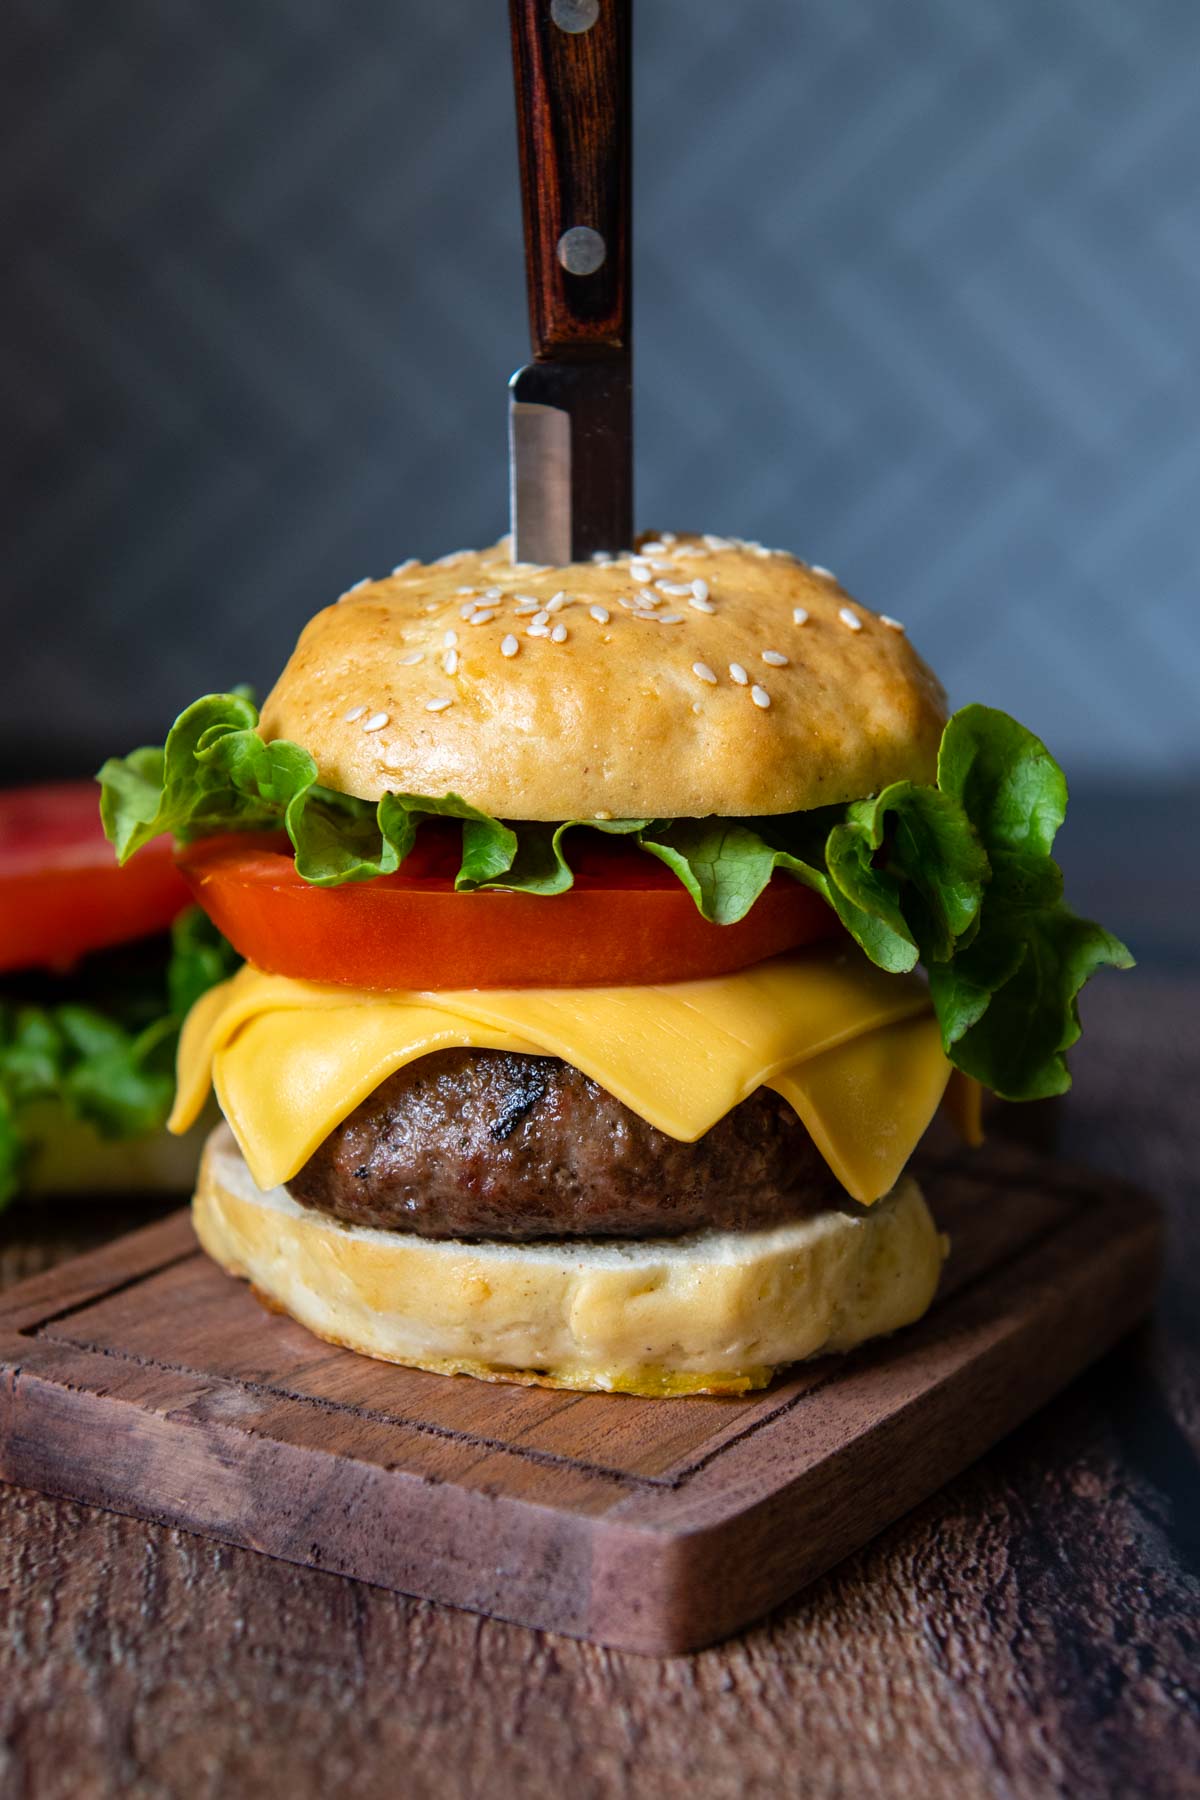
Want to see why people can’t stop gushing over these squishy soft gluten-free hamburger buns? Finally you can enjoy juicy burgers again with a fluffy, pillowy burger buns recipe that isn’t dry and crumbly. They taste even better than you remember with a hint of sweet, buttery flavor. I’ll show you how easy it is, step by step, with a dairy-free option included.
Want to Save This Recipe?
Enter your email below & we'll send it straight to your inbox. Plus you’ll get affordable and easy gluten-free recipes delivered each week!
Seriously. The BEST Gluten-Free Burger Buns
No longer does enjoying a gluten-free bun mean sacrificing a soft, pillowy hamburger bun. Not only is this recipe for gluten-free burger buns easy to make, but has the same texture of traditional ones! If you can’t take my word for it, just check out the hundreds of 5-star reviews below.
If you’ve ordered gluten-free hamburgers or purchased buns, chances are you’ve experienced some disappointing stand-ins. Through decades of recipe testing I’ve learned how create elasticity and softness in my collection of homemade gluten-free breads so home bakers can get the best results every time.
Where a lot of gluten-free hamburger bun recipes fall short is simply adding more GF flour to help with shaping. Yes, you may get something easy to shape, but then you are also left with a dense, dry, crumbly bun. No thanks. I’ve endured enough of those.
What’s the better way to go at it? I borrowed a trick from this viral homemade gluten-free bread – less is more. Use less flour, add a little psyllium husk to help absorb moisture, and definitely use a quality gluten-free flour (my fave? Cup4Cup GF flour blend). To also help hold their shape, a little potato starch is added, which also adds softness.
Shaping the burger buns is easy (did you know you can use a measuring cup to scoop and portion?!). They only require one rise, no kneading, and a quick 15 minute bake in the oven. Let’s banish those bunless burgers forever and get these world’s best gluten-free burger buns into your life ASAP.
Yum!!! Made these with Cup4cup flour mix. Oh my!! They are like a CLOUD, especially fresh out of the oven with butter!! I’m not normally gluten free and I loved them just as much as my gluten free daughter did. Thank you for sharing this recipe!
—BJ
Free Guide! 5 easy tips for baking like a gluten-free pro!
Simple hacks for fail-proof gluten-free dishes every time!
Ingredient Tips and Subs
- Gluten-free flour blend – I recommend Cup4Cup because the added cornstarch gives it that pillowy soft texture. However, a lot of readers have used their own blends. Just check out the comments below to see what else works!
- Potato starch (not flour) – Secret ingredient to make GF buns and homemade gluten-free dinner rolls soft, kind of like potato buns. Instead of relying on additional flour to structure the dough, I substituted another GF starch. Use for best results, but tapioca starch or additional GF flour may be substituted.
- Psyllium Husk Powder – An essential gluten-free binding agent ingredient for any dough that needs shaping. It helps help mimic the elasticity and crumb structure of wheat baked goods. For best results use a lighter colored one, this psyllium is my favorite because it doesn’t turn baked goods dark or even purple. Weird. I know.
- Baking Powder and Yeast – For GF breads I rely on this two-fold method for a good rise. The yeast activates when the dough is mixed and briefly rests, but the baking powder assists as it bakes.
Watch The Recipe
Let’s Make This Together!
(Below shows step-by-step photos and modified instructions. For the complete recipe, along with ingredient amounts, scroll down to the recipe card.)
Easy peasy dough
Start by activating the yeast in warm water and a little sugar. It should be frothy when ready to use. While that’s sitting, combine the dry ingredients in a stand mixer with a paddle attachment. Slowly add in the yeast / water with egg and melted butter.
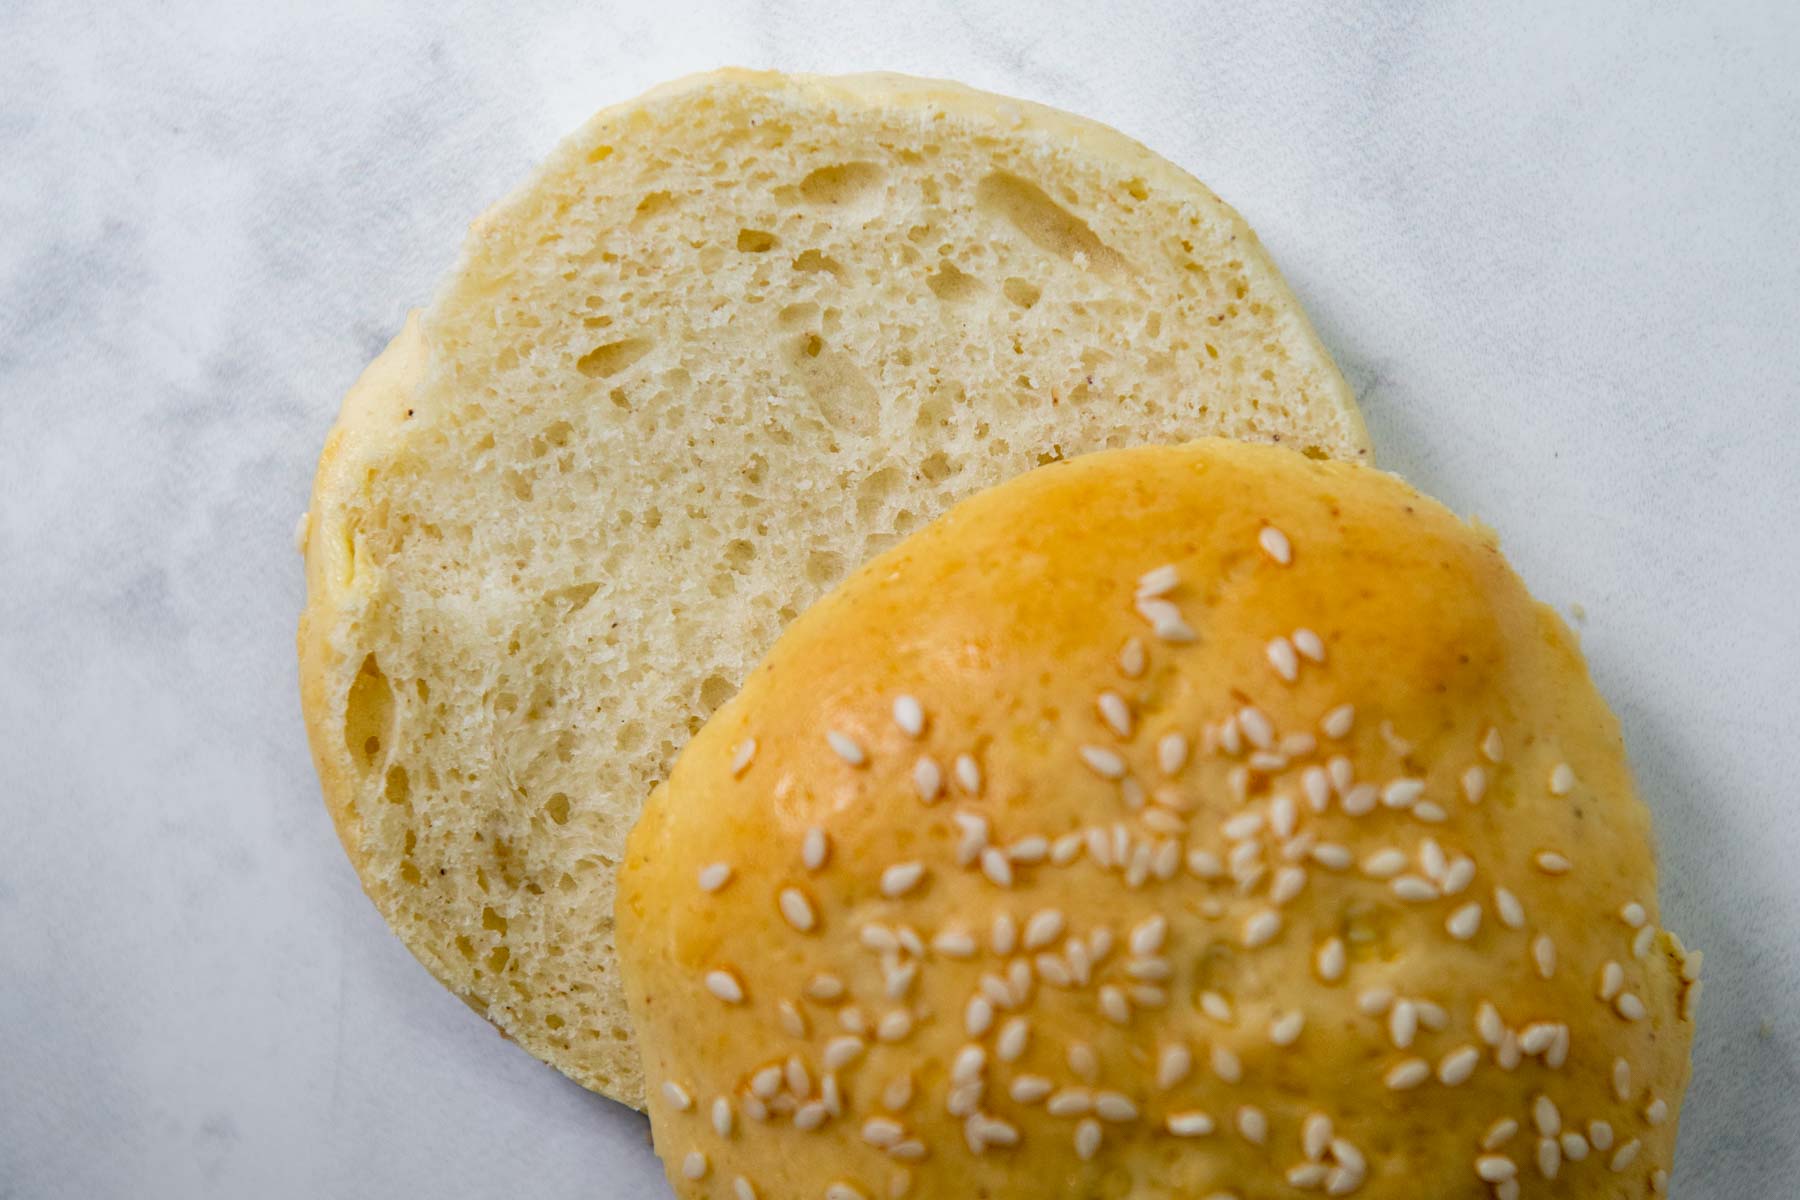
Mix on low speed to combine, then increase to medium speed and beat for 6 minutes. The dough will be pretty stiff at this point, but still a little sticky.

Scoop and roll
There’s a precise way to go about this and then an easier option. (Guess which one I prefer…) For an average-sized burger bun, you’ll need 3 ½ ounce portions. Use 2 ½ ounces if making slider buns. To be very precise use a food scale. Even easier? Spray a ⅓ measuring cup with cooking spray and scoop out the dough evenly to the top.
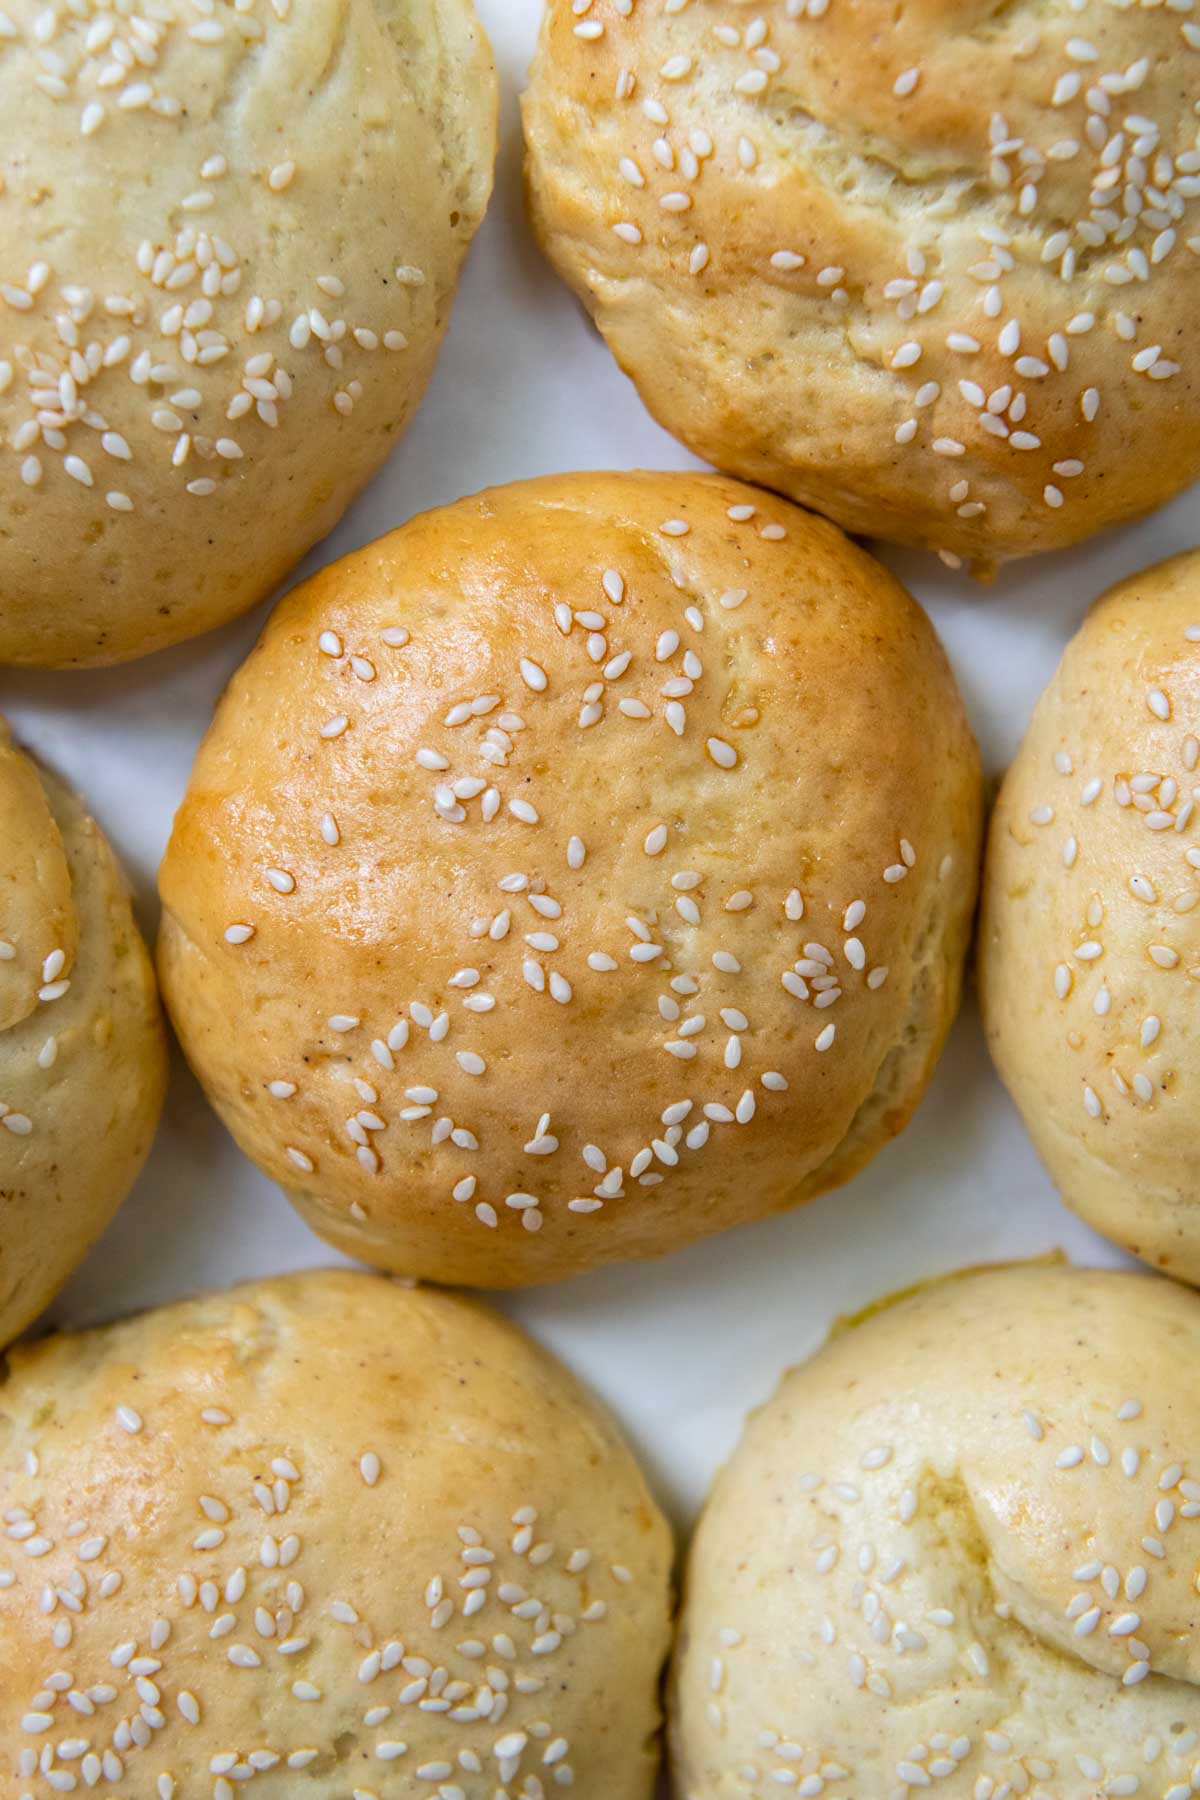
Transfer the dough balls to two baking sheets lined with greased parchment. Once all the dough is divided out, roll into smooth balls. If you don’t want the burger buns to bake up with cracks, be sure they are smoothed out as much as possible.

Press and rise
Now it’s time to smush the balls into thick discs, about ¾-inch high. Cover each tray with a large piece of greased plastic wrap and set aside to rise about 20-30 minutes. Meanwhile preheat the oven to 375°F.

Who doesn’t love a shiny bun? 😳
Once they are risen, it’s time to brush on the egg wash, which is an egg beaten with 1 tablespoon water until frothy. Generously brush it on, then sprinkle with any toppings you’d like, sesame seeds, poppy seeds, or even flaky sea salt.
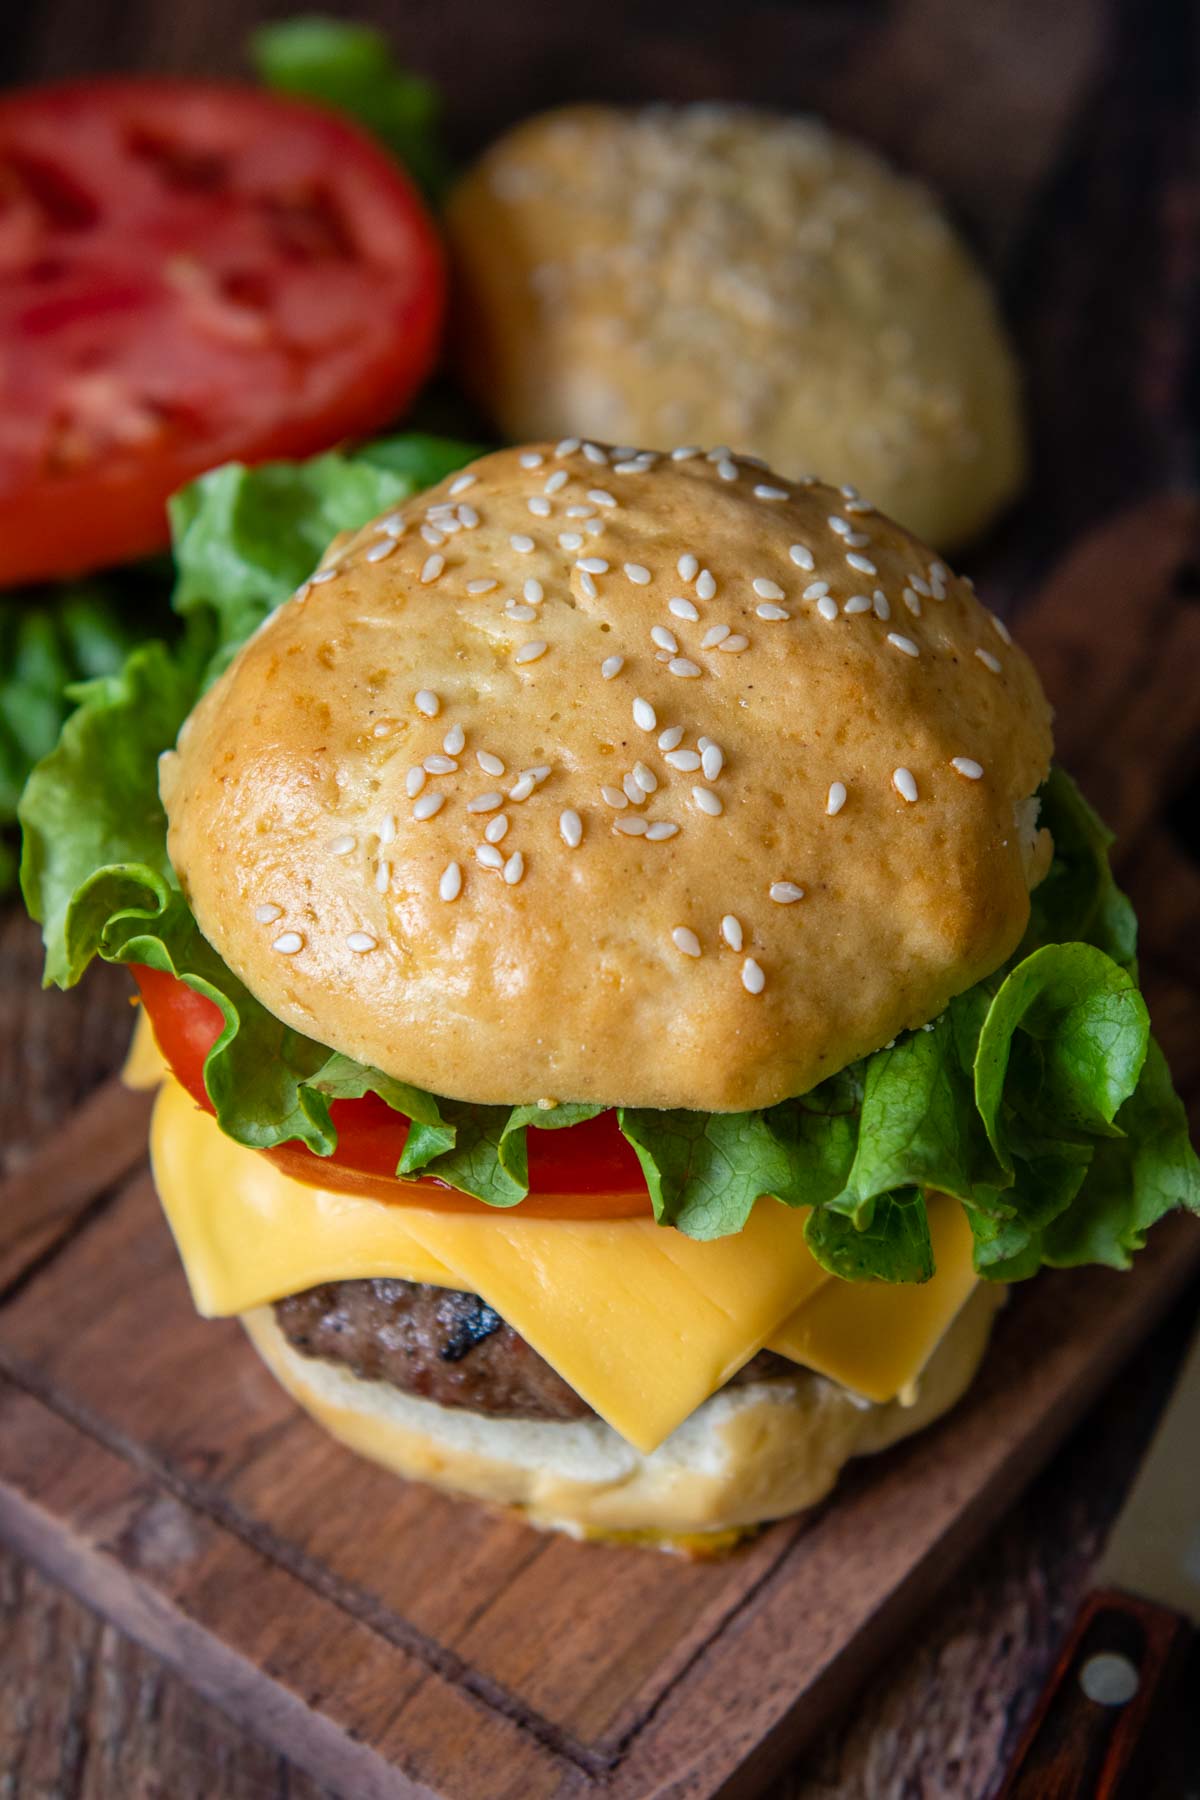
Bake for 15-17 minutes, or until the bottoms are golden brown, rotating the pans about halfway through. Try to save this goodness for hamburgers, but they are amazing to eat as is!

Pro Tip For A Quick, Lofty Rise
To help gluten-free bread dough rise higher, do this easy trick. Before beginning the recipe preheat the oven to 200°F, turn it off, then start making the dough. When the buns are ready to rise, place the baking sheets in the still warm oven for 10-15 minutes. Pull them out to room temperature (better yet, place them on the stove while the oven preheats) to finish rising for 20 minutes.
Some of you may be wondering if you need a stand mixer to make this recipe. Although the dough is slightly sticky, it’s still firm enough to not be able to use a hand mixer on. If you don’t have a stand mixer, then a bread machine using the dough mixing cycle works well too. But, if you make a lot of homemade GF bread recipes, I highly recommend in investing in one!
Can I Use This Dough For…?
For hot dog buns, shaping and baking is a little different, so I created this easy gluten-free hot dog bun recipe as a step-by-step tutorial.
To make slider buns, you can make smaller portion balls, or check out this recipe for soft, squishy gluten-free Hawaiian buns for slightly sweet taste.
Many readers fall in love these recipe so much, they turn it into many more GF bread ideas. Take a look at the comments below and don’t forget to add your own!
Save this recipe to your pinterest board!
Let’s be friends on Pinterest! I’m always sharing great recipes!
Did you make this recipe? I love hearing from you! Leave a star rating and comment below the recipe card. It helps others when searching for recipes and I appreciate feedback from our community. You will always hear back from me! -Melissa
Softest Gluten-Free Hamburger Buns (Not Crumbly)
Ingredients
- 1 ½ cup (360 g) warm water (110°F)
- 1 packet (7 g) (2 ¼ tsp) active dry yeast
- 2 large eggs, room temperature
- ¼ cup (57 g) melted butter, cooled slightly (see recipe notes for dairy-free)
- 3 ¼ cup (473 g) gluten free all purpose flour, I recommend Cup4Cup brand
- ⅓ cup (80 g) + 1 tsp granulated sugar, divided
- ½ cup (80 g) potato starch
- 2 tablespoons (22 g) psyllium husk powder, what is psyllium husk?
- 2 teaspoons baking powder
- 1 teaspoon salt
- egg wash: 1 egg mixed with 1 tbsp water
- (optional) sesame seeds, poppy seeds, or flaky sea salt, for topping
Instructions
- Before you begin mixing the dough, turn the oven to 200ºF. Once it reaches the temperature, turn it off. Line two baking sheets with greased parchment paper.
- Stir the yeast and 1 teaspoon sugar into the warm water. Let sit for 5 minutes. Add the eggs and butter to the yeast mixture (no need to stir together).1 ½ cup warm water (110°F), 1 packet (2 ¼ tsp) active dry yeast, 2 large eggs, ¼ cup melted butter
- While the yeast sits, use a stand mixer with a paddle attachment to combine the dry ingredients – flour, remaining sugar, potato starch, psyllium husk powder, baking powder, and salt. Slowly add the yeast mixture and mix on low speed to combine.3 ¼ cup gluten free all purpose flour, ⅓ cup + 1 tsp granulated sugar, ½ cup potato starch, 2 tablespoons psyllium husk powder, 2 teaspoons baking powder, 1 teaspoon salt
- Once the dough comes together, increase to medium speed and beat for 6 minutes. The dough will be pretty stiff but still sticky. You may want to stop the mixer and scrape down the bowl once or twice.
- For an average sized burger bun, portion the dough into about 3 ½ ounce portions. To do this easily, place greased plastic wrap on top of a food scale. to measure precisely. Alternatively, spray a ⅓ measuring cup with cooking spray and scoop out evenly to the top.
- Use additional cooking spray on your hands to roll the dough into a tight ball. The smoother the ball is the better, so the dough doesn't crack during baking, which doesn't affect taste, just appearance. Place on the prepared baking sheet, about 2-3 inches apart. Repeat with remaining dough.
- Flatten the dough balls to about ¾-inch high. Cover loosely with a piece of plastic wrap and place in the warmed, turned off oven for 10 minutes. Remove the pan from the oven and let sit at room temperature for 20-30 more minutes while the oven preheats to 375°F.
- Brush the top and sides with and egg wash and sprinkle on sesame seeds. Bake for 15-17 minutes, or until the bottoms are golden brown. Cool completely before storing in an airtight container or freezing.egg wash: 1 egg mixed with 1 tbsp water, (optional) sesame seeds, poppy seeds, or flaky sea salt
Notes
Dairy-Free Modifications
Replace the melted butter with vegan, plant-based butter sticks and reduce the salt to ¾ teaspoon.Storing and Freezing
Gluten-free baked goods lose moisture quickly, so I recommend serving the day they are made. To make ahead of time, cool the buns completely then wrap in plastic wrap and transfer to a ziplock freezer bag. Freeze up to 2 months. When ready to serve, make sure they are at room temperature and not chilled. If the buns are cold they will not be soft and have a more crumbly texture. They can be warmed for a few seconds in the microwave to make sure all the “chill” is off.This post contains affiliate links. My opinions are always my own. If you purchase a product through an affiliate link, I make a small commission – at no cost to you. Read full disclosure policy here.


What would you think about replacing the 1/3 C sugar with maple syrup or honey? Would it ruin the taste or consistency?
Of those two, I would try the honey, but maybe 1/4 cup because honey is sweeter and then you won’t be adding as much liquid. Let me know how it goes!
Best,
Melissa
I use Caputo flour as I can’t get your recommended ones in Canada. What chain should I make to the liquid in this recipe thank you.
Hi Jan,
I find when working with Caputo flour it requires less liquid. I would start with 1 cup and gradually add in up to 1/2 cup. You’re looking for the dough to be like the pictures in the post, stiff, yet still moveable and slightly sticky.
Best,
Melissa
Why not use the hamburger rings to place the dough in?
You can do that! I just don’t have any…
Best,
Melissa
With the psyllium husk, my gluten-free all-purpose flour blend has psyllium husk in it, also would it be better to use gluten-free bread flour, or all purpose? What would be a good alternative to potato starch as I do not have that on hand.
Thanks!
Hi Lauren,
If you have GF bread flour, you can use that, but I would still add 1 tablespoon psyllium (instead of 2). Instead of potato starch, I would add additional GF flour, up to 1/2 cup but I would start with less and gradually add until the dough becomes the consistency of the pictures.
Best,
Melissa
My dough turned out wet and I think a squished them down too flat, but Oh, Mama!! They taste so good and they’re so squishy and not at all dry like other recipes! Will definitely try these again!
Hi Leslie,
So glad you enjoyed them! If the dough was wet, but the baked texture turned out great for you, I wouldn’t change a thing expect maybe not flattening them next time. Out of curiosity, which GF flour did you use? They all absorb liquids differently.
Best,
Melissa
I used the last of my Just About Foods 1:1 gluten-free flour, about 1 1/2 cups and Bob’s Red Mill 1 to 1 gluten-free flour for the remaining amount. I didn’t like the JAF because its consistency is more like baking powder and not flour. I also bought the wrong psyllium. I bought the whole psyllium husk instead of the powder and I also didn’t have potato starch, so I used tapioca flour. 😂 But they were still delicious! Stretchy and spongy like brioche!
I’m ordering the brands you recommended and trying again, but I still am so happy to have found this recipe! I ate a hamburger with a bun instead of a bed of greens and it was amazing! It’s been a long time!
Thanks for the recipe!
Wow, so glad to hear, Leslie! I’ll be curious what you think the next time around with the suggested ingredients! Let me know!
Best,
Melissa
Hi! My son is not only gluten free, but egg free. Will this recipe work without egg?
Hi Holly,
I haven’t personally tried it, but a lot of readers have written in with my other bread recipes and tell me they work with an egg replacer substitute. Perhaps you could try it with a half recipe to see if it works out? I’d love to know the results!
Best,
Melissa
Don’t have potato starch. Would tapioca or arrowroot work as a replacement?
Of these options, I would go with the tapioca starch, but start with 1/4 cup. If you need to make the dough a little stiffer, add in 1 tablespoon at a time.
Best,
Melissa
I tried with tapioca and buns turned out but heavy and dense. If I make with potato starch would they be light and airy?
Hi Melissa,
Tapioca starch has more binding. Did you end up using just the 1/4 cup? I have never had a problem with the buns being dense, so using potato starch would be preferred.
Best,
Melissa
I used 1/2 cup. They turned out dense and heavy.
I don’t have room in my small apartment for a stove so I was given a table top (do it all) cookerl
Can I mix your bread recipes in a bread maker?
Yes! Many people have written in and said it works in a bread machine. In fact, if you search through the comments you can find others that have written in.
Best,
Melissa
Can nkt have xanthan gum that is in that flour I have to use one without. What to replace that with in the flour when it already calls for psyllium husk?
Hi Michelle,
Just to be clear, are you asking what to add to the recipe if your flour doesn’t have xanthan gum in it? You can add extra psyllium, maybe a 1/2 tablespoon?
Best,
Melissa
Hi!! Im hoping you could help troubleshoot. My dough was not sticky or whipped looking at all. I didn’t need flour to handle it. I measured exact ingredients with my kitchen scale. They are rising now. Should I have added more liquid to have a stickier dough? I’m a not worried they’ll be crumbly. I couldn’t smooth any cracks as the dough was quite firm. Thanks so much for any suggestions!
How did they turn out, Julia? Which GF flour did you use?
Best,
Melissa
Hi! I used C4C and the other ingredients listed. The flavor was excellent but they were pretty heavy and dense crumb. I think the dough was too thick but I was scared to a more water. Would adding oil or egg or another liquid have been a good idea to get the better consistency? Needless yo say everyone gobbled then up regardless. I’d love to get this one right as the recipe and method were simple. Thanks!
Hi Julie,
I always error on scaling down the GF flour instead of adjusting liquid. Too much liquid will make for a gummy texture or that thick ribbon that settles sometimes on the bottom of GF breads. If you found it too dense, next time cut back your flour by 1/4 cup. If the dough is way too loose after mixing, you can always add a tad bit more back in.
Best,
Melissa
Ok thanks ill try that next time. I do have 2 questions….
Is there anything special to consider when doubling or 3x or 4x your recipes?
Do you recommend swapping out a little C4C with evaporated milk in other recipes like you suggested in your bread recipe? Any sort of ratio to consider?
Hey Julie,
I don’t think it would hurt to do the milk powder swap out here. For the bread I remove 2 T of flour and replace with 2 T milk powder and I would do the same here. My concern with doubling, 3X, or 4X recipes is the amount of flour. For this recipe that would be at least 6 1/2 cups, so I’m not sure many standard stand mixers could handle that, especially since this doesn’t use a dough hook.
I think it would be best to make the dough in batches and then shape them all out at once. It’s not going to hurt for the dough to have a short initial first rise while the other dough is being mixed, if that makes sense.
Best,
Melissa