
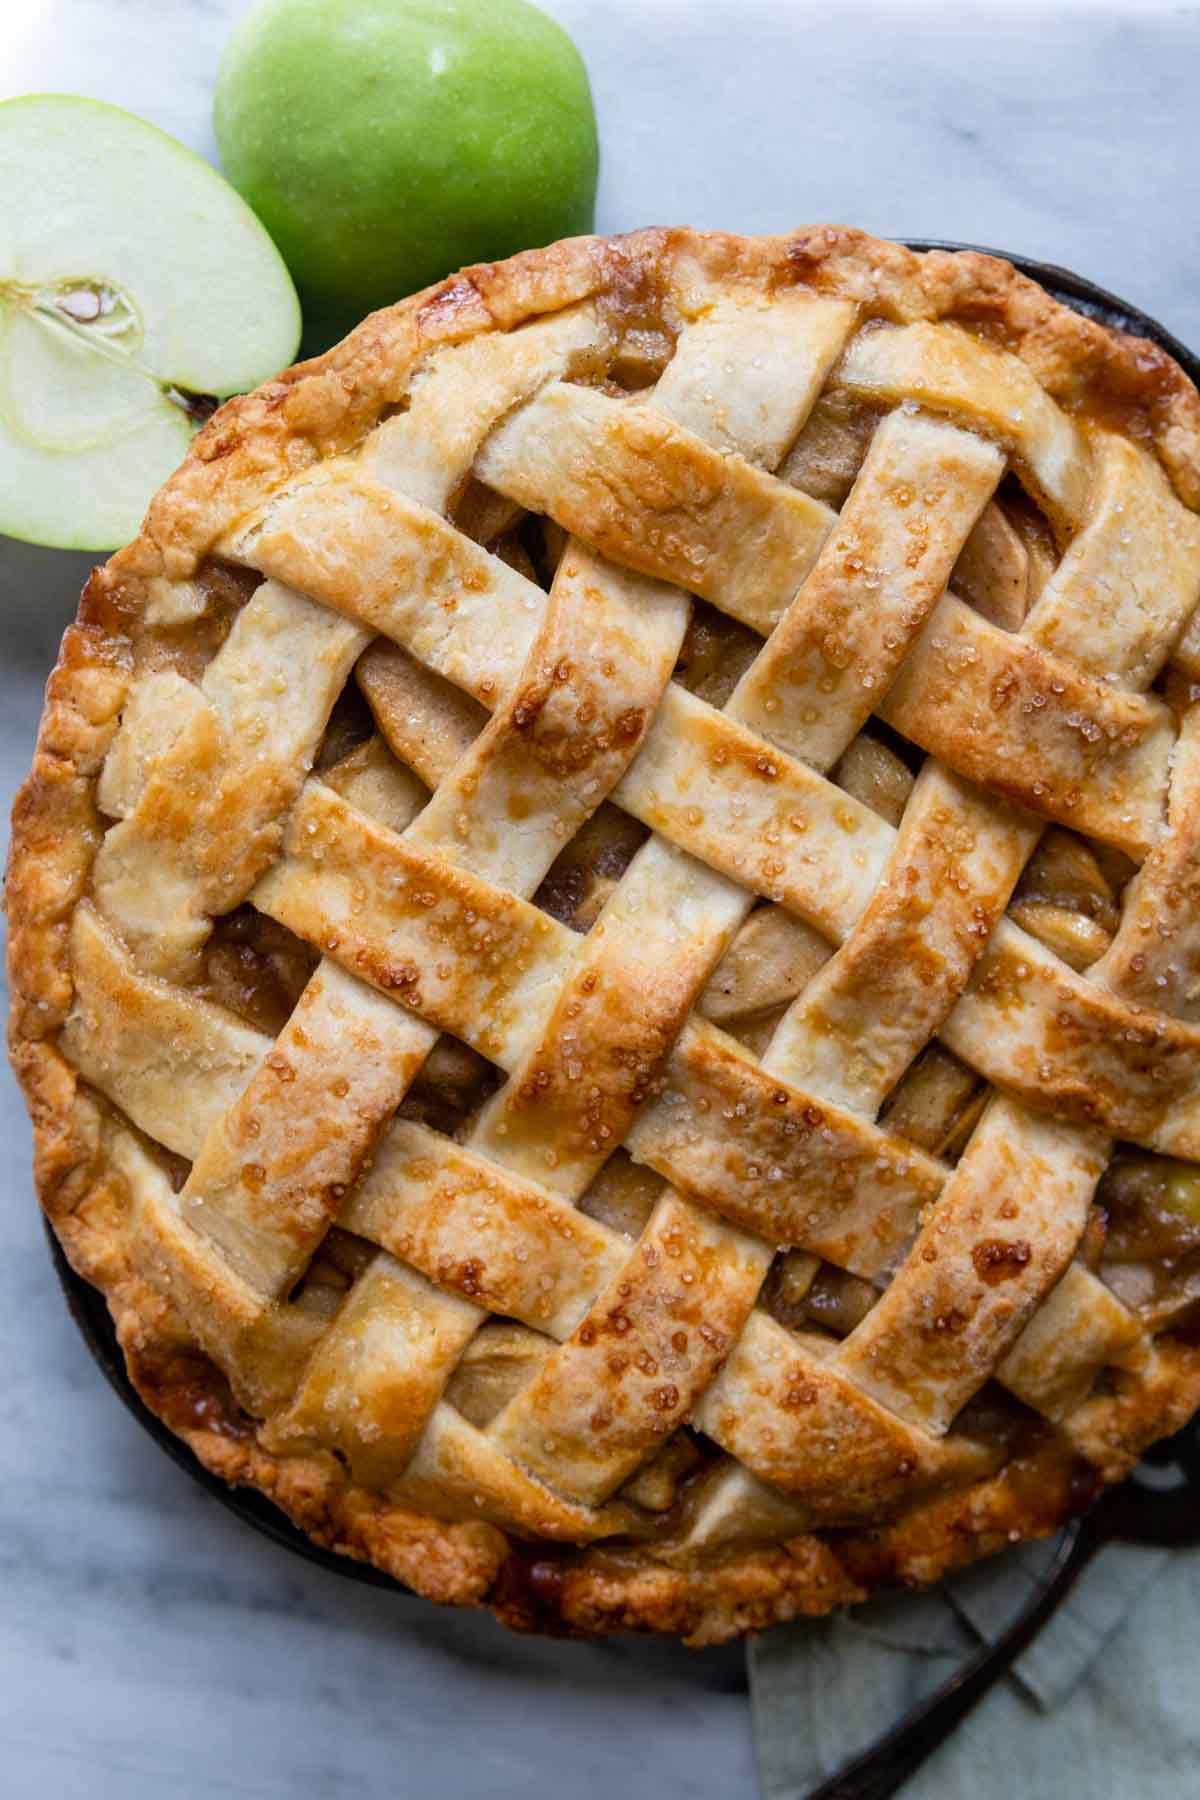
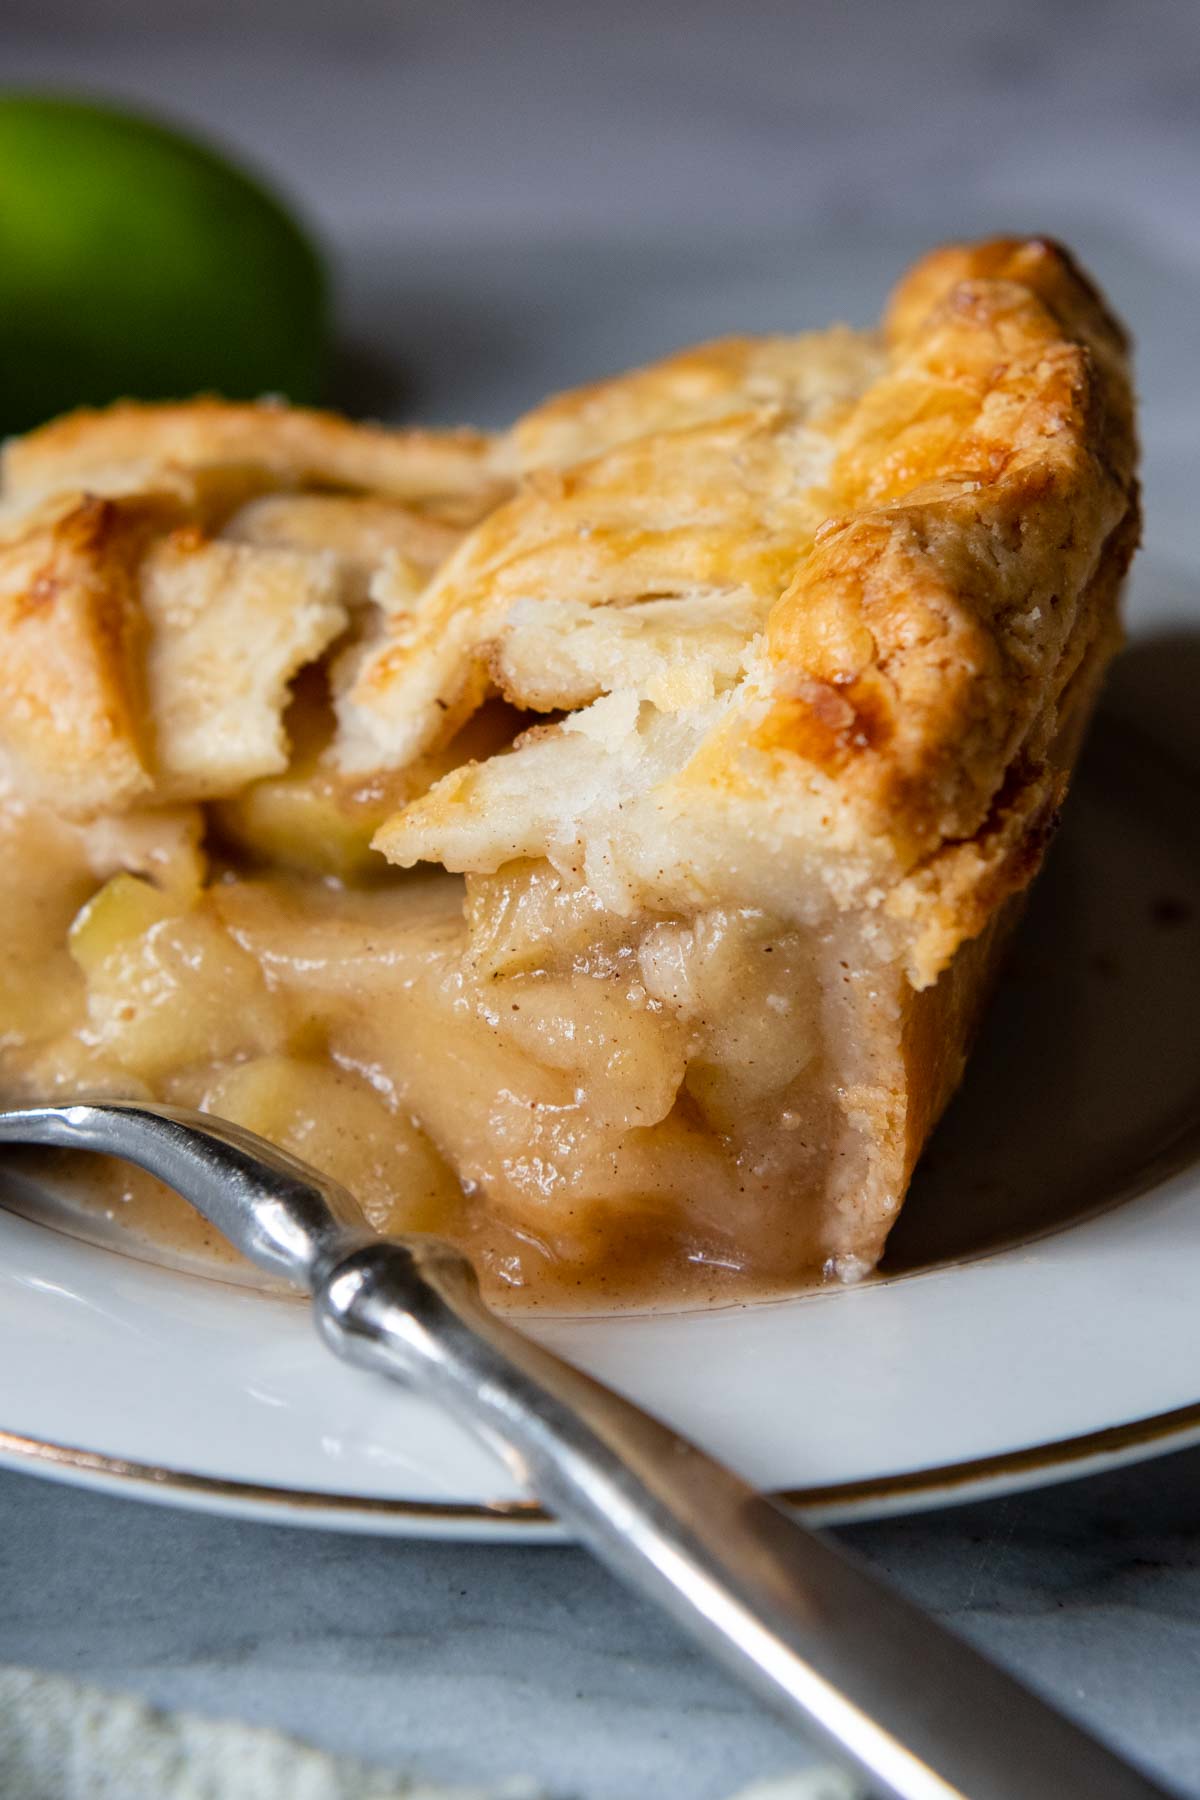
Ready to make the best homemade gluten-free apple pie? All you need is an exceptionally flaky gluten-free pie dough, a juicy deep dish apple filling, and the easy tips shared here! This apple pie with gluten-free crust is foolproof using my easy hacks for a crisp pie crust, perfectly cooked apples that are neither liquidy or mushy, and a golden double lattice crust. I will teach you, step-by-step!
Want to Save This Recipe?
Enter your email below & we'll send it straight to your inbox. Plus you’ll get affordable and easy gluten-free recipes delivered each week!
Gluten-Free Apple Pie with Flaky Crust
The very first pie recipe I made was a homemade apple pie. I remember the extremely vague directions my mom gave me – make a homemade crust, slice apples, mix with a little sugar, lemon juice, and cinnamon, top with another crust and bake.
Miraculously it did turn out, but had two things going for me. I already knew how to make pastry dough. Plus, it wasn’t gluten-free, which means it was a lot harder to mess up!
Now that I’ve fine tuned many gluten-free baking tips, I’ve learned to make foolproof gluten-free pie recipes with ease. I used this expertise to make the best gluten-free apple pie recipe, void of all common shortfalls – lackluster pastry, soggy bottom crust, mushy apples, or a liquidy filling.
If GF pies contain a lot of moisture in the filling, there are easy ways to make sure the crust stays crisp. One method is to parbake the pie before filling, which is a technique used in this easy gluten-free pecan pie recipe.
Apples contain a lot more moisture, though. This especially causes issues with gluten-free pie crust because the starches have a different threshold for moisture, and how it affects them. Therefore, a gluten-free recipe for homemade apple pie needs to go a step further.
Fortunately, the fix (borrowed from this perfected gluten-free pumpkin pie crust) is even easier than par-baking the crust! Simply place the pie directly on a hot, preheated baking sheet to bake. The heat from the metal conducts up towards the bottom crust, so it becomes golden and crisp as the apples bake to perfection.
For a perfectly cooked gluten-free apple pie filling it’s best to slightly soften the apples and thicken the filling first, before pouring it into the crust. With the sauce already thickened, less moisture seeps into the crust as it bakes.
Whether you are intimidated by making a from scratch apple pie, or looking for some easy next level baking tips, find it all here! With step-by-step photos, an easy tutorial, you’ll learn how to make a deep dish apple pie complete with a gluten-free lattice pie crust!
Free Guide! 5 easy tips for baking like a gluten-free pro!
Simple hacks for fail-proof gluten-free dishes every time!
Best Apples to Use for Pie
The ingredients for apple pie are simple, with the superior results coming baking tips. However there is one ingredient that will make or break your pie – the best variety of apples!
The apples listed below make excellent choices for gluten-free apple recipes. They maintain their shape, don’t break down or become mushy during baking. However, some are preferred for making apple pies.
If you like a tart filling, Granny Smith are a good choice. This gluten-free apple pie filling contains less sugar, though, so I found Granny Smith to be a little too tart, and not the best balance of flavor.
My number one choice are Golden Delicious, which is also what I use for my favorite gluten-free crisp recipe. They have a perfectly balanced flavor, not too sweet or too tart, and hold their shape.
- Golden Delicious (preferred variety)
- Honeycrisp
- Granny Smith apples (very tart, so may want to pair with something else)
- Jonagold
- Braeburn
- Pink Lady
how to make Gluten-Free Apple Pie
(Below shows step-by-step photos and modified instructions. For the complete recipe, along with ingredient amounts, scroll down to the recipe card.)
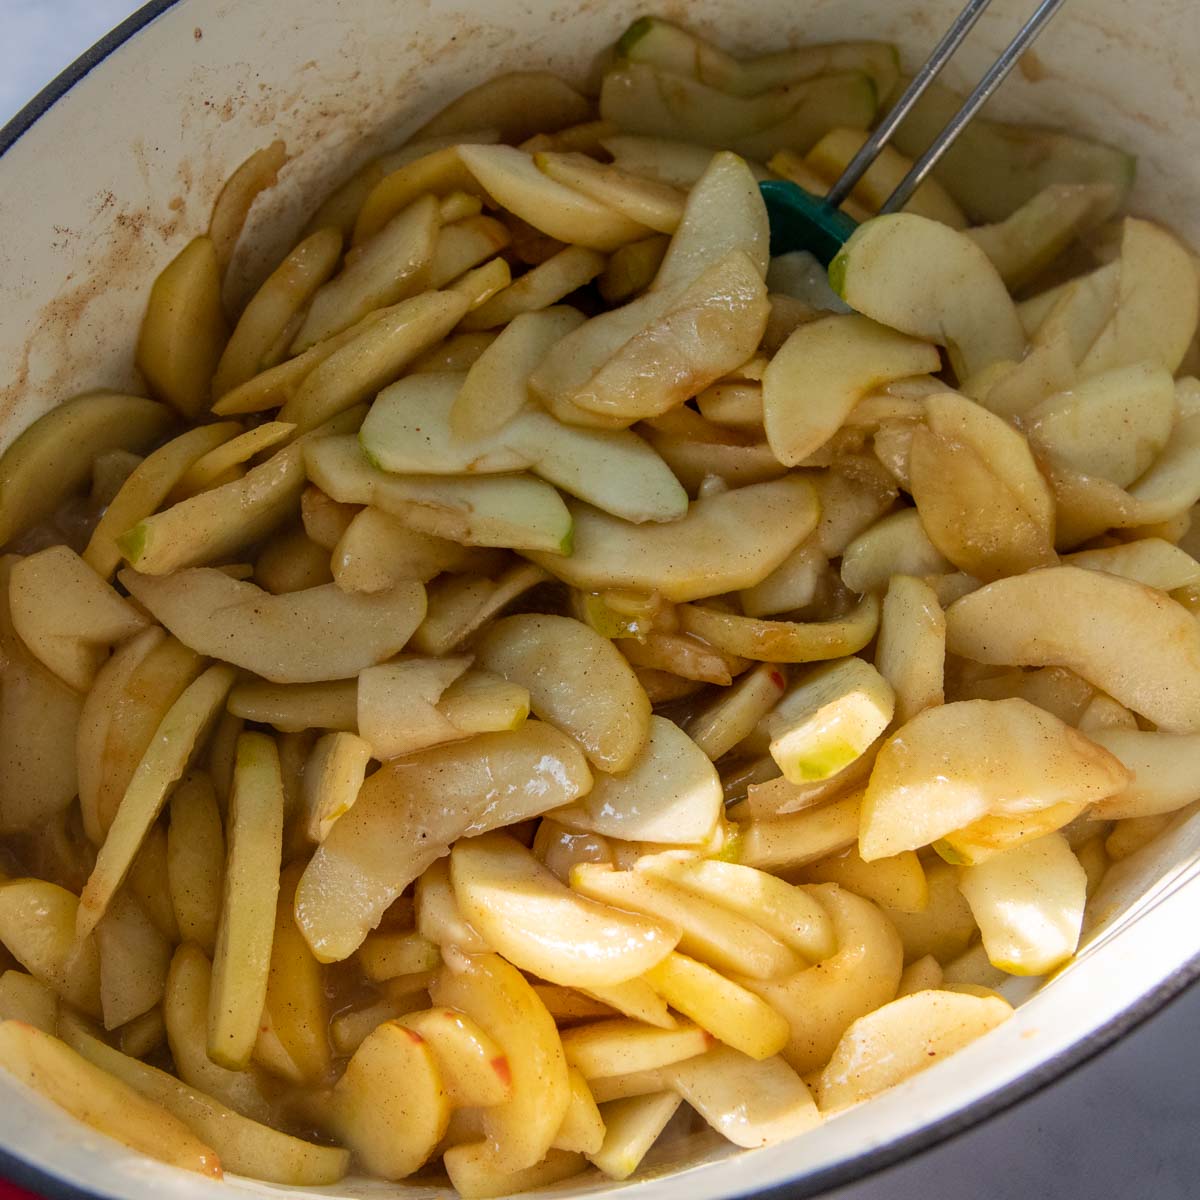
- While the pie dough is chilling, start the filling on the stove top. This starts the cooking process so fresh, crisp apples end up with the ideal soft texture in a perfectly thickened sauce. In a large Dutch oven or pot, combine the apples, sugars, butter, spices, salt, and lemon juice.
- Cook over medium heat, uncovered, stirring occasionally for 15 minutes. The apples should be slightly softened, but not breaking down or losing their shape.
- Mix together the cornstarch with water. Pour into the apple mixture and cook for another 2 minutes, or until thickened. Remove from heat and stir in the vanilla.
- Before the apples go into the prepared pie crust, they must fully cool. Either leave out at room temperature for 1 hour, stirring occasionally, or speed up the process by spreading on a baking sheet and transfer to the refrigerator.
Gluten-Free Pie Crust
Besides a mile-high apple filling, the other essential competent is a buttery, flaky, foolproof gluten-free pie crust recipe. Of course, I turned to my tried-and-true recipe that has fooled many people into thinking they were enjoying a “traditional” crust, instead of one made with a gluten-free flour blend.
Below are the basic steps for how to make gluten-free pastry dough, with more details included in the recipe card. To achieve a perfectly baked crust, without a soggy bottom, see the bonus baking tips in the Tricks for Crispy Crust section.
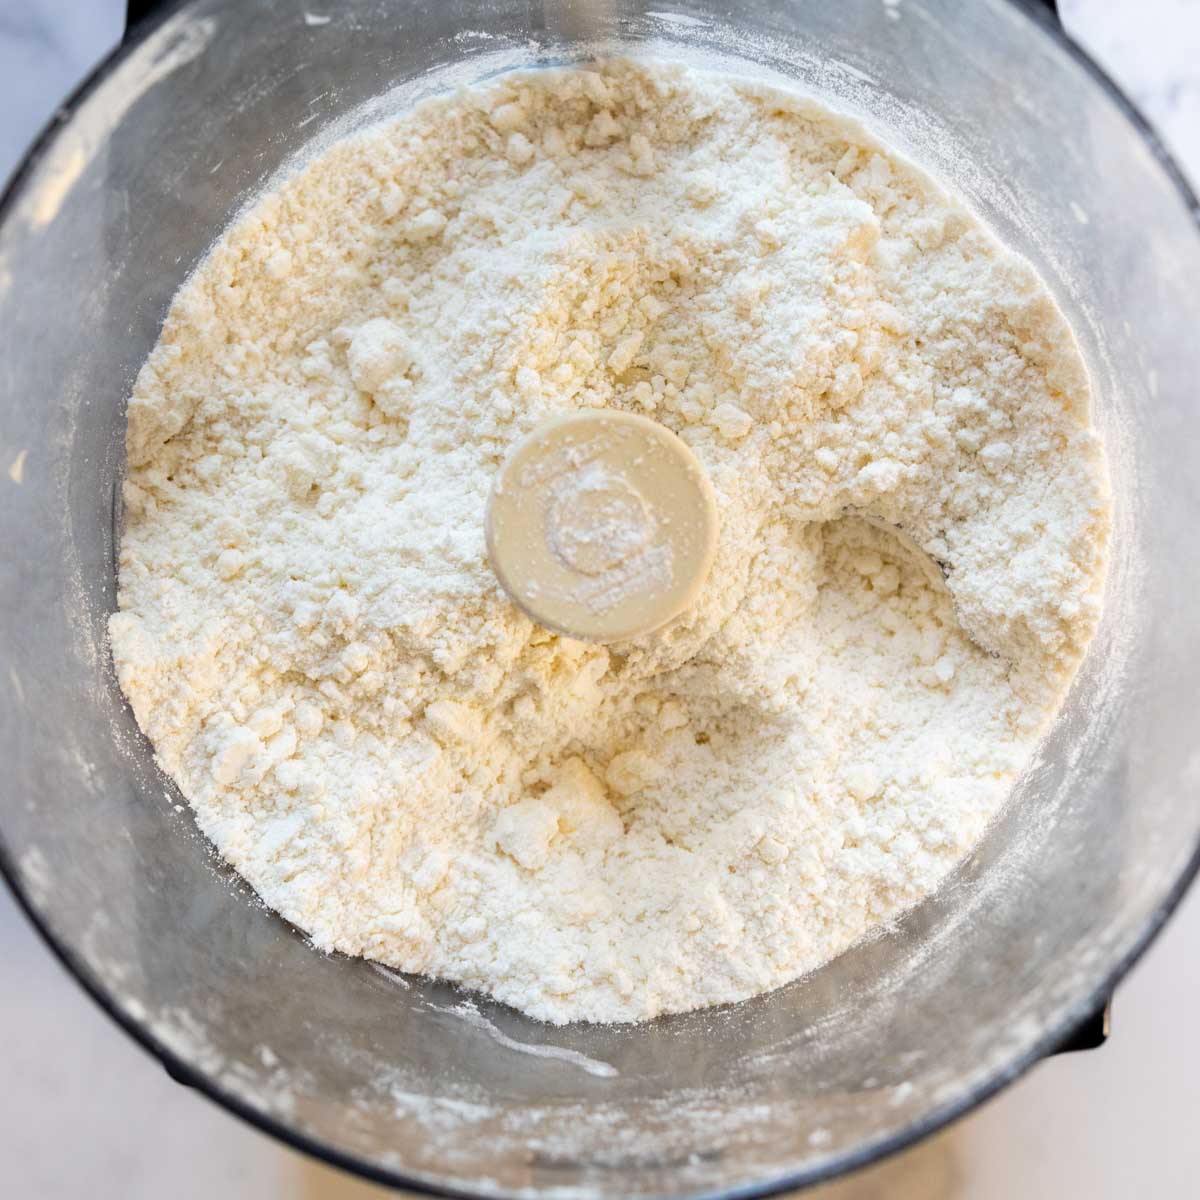
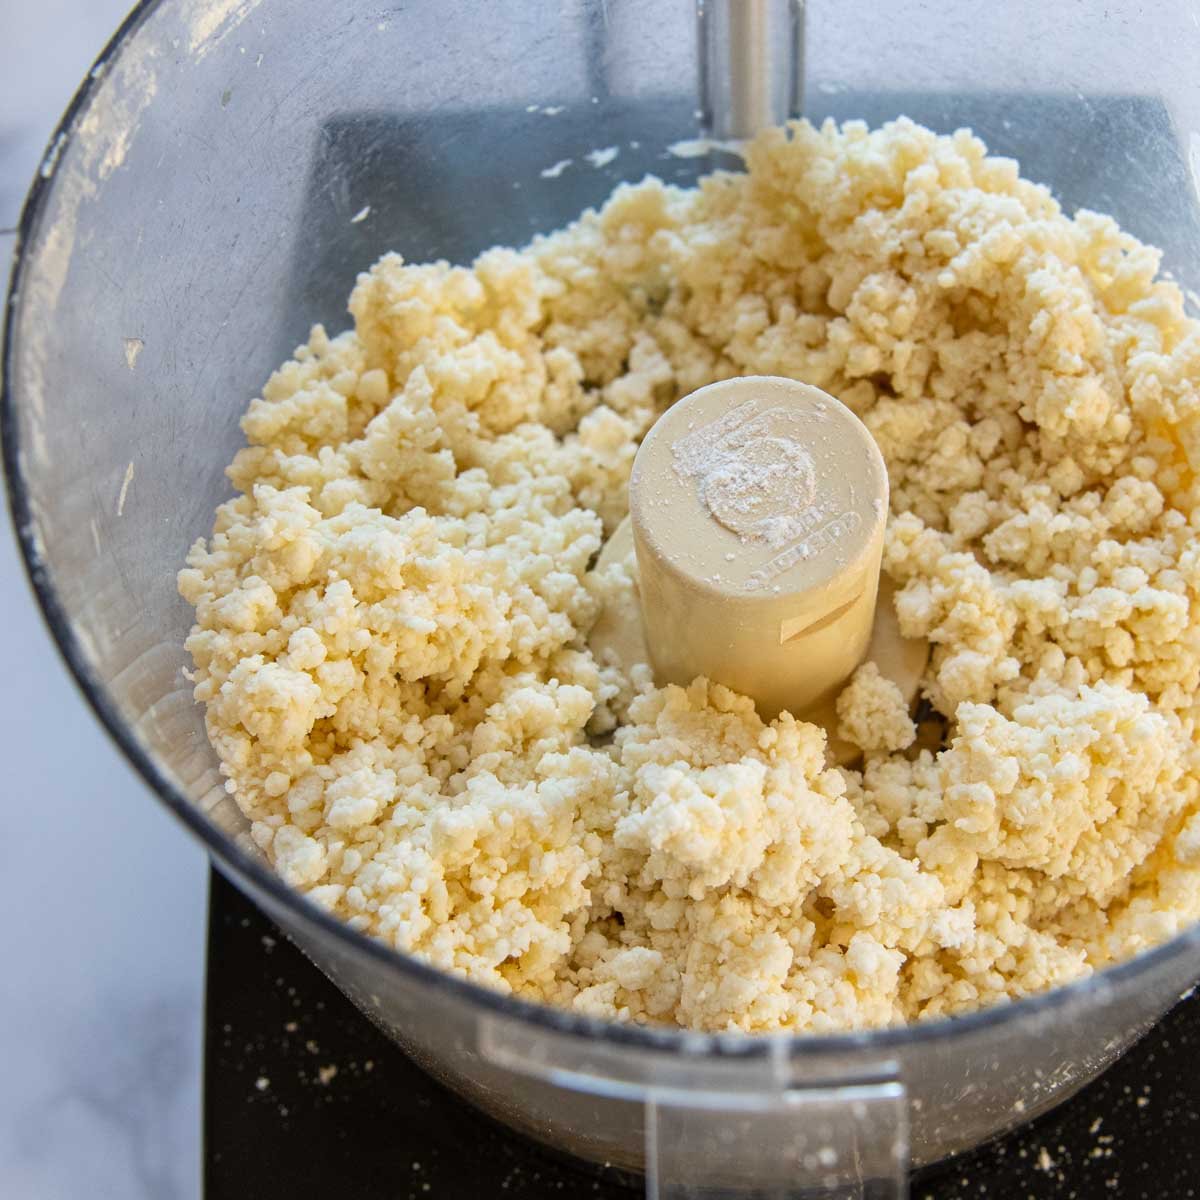
- Blend together the gluten-free flour, sugar, and salt. Add the chilled butter and process until evenly dispersed throughout.
- Whisk together the liquid ingredients – ice water, vinegar, and sour cream. Add to the flour / butter mixture and pulse until the dough comes together in small, wet clumps.
- Divide the dough onto two large sheets of plastic wrap and flatten into a thick 1″ disk. Wrap tightly and refrigerate for at least 1 hour or freeze for 30 minutes.
Making Lattice Crust or Double Crust
While a lattice crust requires a few extra steps, it’s actually easy to pull off and looks so impressive! However, if you want to save time and still enjoy the best gluten-free apple pie, I included an option for a double crust pie as well.
How to Make a Lattice Crust:
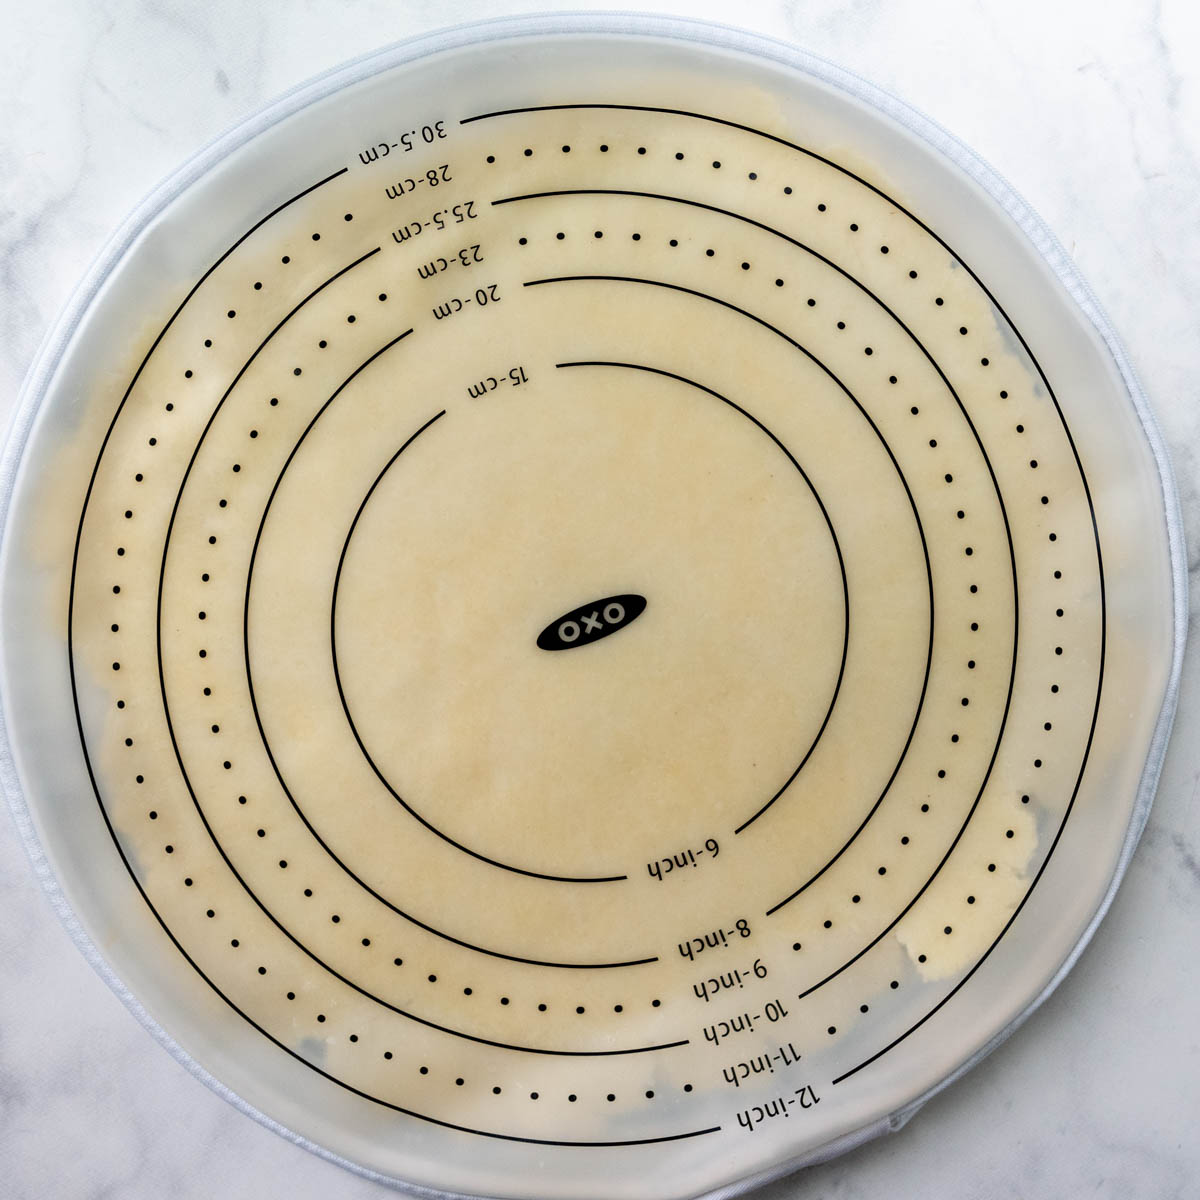
- Use a pastry rolling bag (so much easier to work with!), or place the chilled dough between two large sheets of parchment paper. Use a rolling pin to press and spread out down from the middle out. Roll out into a circle slightly larger than your pie dish, about 11-12 inches.
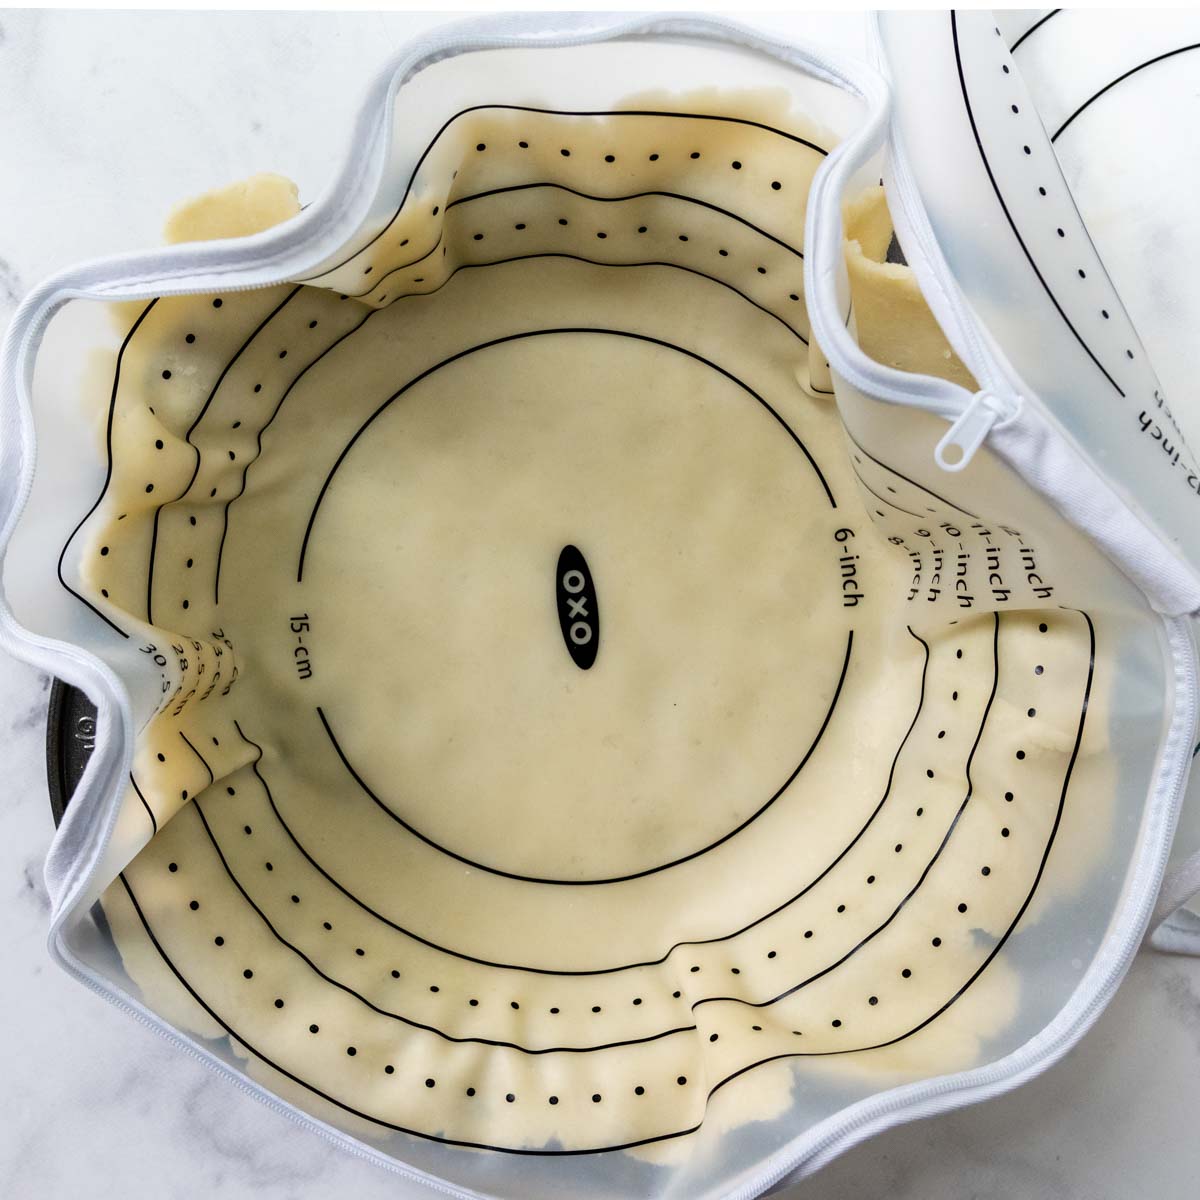
- Remove the top paper, and invert into a pie dish. Add the cooled apple filling and transfer to the refrigerator while making the top lattice crust.
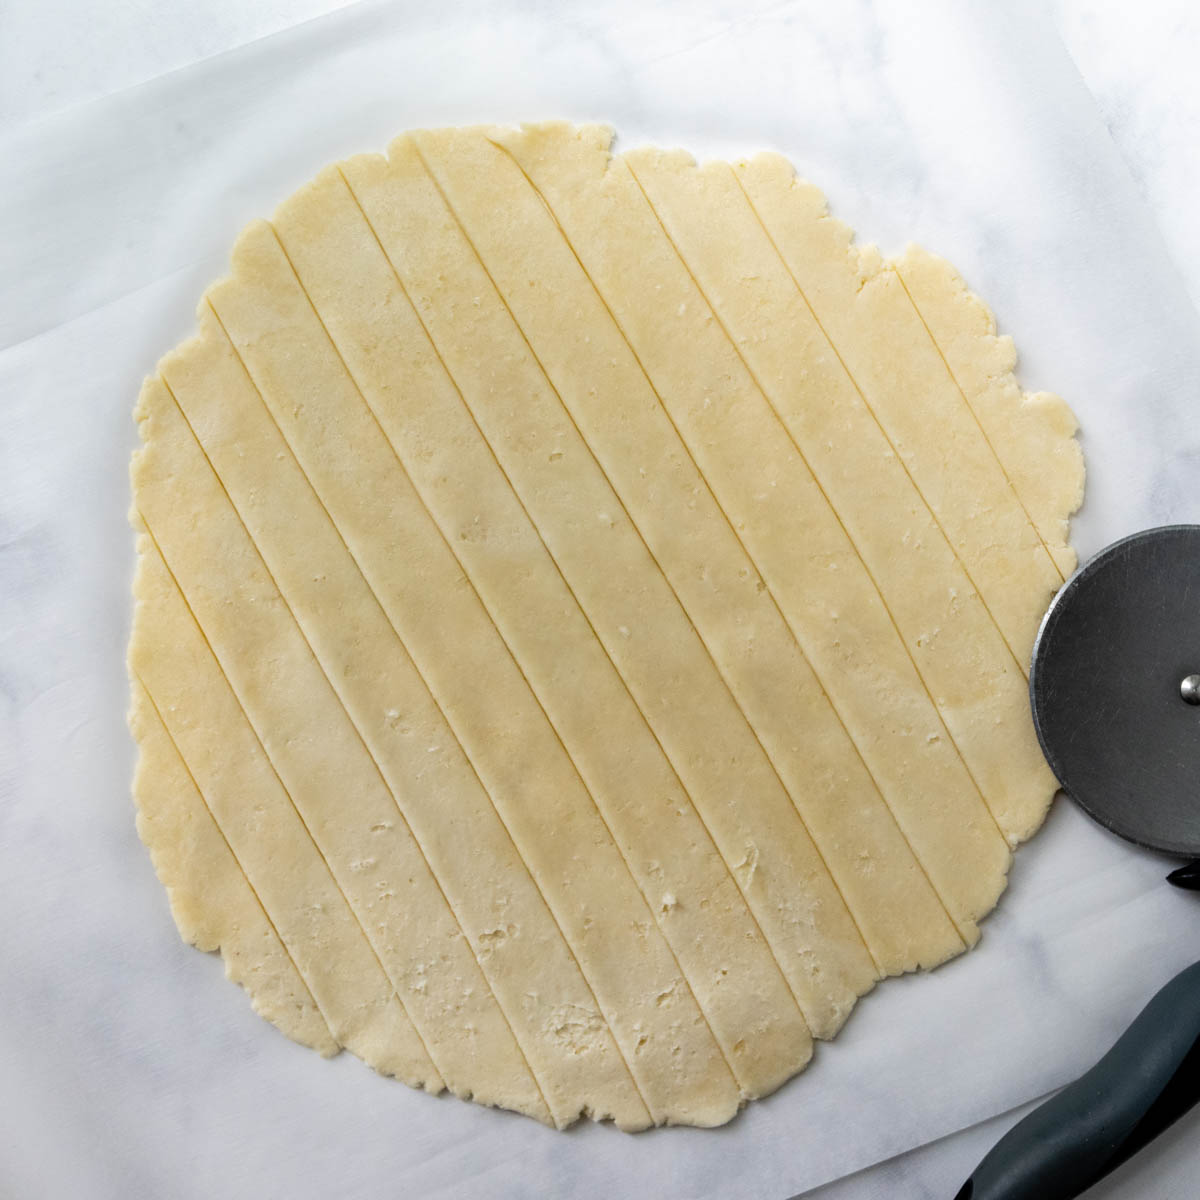
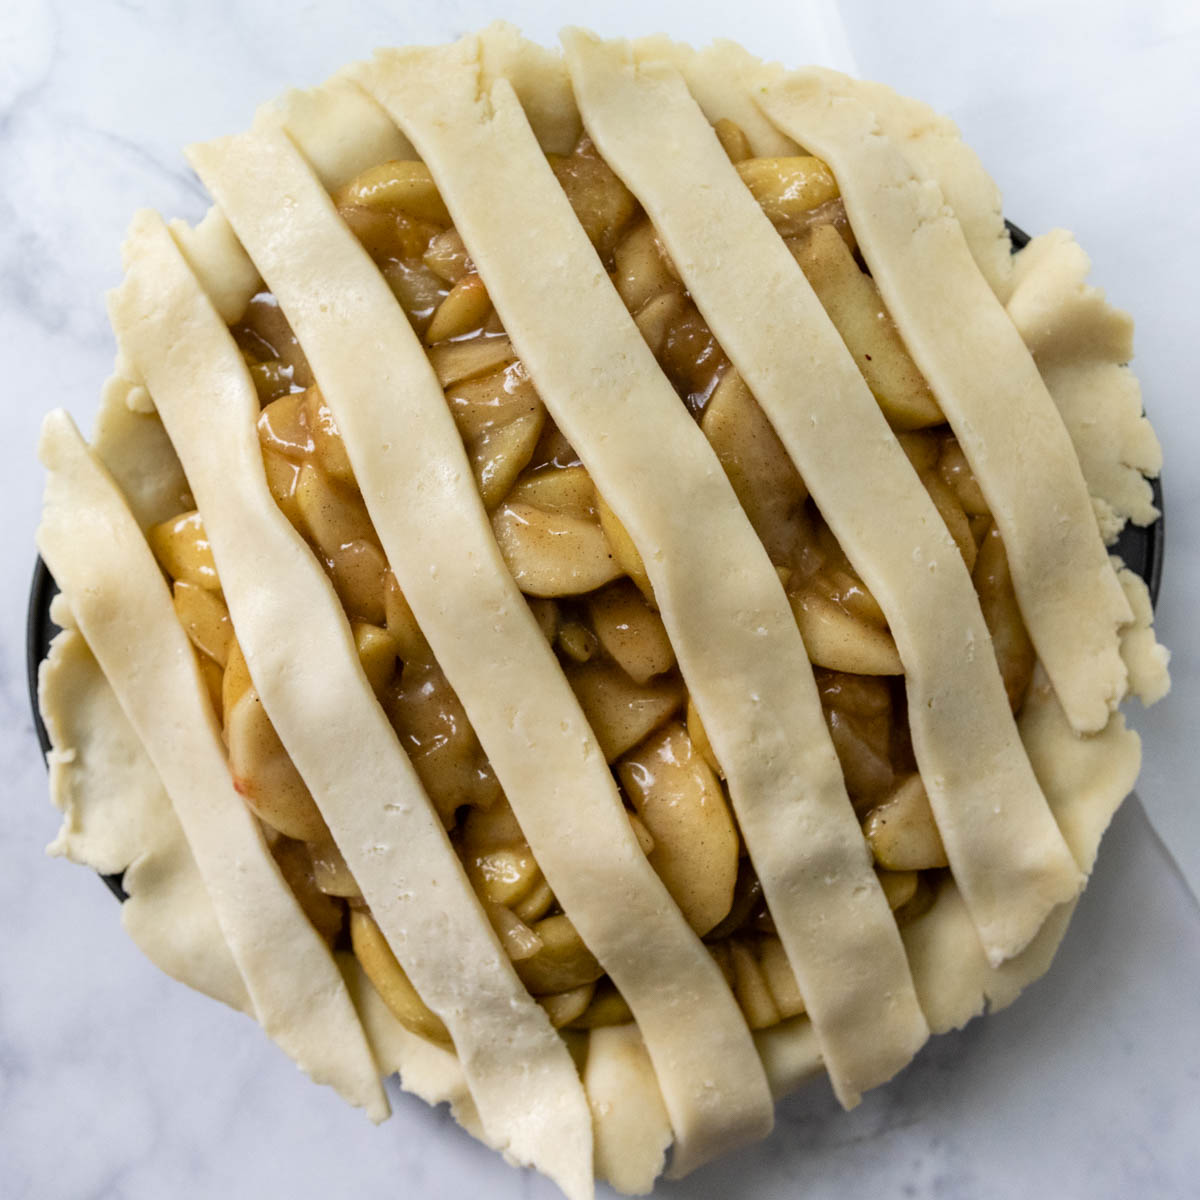
- Roll a second 12-inch circle. If using a pastry bag, invert the rolled dough onto a sheet of parchment. Use a pizza cutter or knife to slice the dough in twelve 1-inch strips. Lay 6 strips, evenly spaced, across the pie.
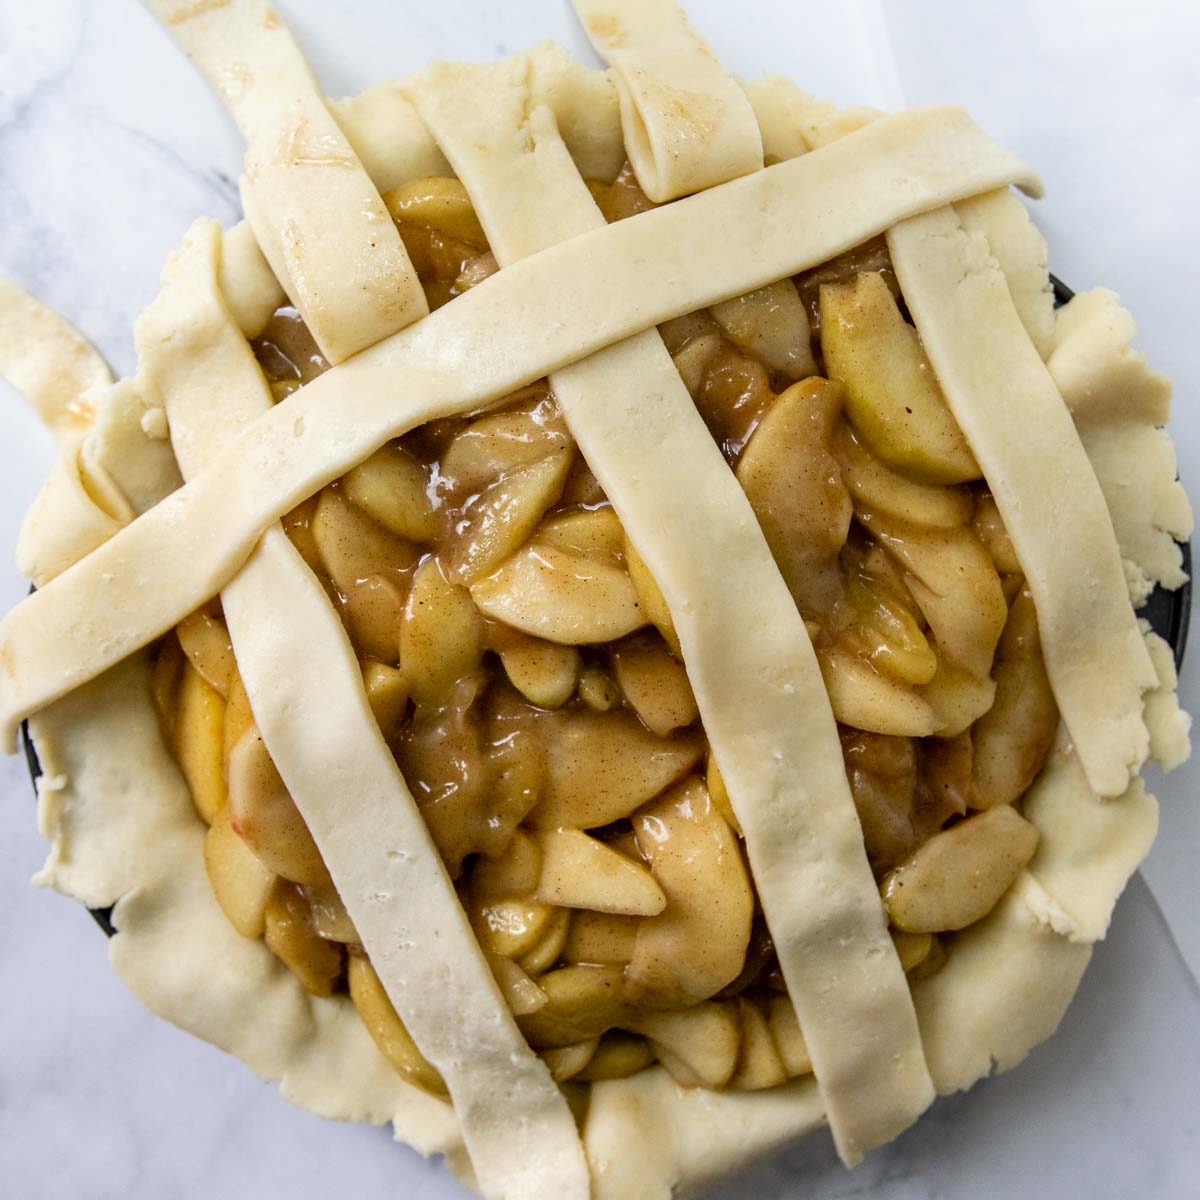
- Fold back 3 alternating strips almost all the way off of the pie. Take one unsused strip and lay it right against where the strips are folded back. Return the strips back over the pie so they cover the strip just placed. Repeat folding back the alternating strips until all the strips are placed.
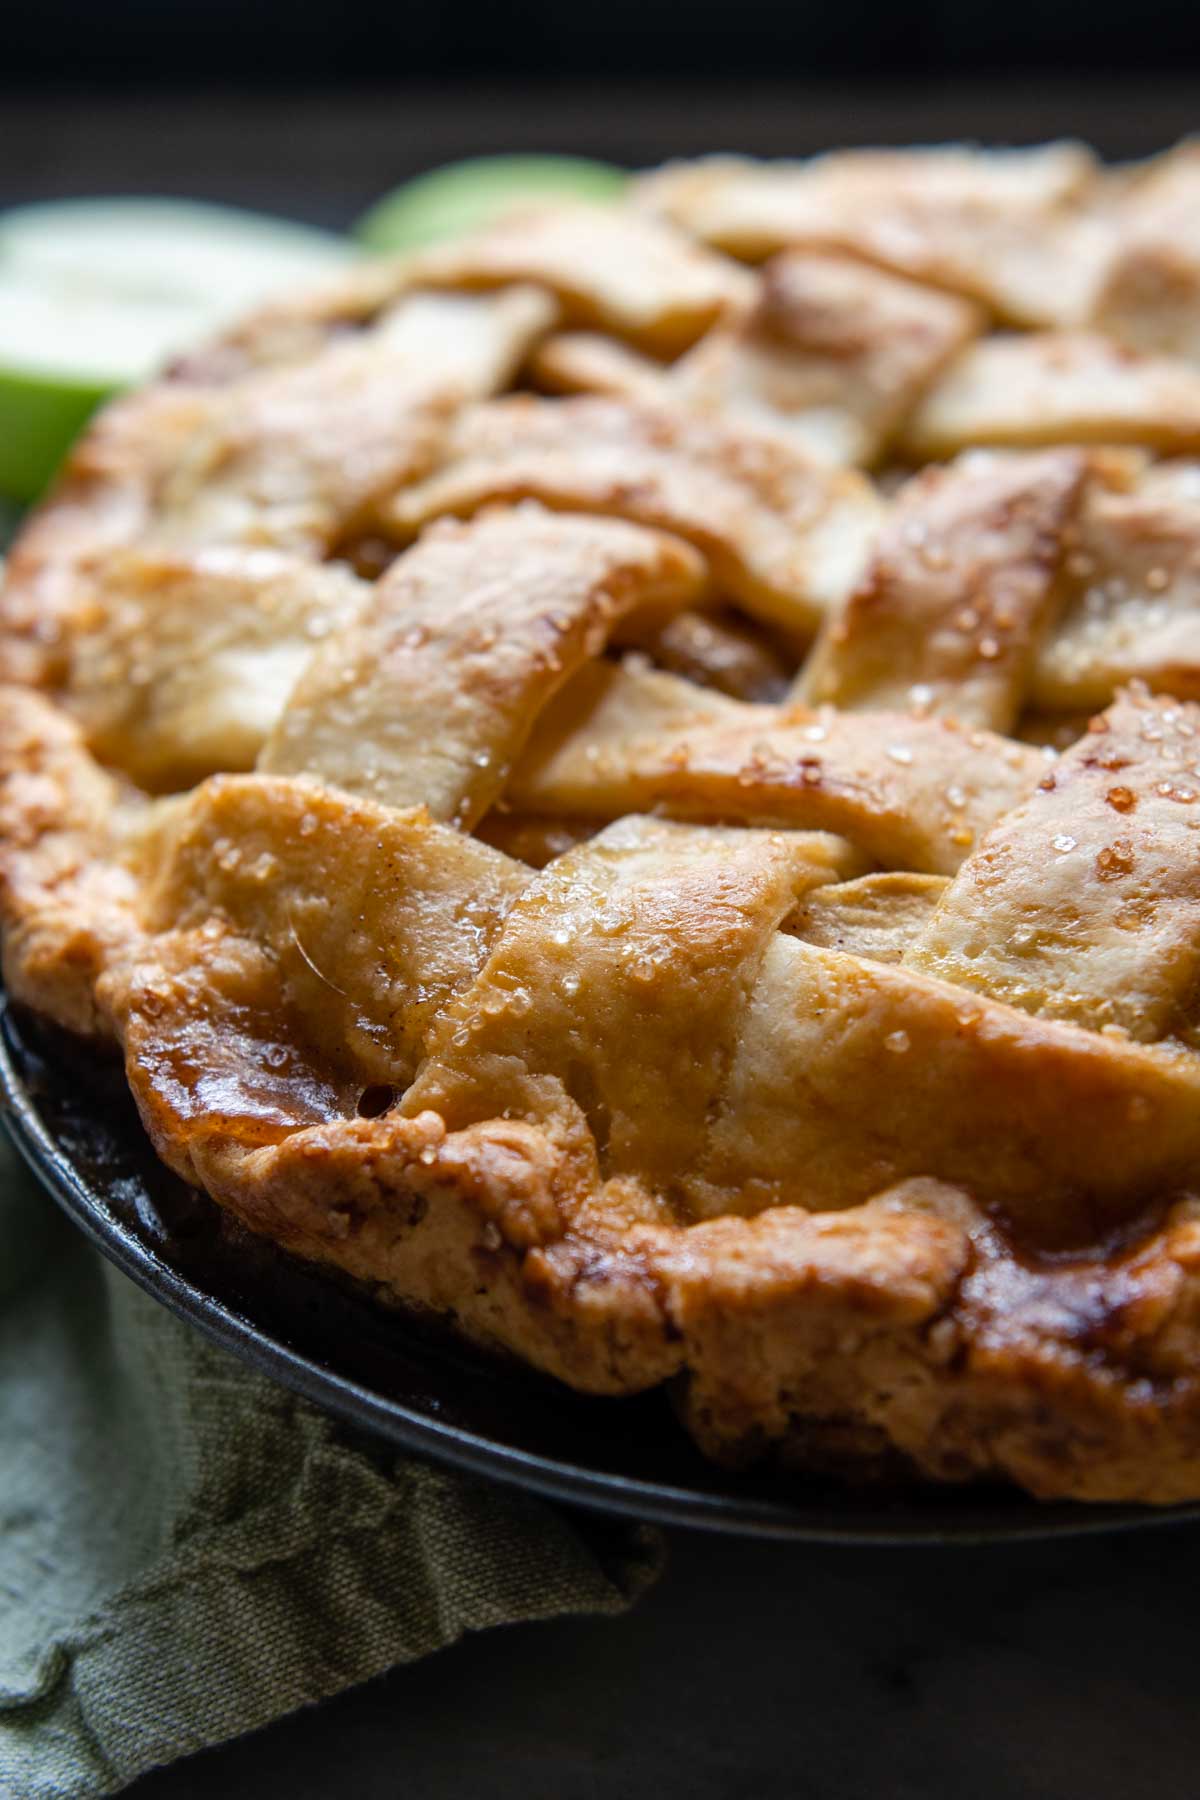
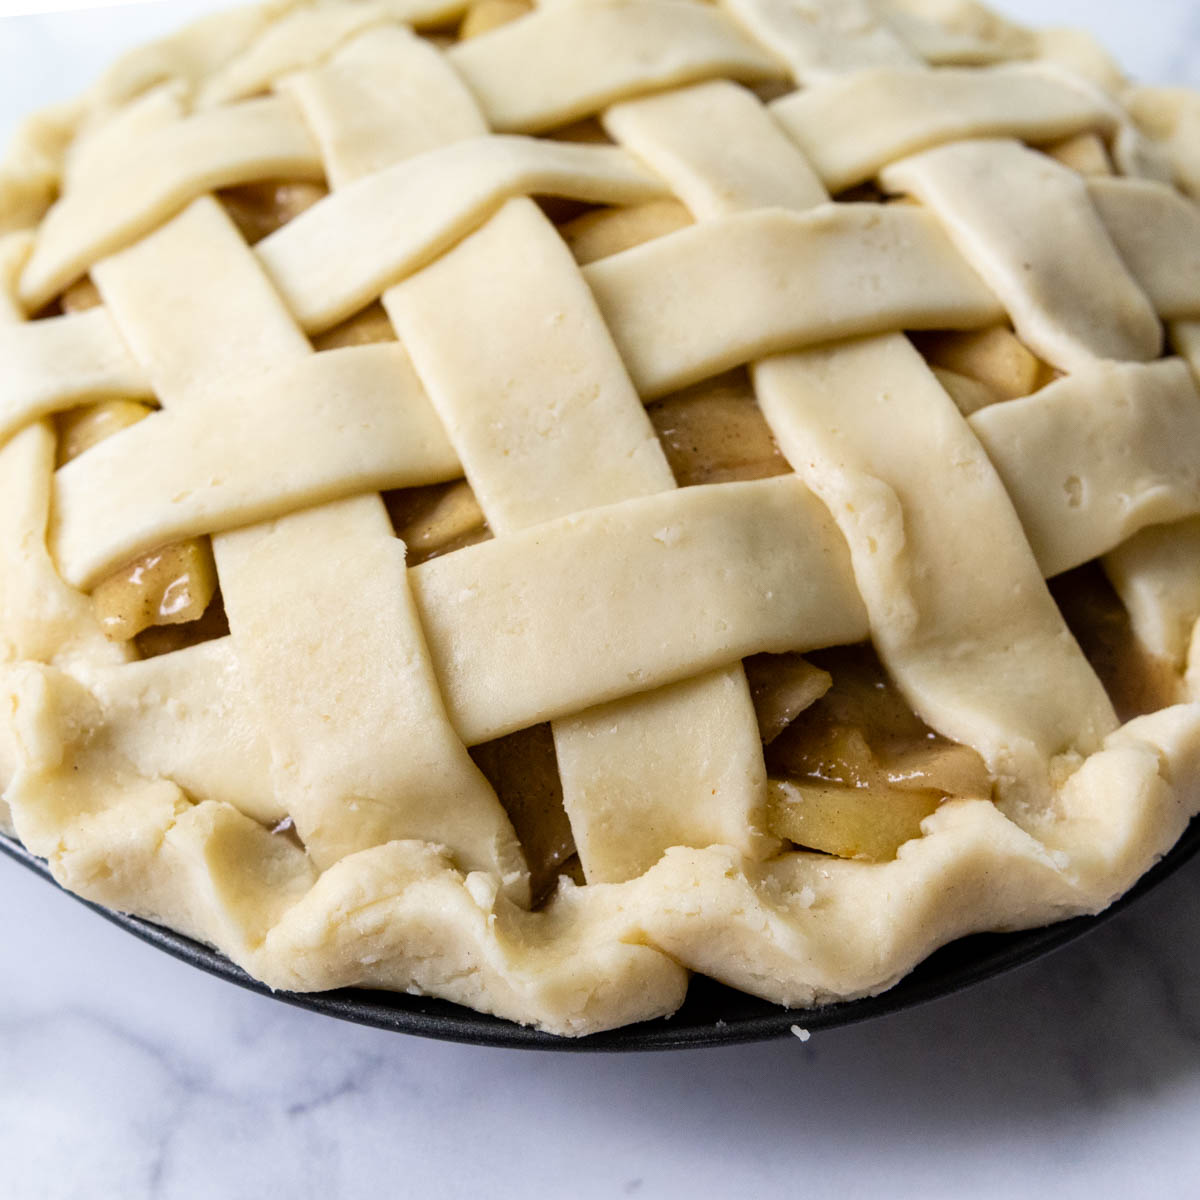
- Fold the excess dough edges under, sealing the lattice crust strips with the bottom crust. Use your finger and thumb to make a decorative edge. Freeze the pie for 15 minutes before baking. For a shiny, sugared crust brush with an egg wash and sprinkle with coarse sugar crystals before baking.
How to Make a Double Crust:
- Invert the top crust over the filling. If necessary, trim the edges so there is an even ½ inch overhang all around the edges.
- Seal the top and bottom edges together, tucking under, and then use your finger and thumb to make a decorative edge. Freeze the pie for 15 minutes before baking.
- For a shiny, sugared crust brush with an egg wash and sprinkle with coarse sugar crystals. Before baking, cut 3-4 slits in the middle so steam can escape as the pie bakes.
Baking Tips for Crispy Bottom Crust (Not Soggy)
For an apple pie, especially a mile high, deep dish variety, I wanted to make sure the crust held up to the filling with a golden, crispy bottom. This requires a little extra finesse when making an apple pie with a gluten-free crust.
GF pastry dough has a harder time absorbing fat, which is where the common problems of dense crust or soft bottom layers comes from. Fortunately it’s not hard to rectify this problem using the easy tricks below!
- Be sure the pie is well chilled before going in the oven. Freezing for 15 minutes before does the trick. It’s important to bring the fat (butter) back down to a cold temp before baking.
- While the oven is preheating, place a metal baking sheet in the oven, which the pie will sit on to bake. The extra heat from the pan reflects into the crust, making it crisp.
- For best results use a deep dish metal pie pan, rather than glass or ceramic. When coupled with the heated baking sheet, you are guaranteed great results.
- Start at a high oven temperature for first half of baking time. With the cold butter, hot metal baking sheet and pie dish, it crisps the crust quickly. Finishing baking at a slightly lower temp.
- Use a silicone pie shield to protect the outer crust. While we are using excess heat to crisp the bottom and sides, you do not want the edges to become overly browned and tough.
Make-ahead and storage tips
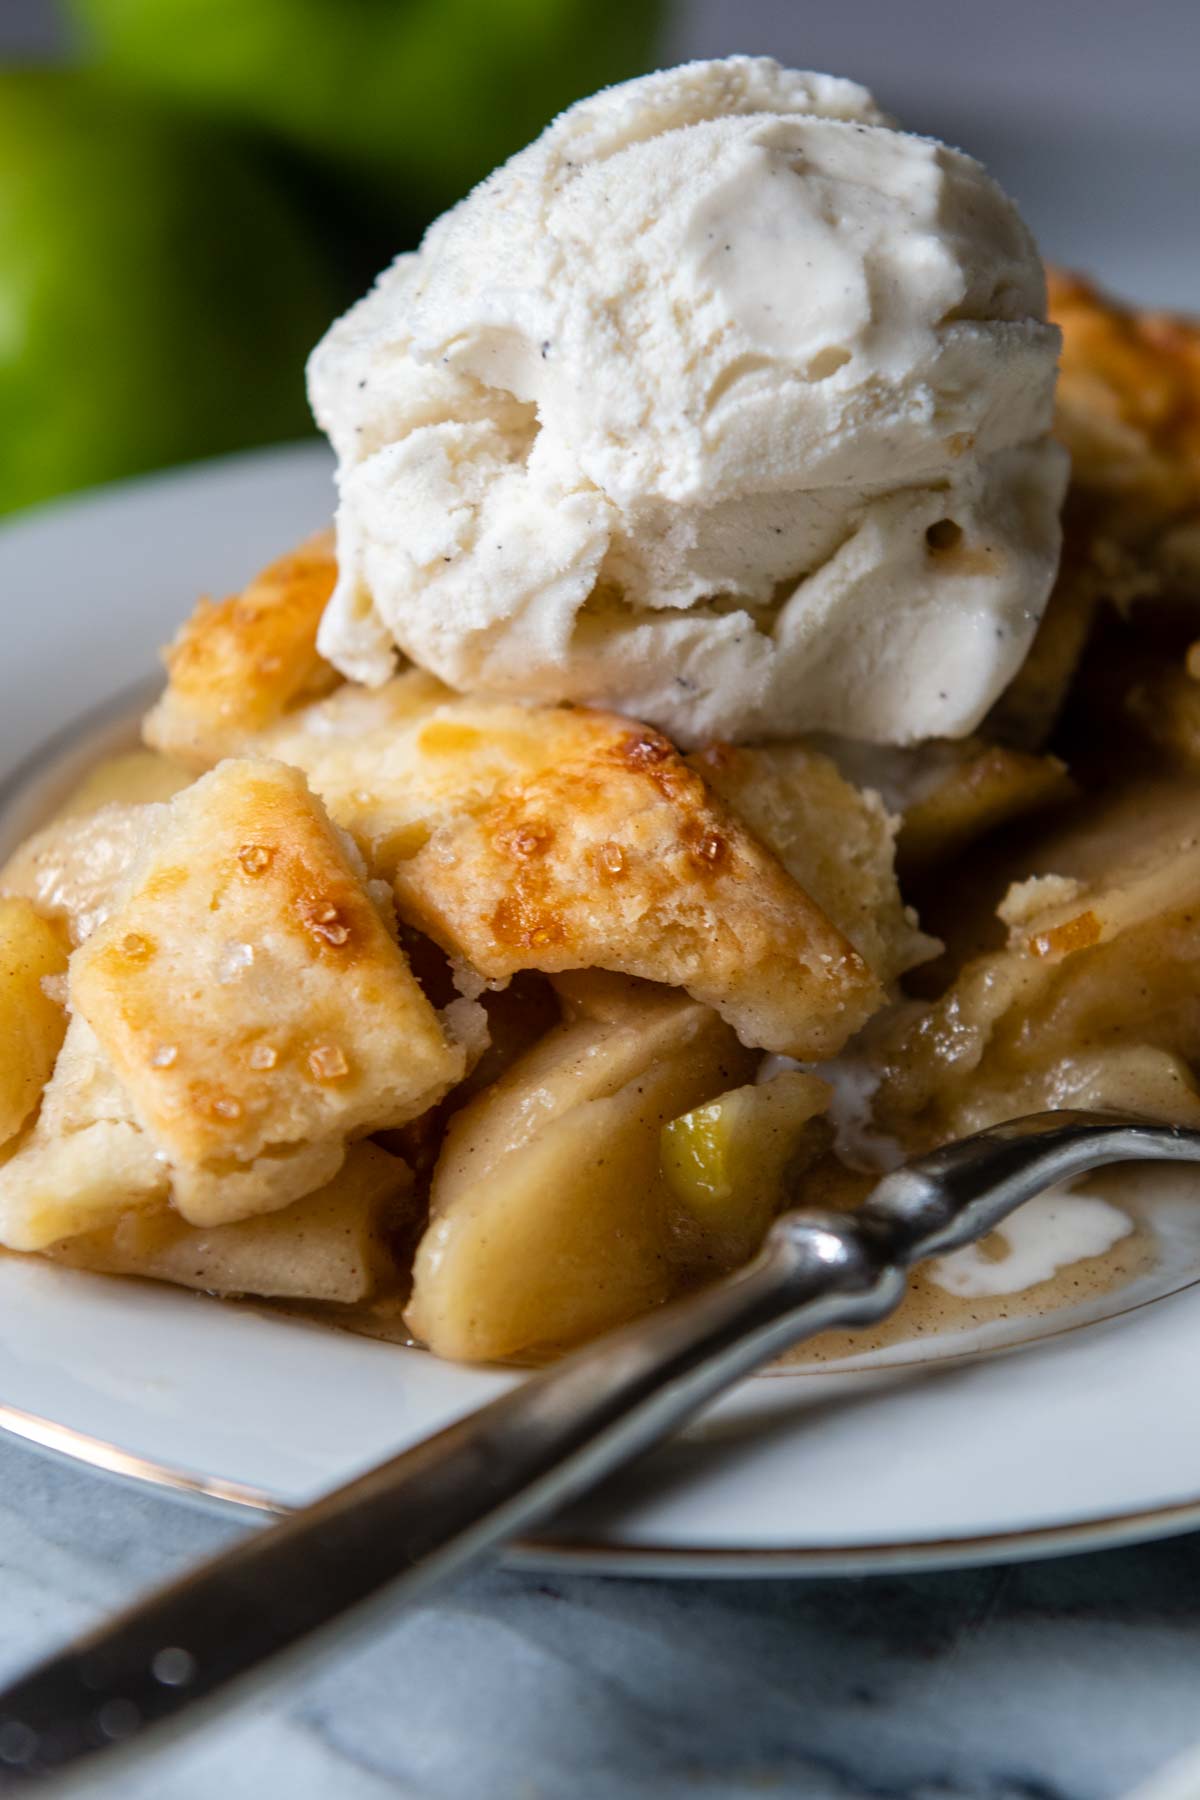
For maximum flakiness, enjoy an apple pie with a gluten-free pie crust the day it is made. The crust becomes softer after 24 hours as it absorbs the moisture from the apples.
Since this pie requires a long baking and cooling time before serving, it may not be possible to make the day you want to serve it. No problem, there’s an easy solution!
For a make-ahead apple pie, follow the recipe for assembly until right before baking. Freeze until solid and then wrap securely with plastic wrap and foil. Return to freezer up to 2 months.
When ready to serve, bake directly from frozen, do not thaw. Unwrap the pie and bake as directed with the preheated baking sheet. Once the oven temperature is lowered, it will required about 10-20 minutes additional baking time. Be sure the edges are covered with a pie shield and foil loosely tented over the top.
When storing leftovers, leave at room temperature and loosely tent foil over the top, not securely, so moisture can escape. Enjoy within 3 days, but the crust will became softer on days 2 and 3.
Save this recipe for Gluten-Free Apple Pie to your pinterest board!
Let’s be friends on Pinterest! I’m always sharing great recipes!

Homemade Gluten-Free Apple Pie (No Soggy Bottom!)
Ingredients
Gluten-Free Lattice Crust
- 2 sticks (113.6 g) (16 tablespoons) unsalted butter, cut into cubes and frozen for 10 minutes
- 5 tablespoons (2.5 tbsp.) ice water
- 3 tablespoons (1.5 tbsp.) sour cream
- 3 teaspoons (1.5 tsp.) apple cider vinegar
- 2 ½ PLUS ⅓ cup (184 g) (13 ounces weight total) gluten free flour, I highly recommend Cup4Cup gluten-free flour
- 3 teaspoons (1.5 tsp.) sugar
- 1 teaspoon (0.5 tsp.) salt
Gluten-Free Apple Pie Filling
- 5 pounds apples, cored, peeled, and ¼" slices, see recipe notes for best variety
- ⅓ cup granulated sugar
- ⅓ cup light brown sugar
- 3 tablespoons butter, chopped
- 1 ½ tablespoons lemon juice
- 1 ½ teaspoons ground cinnamon
- ¼ teaspoon ground allspice
- ¼ teaspoon ground nutmeg
- ⅛ teaspoon salt
- 2 tablespoons cornstarch
- 2 teaspoons vanilla extract
- eggwash: 1 egg whisked with 1 tbsp milk
- optional coarse sugar, for sprinkling on crust
Instructions
Gluten-Free Double Crust
- Place the cubed butter in the freezer for 10 minutes. Mix together the cold water, sour cream, and vinegar in a small bowl. Place the liquids bowl in the refrigerator until you are ready to use.2 sticks (16 tablespoons) unsalted butter, 5 tablespoons ice water, 3 tablespoons sour cream, 3 teaspoons apple cider vinegar
- FOOD PROCESSOR: Pulse flour, sugar, and salt together until mixed.BY HAND: Whisk dry ingredients in medium-sized bowl.2 ½ PLUS ⅓ cup (13 ounces weight total) gluten free flour, 3 teaspoons sugar, 1 teaspoon salt
- FOOD PROCESSOR: Process the butter into the flour mixture until well incorporated, evenly dispersed, and without large chunks.BY HAND: Use a pastry blender, fork, or fingers to cut and knead butter into the dough until it is well incorporated throughout.
- FOOD PROCESSOR: Add the liquids to the food processor and pulse until the flour becomes moistened and small dough clumps appear. If dough doesn't start to come together, add a touch more cold water. BY HAND: Add half the liquids and knead with fingers or a fork. Pour in the remaining liquids. Knead until the dough starts to come together and the liquids are well mixed with flour.TIP: To check if you have enough liquid, clump and flatten a small bit of dough. If it doesn’t stick together, is crumbly, or breaks apart easily, add a small dash of ice water. Pulse a few times and recheck. If the dough is too wet or sticky, add a dash of flour. Pulse a few times and recheck.
- Divide the dough between 2 large sheets of plastic wrap and flatten into a thick 1" disk. Wrap tightly and refrigerate for at least 1 hour or freeze for 30 minutes.
Apple Pie Filling
- While the pie dough is chilling, prepare the filling. In a large Dutch oven or pot, combine the apples, sugars, butter, spices, salt, and lemon juice.5 pounds apples, cored, peeled, and ¼" slices, ⅓ cup granulated sugar, ⅓ cup light brown sugar, 3 tablespoons butter, 1 ½ tablespoons lemon juice, 1 ½ teaspoons ground cinnamon, ¼ teaspoon ground allspice, ¼ teaspoon ground nutmeg, ⅛ teaspoon salt
- Cook over medium heat, uncovered, stirring occasionally for 15 minutes. The apples should be slightly softened, but not breaking down or losing their shape.
- In a small bowl mix together the cornstarch with 2 tablespoons water. Pour into the apple mixture and cook for another 2 minutes, or until thickened. Remove from heat and stir in the vanilla.2 tablespoons cornstarch, 2 teaspoons vanilla extract
- At this point the filling will have to completely cool before transferring to the pie crust. Either let it sit out for 1 hour, or for quicker cooling, transfer to a baking sheet and place in the refrigerator.
Shaping Crust and Baking
- Preheat the oven to 400ºF. Place a baking sheet, lined with parchment paper or foil, on the middle rack. The baking sheet heats, along with the oven, to place the pie on. The metal conducts the heat better, which makes a crisp bottom crust. The foil or parchment catches drips, saving you clean up!
- To roll the pie dough, lay a large piece of parchment paper on your workspace. Place one unwrapped dough disc in middle and place same sized sheet on top. Alternatively, use the pastry rolling bag pictured in the post. Use a rolling pin to press and spread out down from the middle out. Roll out into a circle slightly larger than your pie dish, about 11-12 inches.
- Remove the top paper, and invert onto pie dish. Press the dough to fit securely against the pie plate. Remove the second paper. Tip: If the dough warmed while rolling, it may be trickier to take the paper off. If this happens, leave the paper on, and stick the whole thing in the fridge for 5-10 minutes. Once the crust is chilled again it's much easier to pull off the paper.
- Pour the cooled pie filling in the bottom crust and place the pie in the fridge while you repeat the rolling process with the top crust.
How to Make Lattice Crust
- Roll out the second disc into a 12-inch circle. If using the pastry rolling bag, invert the rolled crust onto a piece of parchment paper for cutting. Use a pizza cutter or knife to slice the dough in twelve 1-inch strips. Lay 6 strips, evenly spaced, across the pie. Use the shorter strips at the ends, longer strips towards the middle.
- Fold back 3 alternating strips almost all the way off of the pie. Take one unsused strip and lay it right against where the strips are folded back. Return the strips back over the pie so they cover the strip just placed.
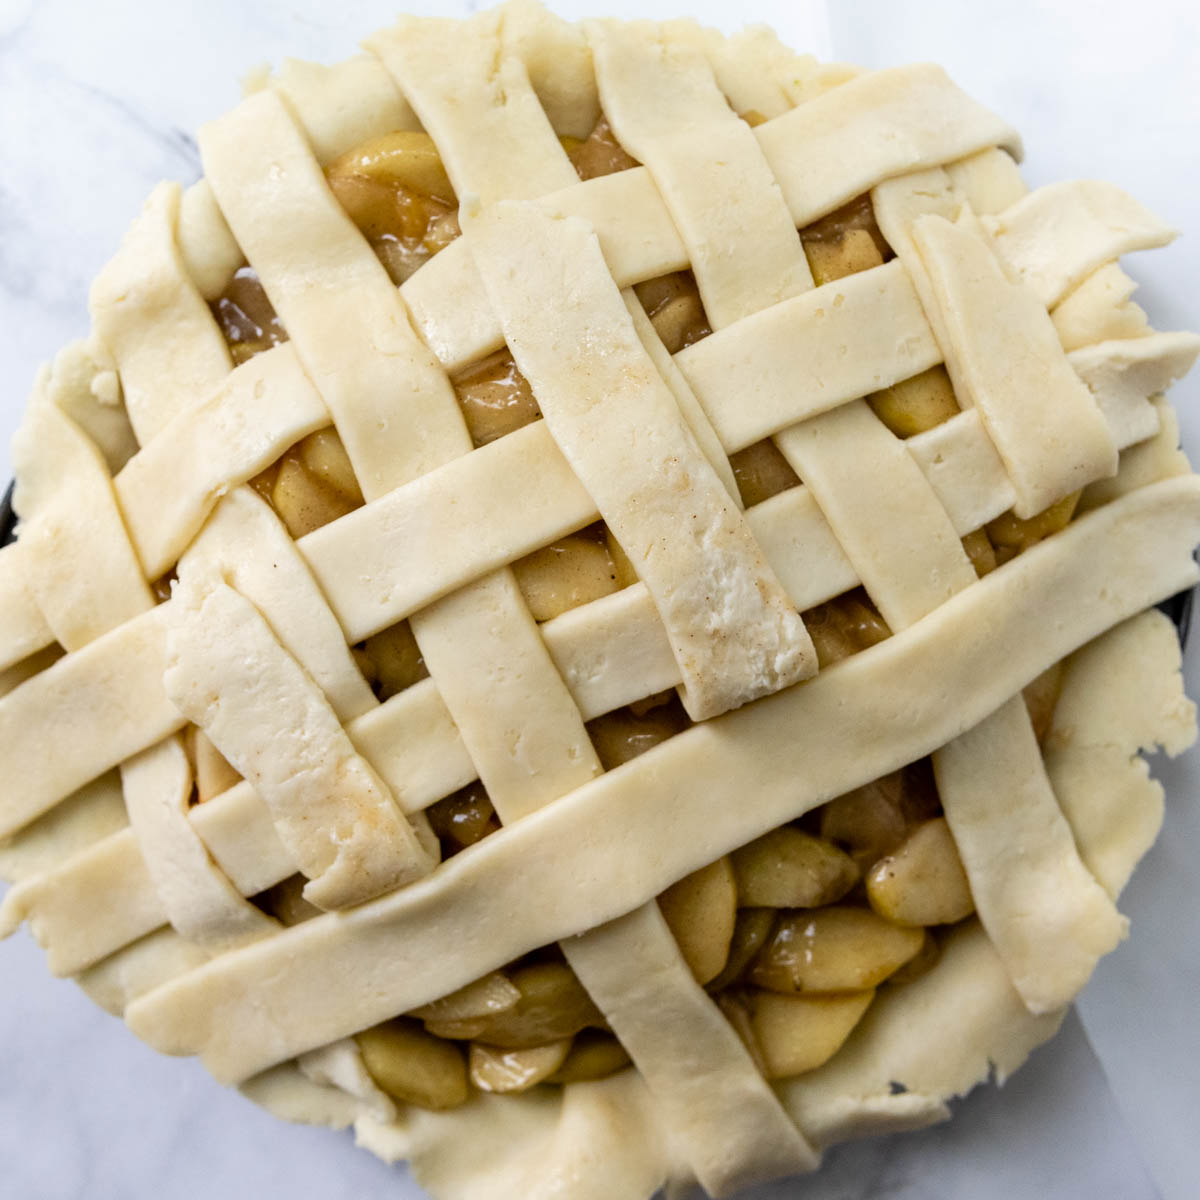
- Fold back the other 3 vertical strips. Take another usused strip and lay it against where the strips are folded back. Return the vertical strips back over it. You will start to see the woven pattern. Repeat process with remaining strips.
- Fold the excess dough edges under, sealing the lattice crust strips with the bottom crust. Use your finger and thumb to make a decorative edge. Freeze the pie for 15 minutes before baking.
How to Make a Double Crust
- Roll out the second disc into a 12-inch circle. Invert the crust on top of the filling. If necessary, trim the edges so there is an even ½ inch overhang all around the edges. Seal the top and bottom edges together, tucking under, and then use your finger and thumb to make a decorative edge. Freeze the pie for 15 minutes before baking.
Baking Instructions
- After the pie has chilled in the freezer, brush on the egg/milk mixture on the top crust and edges to make a shiny crust. Sprinkle with the optional coarse sugar. If using a double crust, cut 3-4 slits in the top for steam to escape.eggwash: 1 egg whisked with 1 tbsp milk, optional coarse sugar
- Use a pie shield to protect the edges or shield with strips of foil circled around. Place the pie directly on the heated baking sheet. Bake for 35 minutes.
- Leave the pie in the oven, but lower the temperature to 375℉. If the crust is becoming too browned, loosely tent a piece of foil over the top. Continue to bake for 30-40 minutes, or until the juices start to bubble throughout the vents.
- Cool the pie on a wire rack for at least 3 hours before slicing. This allows enough time for pie to cool and the sauce to set. It's best served the same day or see recipe notes for make-ahead tips.
- DID YOU MAKE THIS RECIPE?? DON'T FORGET TO LEAVE FEEDBACK AND/OR CLICK A STAR RATING ON THE RECIPE CARD
Notes
Recommended Apples
- Golden Delicious (preferred variety)
- Honeycrisp
- Granny Smith apples (very tart, so may want to pair with something else)
- Jonagold
- Braeburn
- Pink Lady
Make-Ahead and Storage Tips
For maximum flakiness, enjoy the day it is made. The crust becomes softer after 24 hours as it absorbs the moisture from the apples. When storing leftovers, leave at room temperature and loosely tent foil over the top, not securely, so moisture can escape. Enjoy within 3 days, but the crust will became softer on days 2 and 3. For a make-ahead apple pie, follow the recipe for assembly until right before baking. Freeze until solid and then wrap securely with plastic wrap and foil. Return to freezer up to 2 months. When ready to serve, bake directly from frozen, do not thaw. Unwrap the pie and bake as directed with the preheated baking sheet. Once the oven temperature is lowered, it will required about 10-20 minutes additional baking time. Be sure the edges are covered with a pie shield and foil loosely tented over the top.This post contains affiliate links. My opinions are always my own. If you purchase a product through an affiliate link, I make a small commission – at no cost to you. Read full disclosure policy here.


This has become my go-to crust. I have used it for apple pie, peach pie, and chicken pot pie. It is sooo good that even my gluten-eating family members said it was their favorite crust and could eat it alone! I also used this apple pie recipe and it’s perfect. I added some cranberries for the holiday. Delicious!
Thank you so much for this, America! This makes me immensely happy, especially the part about non-GF family members!
Best,
Melissa
I am relatively new to gluten free baking AND I have never been great at making pie crusts. I had very little confidence that this recipe would turn out.I was absolutely shocked when it was the very best pie I’ve ever made! My whole family (even those who aren’t gf) raved about this crust. Thank you for sharing this recipe!!
Thank you so much, AJ! I really appreciate you taking the time to let me know! This is the best thing to hear. 🙂
Best,
Melissa
This crust is SO good! My family couldn’t even tell it was gluten free!
Yes! That is the best compliment ever to hear! Thank you so much, Ashley.
Best,
Melissa
I can’t have dairy,any sub for the sour cream?
Hi Sheryl,
You can use plant-based yogurt as a substitute. Hope this helps!
Best,
Melissa
Well, no matter the flour, I gave up on bottom crusts altogether. Until I decided to take you up on this flaky crispy apple pie crust. I only had Bobs 1-1 so had to use it. I went the extra mile with the pink lady filling, already had them cut in fridge, yeah.
Used recipe to the t. Cooled the thickening apples outside in the cold, added them to the frozen crust, had to add about 20 or so minutes for it to thicken for my taste, and voila. Cool down was torture! It was delicious! Definitely crispy, especially the edge which disappeared after my picture
Thanks so much.
This makes me so happy, Charlene! I hope you have found your new go-to pie crust recipe! Your comment made my day 🙂
Best,
Melissa