Learn how to make amazing homemade chocolate bark this holiday season! This easy bark recipe has everything you need to know about making milk or dark chocolate candy bark with tons of tips, tricks, topping ideas, and problems solved!
Want to Save This Recipe?
Enter your email below & we'll send it straight to your inbox. Plus you’ll get affordable and easy gluten-free recipes delivered each week!
Perfectly Set Chocolate Bark in Only 5 Minutes
Making the best, homemade chocolate bark recipe is as easy as picking the right chocolate and using a simple method for melting so it’s crisp, crunchy, smooth, and glossy. It makes an easy homemade gift idea for Christmas, festive treat for holidays, or a quick sweet treat when you need a chocolate fix.
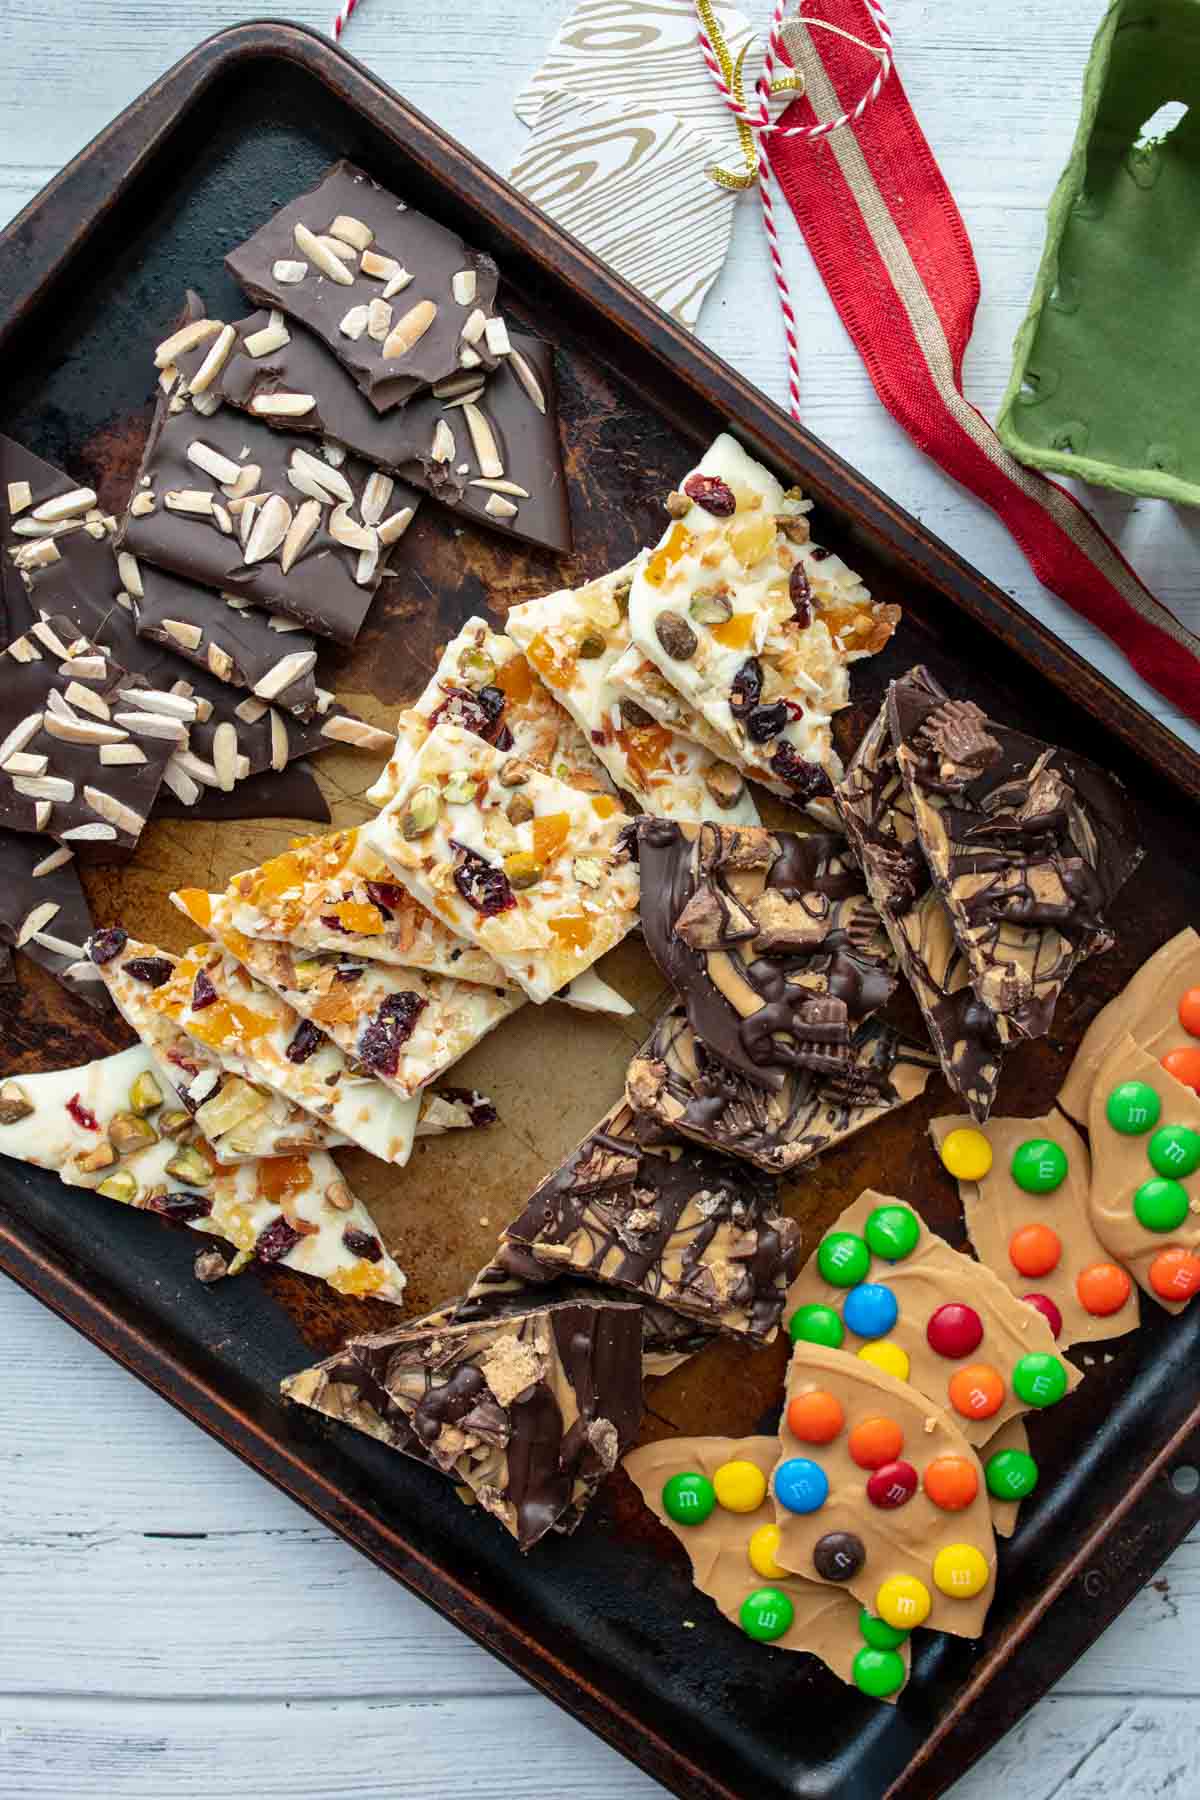
There are endless variations, toppings, and flavors, so much so, it’s hard to choose just one version. So don’t! Some of my favorite bark mix-ins are listed below, but please leave a comment below if there is anything I missed.
Can a one-ingredient dessert be considered a “recipe?” I vote yes. I find many versions offer vague instructions and leave a lot of questions unanswered. Unfortunately that opens the door for common problems, like white, spotty chocolate (known as “blooming”), soft chocolate that never sets, or grainy, separated melted chocolate (known as “seizing”).
It’s not complicated, though. It’s all picking the right chocolate to melt and going about it in the right way. You can even still do it in the microwave. I’ll show you how. 🤗
Best Chocolate To Use
Although chocolate chips are affordable and readily available, using any baking chips can be problematic because of the additives. They are manufactured to hold their shape, so they aren’t always ideal for melting chocolates.
Chocolatiers and gourmet recipes call for high-quality chocolate bars, but fail to name brands or where to locate this superior chocolate. 🤷♀️
Although I’m certain expensive chocolate would yield some great results, I find it a little unreasonable. A large selling point of making homemade gifts, like this or chocolate covered popcorn, is frugality, and high-quality chocolate is extremely pricey!
I’ve found a happy medium between these two options. Using quality chocolate chips with a higher percentage of cocoa makes fantastic chocolate bark, but is still affordable and available at local grocery stores.
If you love milk chocolate, rather than semi-sweet or dark, I recommend using a combination of milk and dark but with the brands listed below. Any of these chocolates would also work well easy homemade fudge as well.
- Guittard 63% Extra Dark Chocolate Chips
- Ghirardelli 60% Bittersweet Chocolate Chips
- Trader Joe’s Pound Plus Dark Chocolate Bars (54%)
- Valrhona 66% Chocolate
- Scharfeen Berger Semisweet Baking Chunks
Free Guide! 5 easy tips for baking like a gluten-free pro!
Simple hacks for fail-proof gluten-free dishes every time!
Let’s Make This Together!
(Below shows step-by-step photos and modified instructions. For the complete recipe, along with ingredient amounts, scroll down to the recipe card.)
Prep first, melt second.
First line a baking pan with wax paper or parchment paper. Get your toppings ready, by chopping nuts, pretzels, or candies to sprinkle on top. Now you’re ready to start melting!
Place two-thirds of the bag of chocolate in a microwave-safe bowl. Microwave until chips are completely melted. This will take about 2 minutes total, but watch carefully the last 45 seconds.
Add the remaining one-third of the bag of chocolate and stir to combine and melt. Continue to stir until all the chocolate is melted, smooth, and glossy. Let it sit a minute and stir again. It will eventually melt from the residual heat.

Spread and top with yumminess.
Pour the melted chocolate on the prepared rimmed baking sheet. Spread in an even layer and then scatter the toppings on.
Allow the chocolate to harden at room temperature for 2-3 hours. Either break in pieces or use a knife to cut. Enjoy!


Why Tempering Chocolate Is Key!
Don’t let the fancy terms such as “temper” be discouraging. Tempering chocolate means melting chocolate to a temperature that breaks down the crystals in the cocoa butter. Although it may sound intimidating, it can actually easily be done in your microwave.
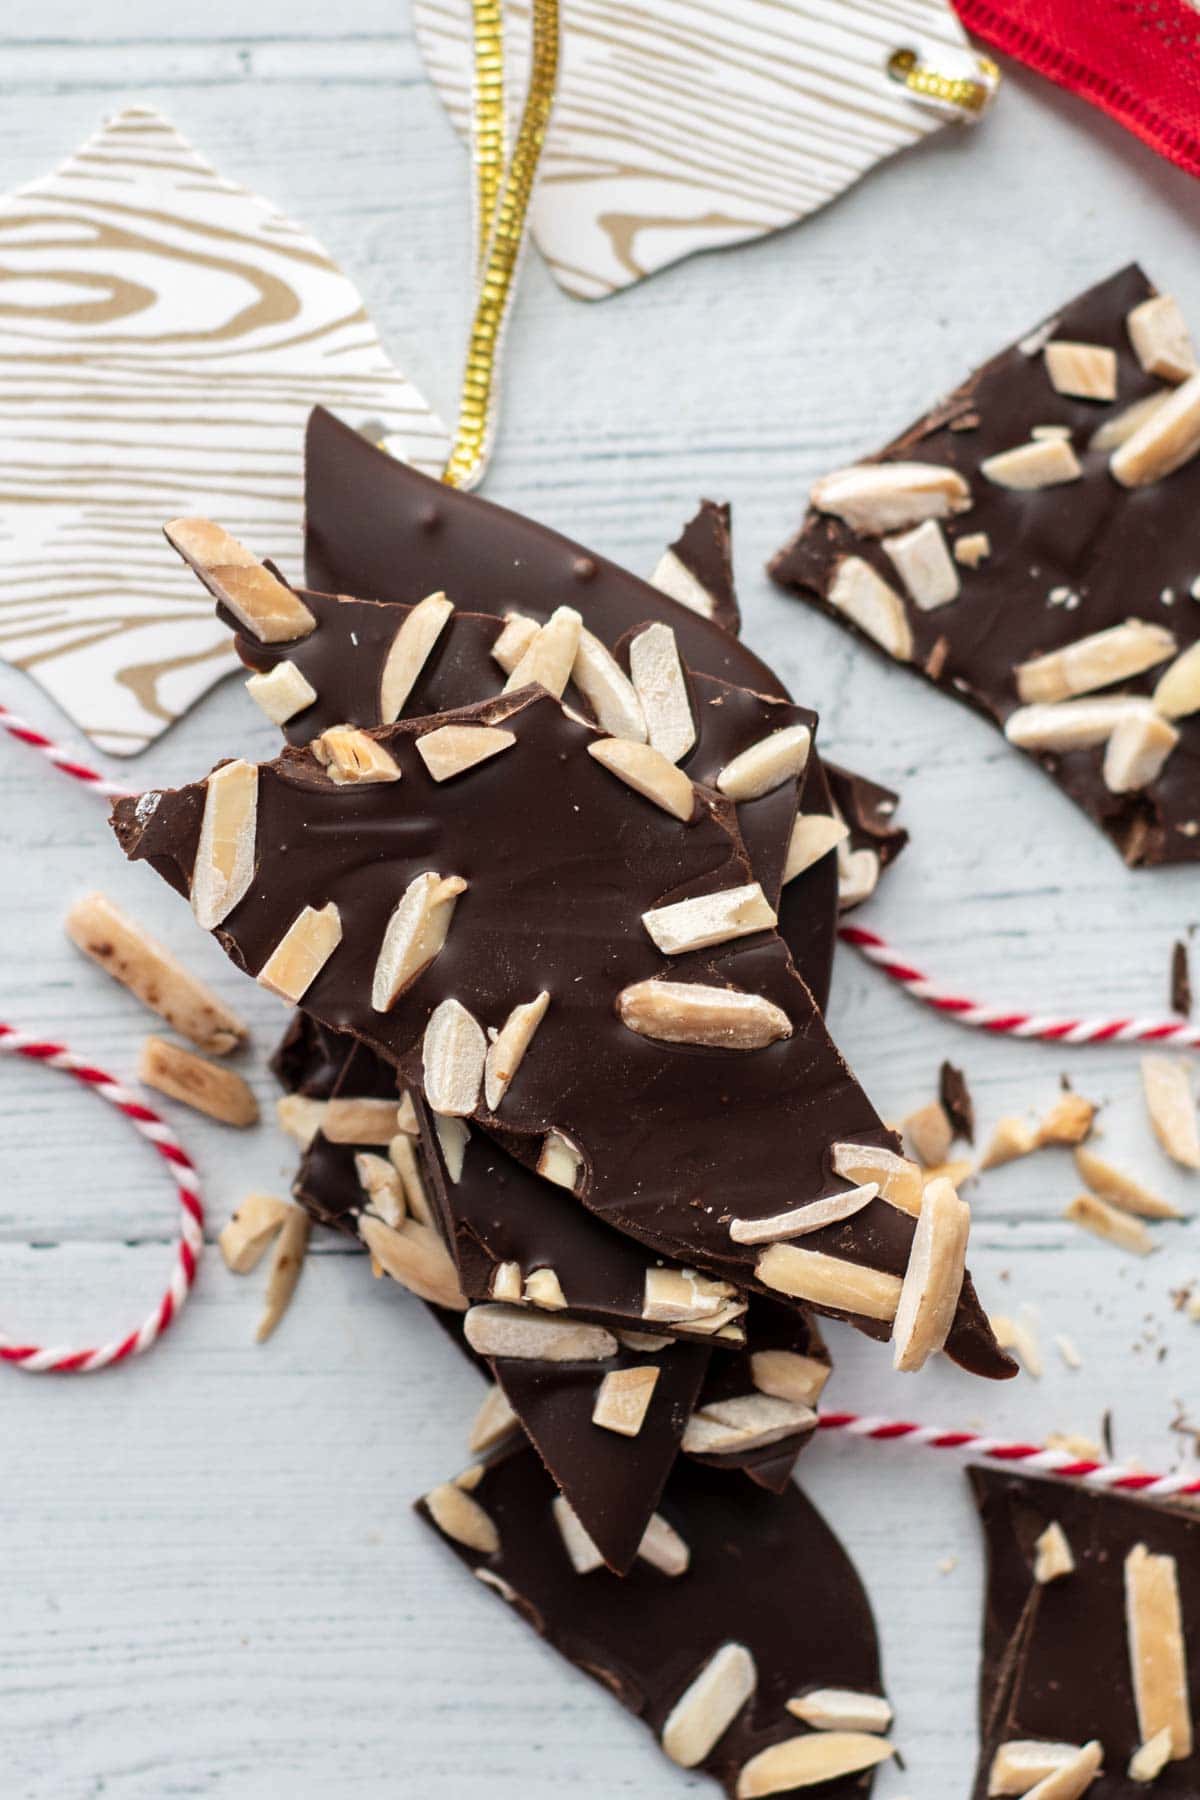
The benefit of tempering chocolate for bark is to give it shiny, glossy sheen. Chocolate that isn’t melted properly will be dull looking, streaky, or grainy. It will also be firm, break off with a snap, and hold it’s shape.
The recipe walks you through how to melt the chocolate for bark using an easy temper method either in your microwave or on the stove top.
Yummy Toppings – Best Part!
The possibilities are truly endless, but here are some popular favorites. Be creative as you want because, really, what doesn’t taste good with chocolate??🤔 Here are some of my favorite chocolate bark ideas!
- Rocky Road – peanuts and miniature marshmallows
- S’mores – graham crackers and miniature marshmallows
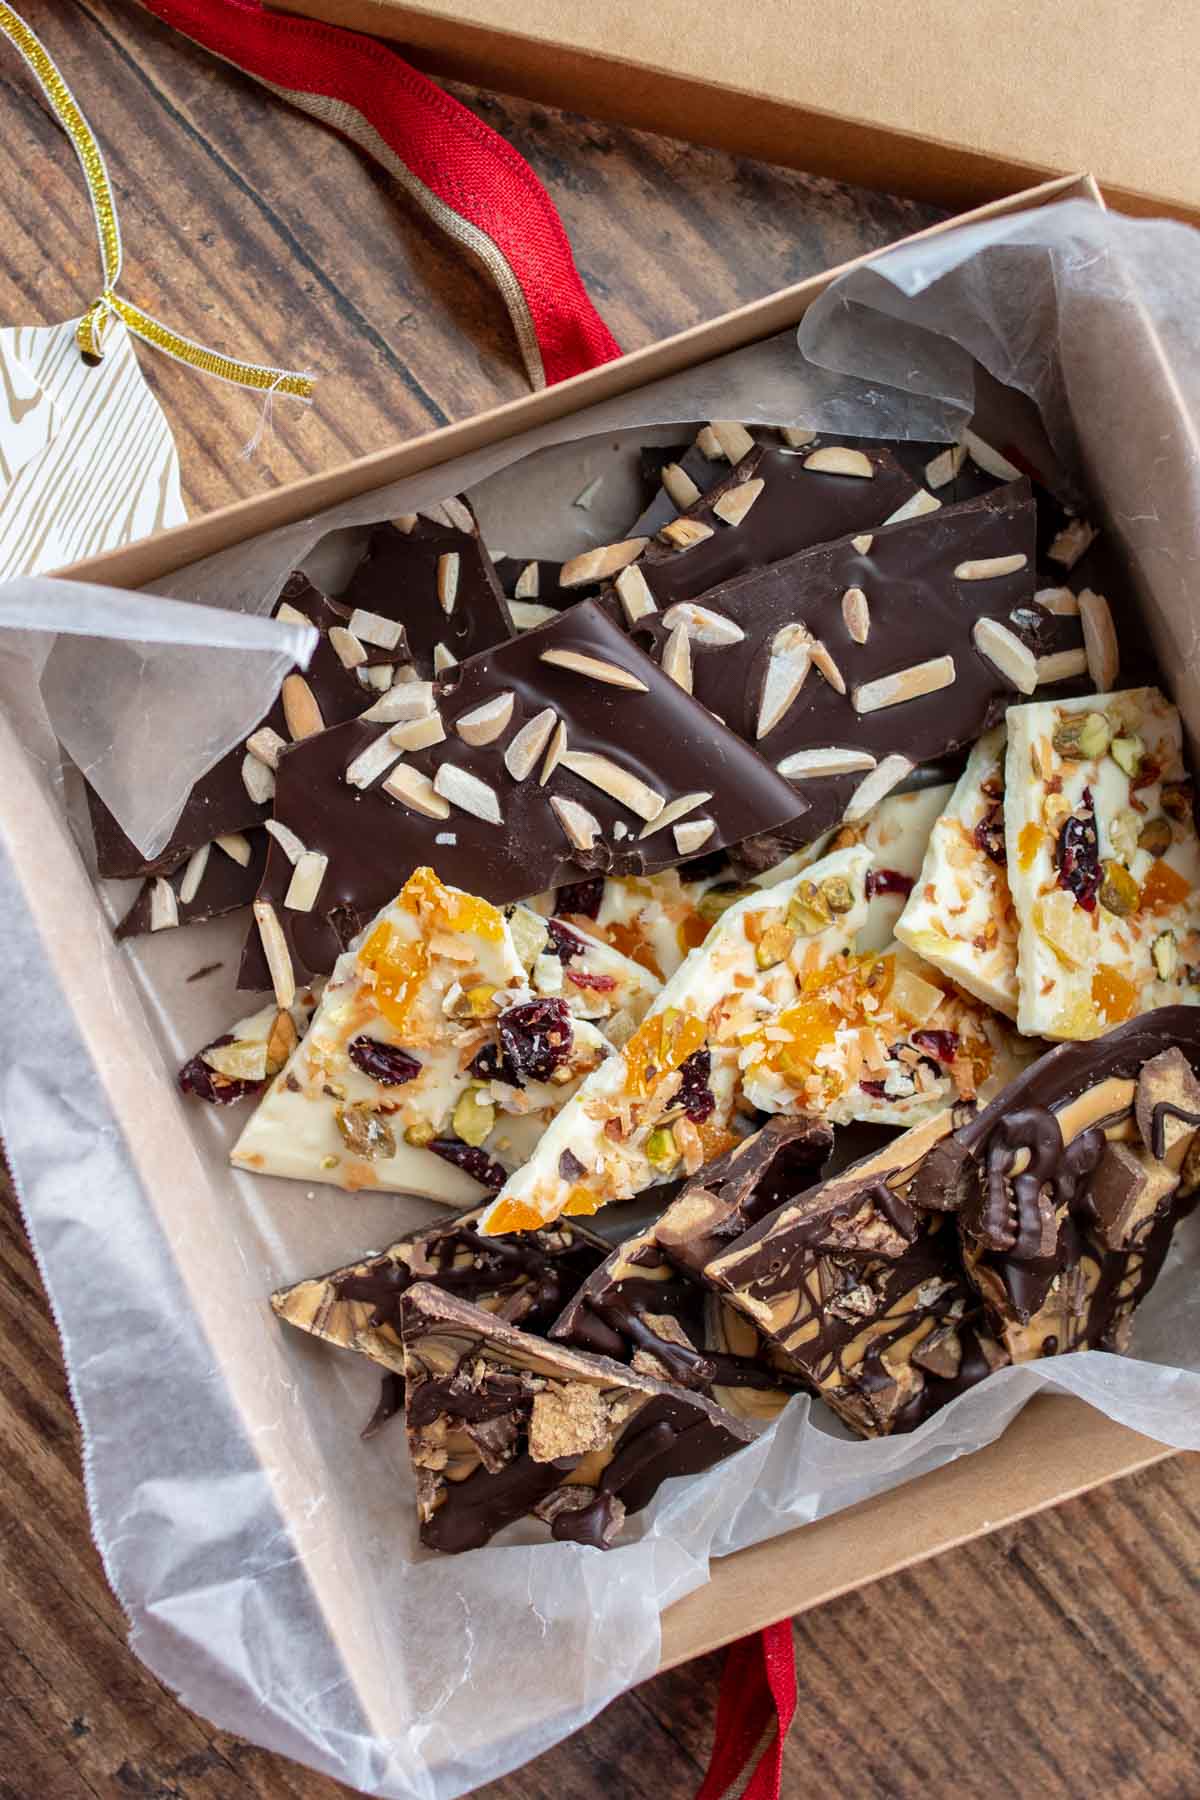
- Toasted nuts – pistachios, cashews, almonds, pecans, hazelnuts
- Candied Pecans
- Dried fruits, such as raisins, cranberries, apricots, cherries, or pineapple
- Candy – chopped Snickers, Reese’s peanut butter cups, Heath bars, Butterfingers, M&M’s, Reese’s Pieces, Rolos
- Toasted coconut flakes
- Crushed candy canes for peppermint bark
- Crushed Oreos, Nutter Butters, or chocolate chip cookies
- Pretzels
Did you end up with soft bark? If nothing extra was added to the melting chocolate, such as oil or shortening, then perhaps the chocolate wasn’t heated to a high enough temperature to temper, or break down the crystals in the chocolate. The bark is still salvageable, though. Simply store in an airtight container in the refrigerator until ready to serve.
Save this recipe to your pinterest board!
Let’s be friends on Pinterest! I’m always sharing great recipes!
Did you make this recipe? I love hearing from you! Leave a star rating and comment below the recipe card. It helps others when searching for recipes and I appreciate feedback from our community. You will always hear back from me! -Melissa

No-Fail Chocolate Bark Recipe (Easy Pro Tips)
Ingredients
- 10-11 ounce bag 60% cacao chocolate chips, (see recipe notes for preferred brands)
optional toppings:
- nuts
- dried fruit
- toasted coconut
- chopped candy
- crushed candy canes
Instructions
- Line a baking sheet with waxed paper or parchment paper. Have the toppings chopped and ready to go. Set aside.
- Place two-thirds of the bag of chocolate in a microwave-safe bowl. Microwave on high in 15-30 second increments, stirring each time, until chips are completely melted. This will take about 2 minutes total, but watch carefully the last 45 seconds. (If using thermometer to take temperature it should read 110-115ºF / 43-48ºC)
- Add the remaining one-third of the bag of chocolate and stir to combine and melt. Continue to stir until all the chocolate is melted, smooth, and glossy. Don't be tempted to put it back in the microwave to finish melting added chips. Let it sit a minute and stir again. It will eventually melt from the residual heat. (If using thermometer to take temperature it should read 88-90ºF / 31-33ºC)
- Pour the melted chocolate on prepared baking sheet. Use an offset spatula to spread chocolate in an even layer, to about 1/4" thick. Immediately sprinkle on desired toppings.
- Allow chocolate to set and harden on counter. Do not break into pieces until chocolate is completely set, about 2-3 hours.
Notes
Recommended Chocolate To Use
If you love milk chocolate, rather than semi-sweet or dark, I recommend using a combination of milk and dark but with the brands listed below.- Guittard 63% Extra Dark Chocolate Chips
- Ghirardelli 60% Bittersweet Chocolate Chips<
- Trader Joe’s Pound Plus Dark Chocolate Bars (54%)
- Valrhona 66% Chocolate
- Scharfeen Berger Semisweet Baking Chunks
Stove Top Method
- Chop chocolate bars in fine pieces so it melts quickly.
- Place 2/3 of chopped chocolate in a double boiler. Make sure the water underneath isn’t boiling, just simmering gently. The water level shouldn’t be directly touching the top portion of the double boiler.
- Use a rubber spoon spatula to stir chocolate occasionally until it reaches a temperature of 110ºF.
- Remove the top portion of the double broiler with melted chocolate from the heat. Add the remaining 1/3 chopped chocolate to the the melted chocolate.
- Stir until remaining chocolate is melted. It will eventually melt from the residual heat. Ideally tempered chocolate should read a temperature of 88°F- 90°F.
How to Store
Once the chocolate is set completely and broke into pieces, store in an airtight container in a cool, dry place, ideally less than 70ºF. Properly tempered chocolate will keep for several weeks and doesn’t need to be refrigerated. If you have to store it in the refrigerator, make sure it’s in an airtight container to prevent moisture, smells, or condensation spoiling the chocolate.Expert Tips
- Make sure all your equipment is absolutely dry and free from any water droplets, otherwise your chocolate will seize and be grainy.
- Properly tempered chocolate will start to harden around the edges almost immediately.
- Be sure to spread the chocolate thinly, about 1/4″ thick. Using an offset spatula helps with getting the job done quickly and evenly.
- If your chocolate hardens, simply reheat using either technique for tempering chocolate, and use again.
- Have toppings ready to sprinkle onto melted chocolate. If the chocolate is starting to harden, press gently on the toppings to work into chocolate.
- Refrigerate for 10 minutes immediately after adding the toppings to set the chocolate.
- Don’t handle the bark to break into pieces until it’s fully hardened. Otherwise you’ll leave smudges or fingerprints on the chocolate.
This post contains affiliate links. My opinions are always my own. If you purchase a product through an affiliate link, I make a small commission – at no cost to you. Read full disclosure policy here.


What size baking pan?
Hi Janet,
You can just use a baking sheet. I use a half sheet pan, which is 13X18-inches.
Best,
Melissa
Looking at your pictures I’m intrigued by the peanut butter- chocolate bark with Reeses peanut butter cups. How do you do the two layers? Is the bottom chocolate layer done first, cooled and then a second layer (peanut butter) done next? It does look like there is a bit of a swirl in them. Also what do you use for the peanut butter layer? Lastly, do you have to do anything to keep the peanut butter cups from melting when putting them on top? {I guess I’m basically asking for your recipe on this one! :)]
Thank you!
Hi Rene!
I’d be happy to help, and I have the perfect answer for you! I actually published the steps and recipe for that is this Tiger Butter recipe. Enjoy!
Best,
Melissa
Can anything be done to repair 2 layer almond bark that separated?
Thanks!
Hi Diane,
I have never tried this, but you can try with a piece of it. Warm a oven to 150 and then turn off. Place the bark (on a baking sheet with wax paper) in the warm oven for 5 minutes to gently remelt. Then let it cool gradually at room temperature instead of the refrigerator. Fingers crossed!
Best,
Melissa
Hi Melissa,
Very happy with your article and it’s so nice you’re taking questions! 🙂
I would like to give the bark as a holiday gift and use the traditional brown boxes with a ribbon. I just wondered, do you need to store it in an airtight box? Or can you also wrap it in aluminium foil (like the stores) and keep it in the giftbox? (I might send some of them them out by mail).
Also I wondered, could you add pepermint essence drops to the melted chocolate, or would that alter the result, like that it turns out to fluid?
Thanks so much!
Hi Harriet,
The beauty of tempering chocolate correctly is that it holds up really well without having to really think about storage. As long as the chocolate won’t be damaged during transporting, you really don’t have to worry about it going “bad,” so it’s fine to wrap up as pretty as you want it for gifts.
For the flavoring, I would stick with flavoring oils because I’m not sure if the the alcohol-based extracts would seize the chocolate or not. Also, add the flavoring before tempering the chocolate, not after it’s melted. Hope this helps!
Best,
Melissa
Hi Lisa. I found you on google, after a long way search. Bcoz there aren’t much info about chocolate bark in my own country language. Thank you for sharing a very detailed stuffs and instructions about the chocolate barks.
Definitely I will practice it. I would like to sell this.
Good luck with selling and I wish you much success! I’m glad you found the article helpful. Let me know if you have any questions!
Best,
Melissa
Have you ever used pre-tempered chocolate like Foley’s wafers. We also have a small plastic tray designed for chocolate bark. I love using it because it always makes the perfect thickness of bark.
I enjoyed reading your recipe. My question is I’d rather have milk chocolate bark. What would you recommend for that please. Thank you
Hi Joe,
Of course, I’d be happy to help! For milk chocolate I would use Guittard or Ghirardelli milk chocolate chips, which you should be able to pick up at your local supermarket. If you have access to a Trader Joe’s they also carry a milk chocolate bar in a pound size that is very good. I’m not sure if it is stocked year round, though, or only during the holidays so I would call first. Hope this helps!
Best,
Melissa
Great advice throughout your article. So appreciated for my first time making bark – especially the advice on tempering! What a great variety of recipes! Thanks!
Thank you so much, Donna! I really appreciate it. Have a wonderful Christmas season.
Best,
Melissa
Hi Donna, This recipe sounds great! I haven’t made bark before and on the weekends my 5 year old Granddaughter comes over. I love doing crafts and baking with her. I would love to make this bark with her on the weekend and am wondering what you would think of Lucky Charms Cereal for St. Patrick’s Day! as the topping.
Thank you
Denise
Hi Denise,
I think that sounds like a perfect idea and would work great. What a fun activity to do with her! Let me know how it turns out.
Best,
Melissa
Hello.
I am interested in writing a guest post for your blog. Are you currently accepting guest post.
Regard’s Angela. For a guest post.
Hello. I have been experimentingwith barkLisa. A friend is having a party and whats to order some. How much do you charge for bark?
Hi Lisa, I don’t personally sell the bark, but I would first look at how much you are paying for your chocolate, which can be expensive. Figure out how much your chocolate is per pound and perhaps double that price? Hope this helps!
Best,
Melissa
I’ve not made this yet. However, I am rating it five stars on thoroughness of content. This is my kind of recipe – DETAILED in every aspect.
I can hardly to make this and enjoy the fruits of your labor……
Excellent work!
Hi Dave, Thank you so much for saying that. I really appreciate the recognition. Please drop me a line after you make it and let me know what you think!
Best,
Melissa
Hello,
Thank you for this! It’s incredibly helpful and easy to follow for non-bakers. I have a question, however, regarding how to do this successfully when the chocolate isn’t the “lower” base layer – i.e., its spread over something else (in this case, something warm.)
I make a “kosher for Passover” chocolate bark that is a big hit but I have some issues with the chocolate. It’s essentially a sheet of matzoh covered with melted toffee (melted on stove top, then poured over matzoh and put in the oven for 15 mins). Once out of the oven, I sprinkle a bag of chocolate chips over it and let the heat of the toffee-covered matzoh melt it. I spread the melted chocolate to cover the toffee, then sprinkle with sea salt and refrigerate.
The issue is that once I take the broken bark out of the refrigerator to put out for dessert, once room temperature the chocolate softens – it won’t stay hard.
My question is: unlike your recipe, I’m putting the chocolate on top of something that’s already warm. I can upgrade the chocolate I’m using and temper it according to your post before spreading it on the toffee-matzoh but how will the heat of the bottom layer impact tempering (i.e., even if I get the tempering right, will it get messed up because of the additional heat from what it’s being spread on?)
So how do I get the chocolate to stay hardened at room temperature?
– Should I let the toffee-covered matzoh cool to room temperature first and then spread the tempered chocolate on it?
– After I know how to spread the chocolate on top correctly, do I let it come to room temperature on its own or put it in the refrigerator?
Thank you!!!
Hi, Thanks for writing I’d be happy troubleshoot this with you. I’ve run into this problem before when making toffee. It uses the same method with chocolate chips but on hot toffee to melt. My chocolate would always bloom or separate cleanly off from the toffee when I tried to break it apart.
This past year I did it differently using the tempering chocolate method. Like you said, make the first layer, temper the chocolate, and then spread on top. It worked great and the my toffee didn’t bloom at all. So yes, I would cool down the toffee first. It doesn’t have to be completely room temperature, but no higher than the temp of the chocolate (90 degrees).
If you have properly tempered chocolate you can completely skip the refrigeration step. Once everything cools down the chocolate should break cleanly and not be soft. I would let it sit for a few hours, though, before breaking.
As far as the chocolate, it doesn’t have to be expensive. To be honest, I primarily just use the ghirardelli chocolate chips (listed in post), which are slightly more expensive than regular chocolate chips. I’ve also used Trader Joe’s big chocolate bars, but those might only be sold around the holidays.
Please let me know if you have any other questions!
Best,
Melissa
Hi thanks for such detailed process about tempering. The issue I am having is that my chocolate barks get soft after 10 mins of staying at room temperature, not sure what wrong I am doing.
Hi Shweta,
Does it get hard eventually? Or it could be the room it’s sitting in is too warm. If that is not the case, check your thermometer to make sure it’s properly calibrated. Put it in a glass of ice with a little bit of water. It should read 32 degrees fahrenheit. If not, you will know the difference of the actual temperature and what it is reading.
Best,
Melissa
The bark was a hit this season!!! I ate way too much if it myself, but hey. Thanks for all the great tips!
Thanks Sarah! I can say it was hit this way too. I probably ate my weight in it around the holidays.
This is the only way I love white chocolate. Otherwise I’m not a fan, but with the nuts and fruits…Yum!!
Thank you Megan! I can’t believe what a difference there is my bark from tempering the chocolate. It makes crazy good bark. 🤗