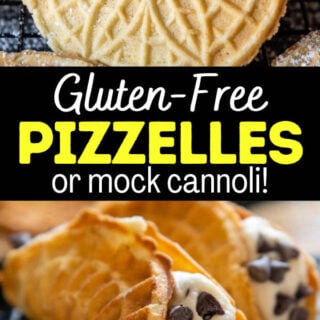
Learn how to make the best gluten-free pizzelle recipe and you’ll enjoy crisp, authentic Italian pizzelles in minutes! Discover expert tips, different flavorings, creative uses for gluten-free pizzelles, along with an easy dairy-free modification.
Want to Save This Recipe?
Enter your email below & we'll send it straight to your inbox. Plus you’ll get affordable and easy gluten-free recipes delivered each week!
Authentic Italian Gluten-Free Pizzelles
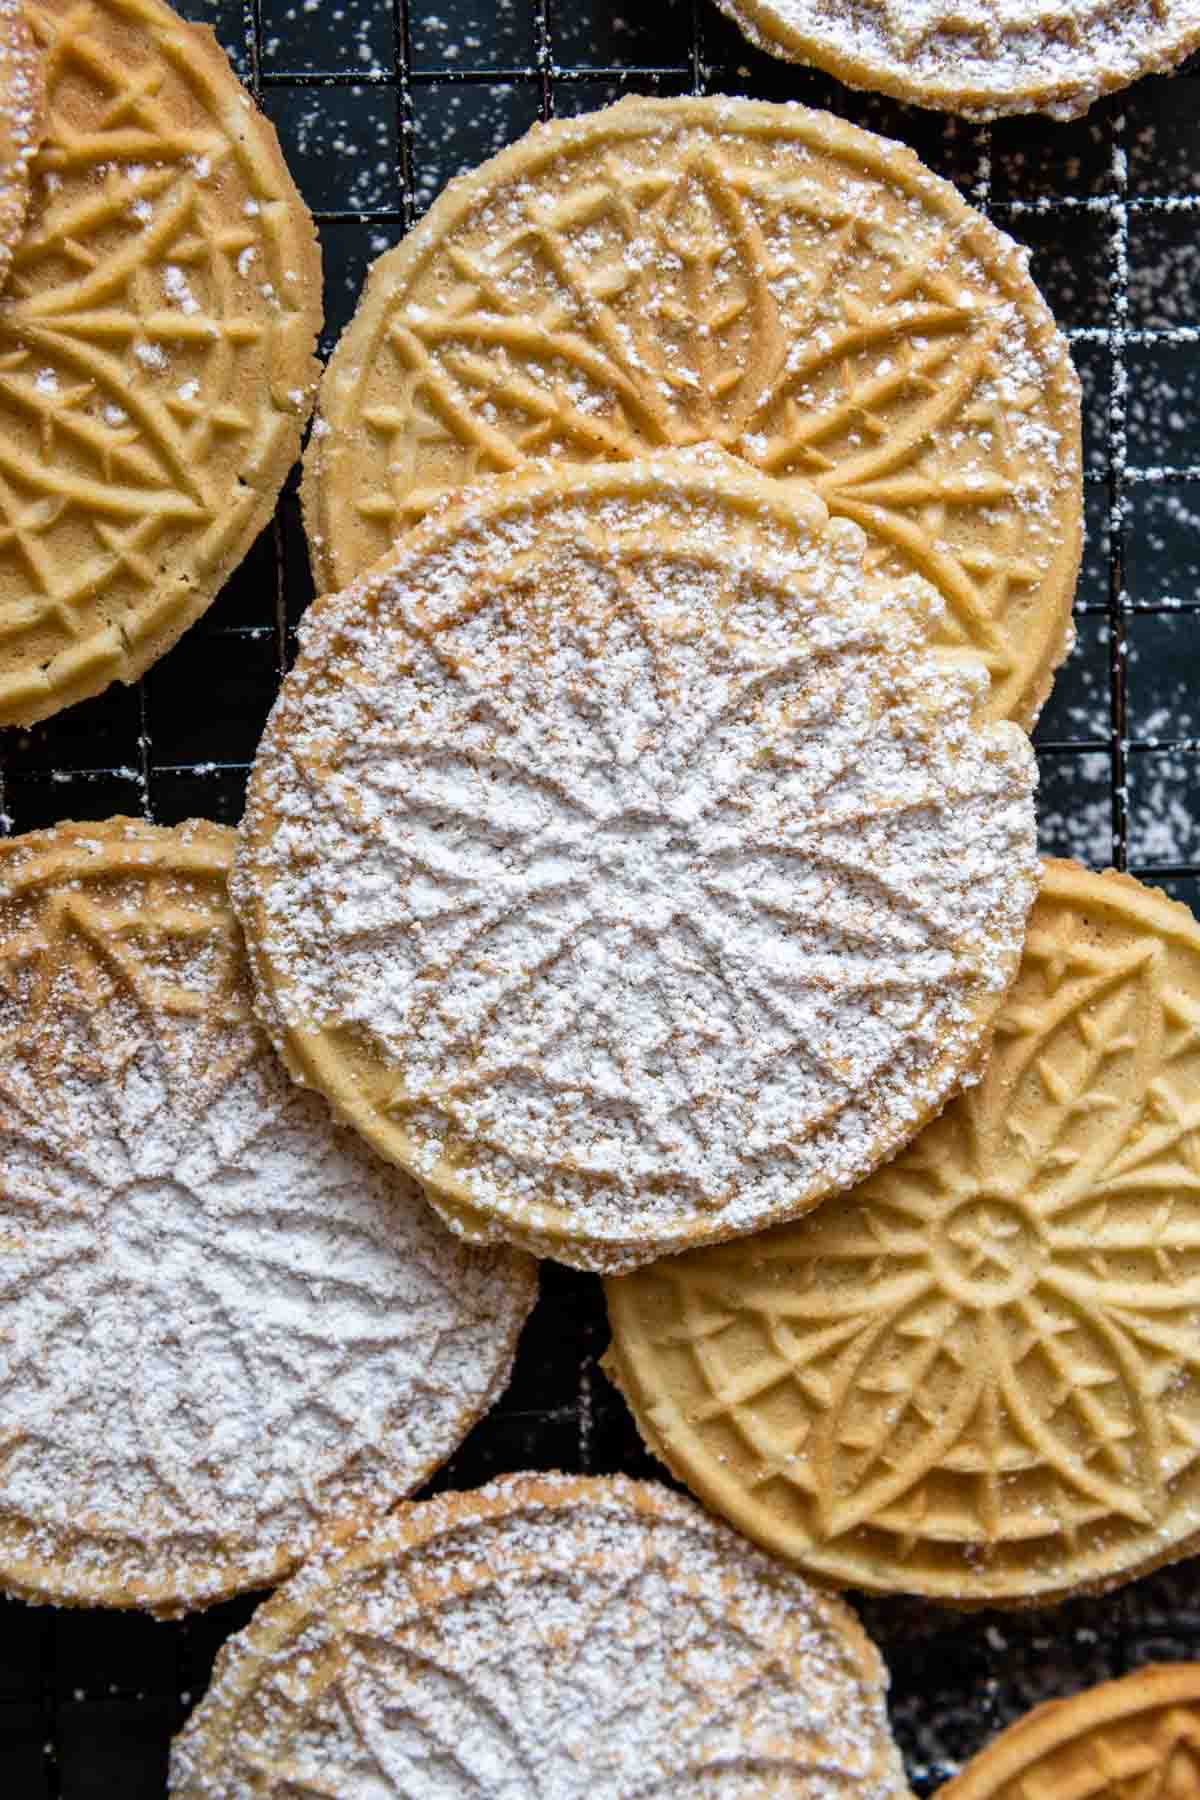
In my family, it wouldn’t be Christmas time without a stack of light and crispy homemade pizzelles covered in a thick dusting of powdered sugar. This gluten free pizzelle recipe keeps the tradition alive, but with a taste so authentic, no one knows the difference!
My first-generation Italian mother continues to make pizzelles not only as a homage to heritage, but they also provide the ideal finish to decadent Italian meals. Now that her recipe has been converted into an easy gluten-free dessert, it can join the ranks of many other Italian holiday favorites.
Pizzelles make the perfect addition to my favorite gluten-free Christmas cookie collection, along with decadent Italian almond paste cookies. They also made a lovely addition to afternoon tea and entertaining. Like buttery, tender gluten-free shortbread, they are divine dunked in a steaming mug of tea or coffee.
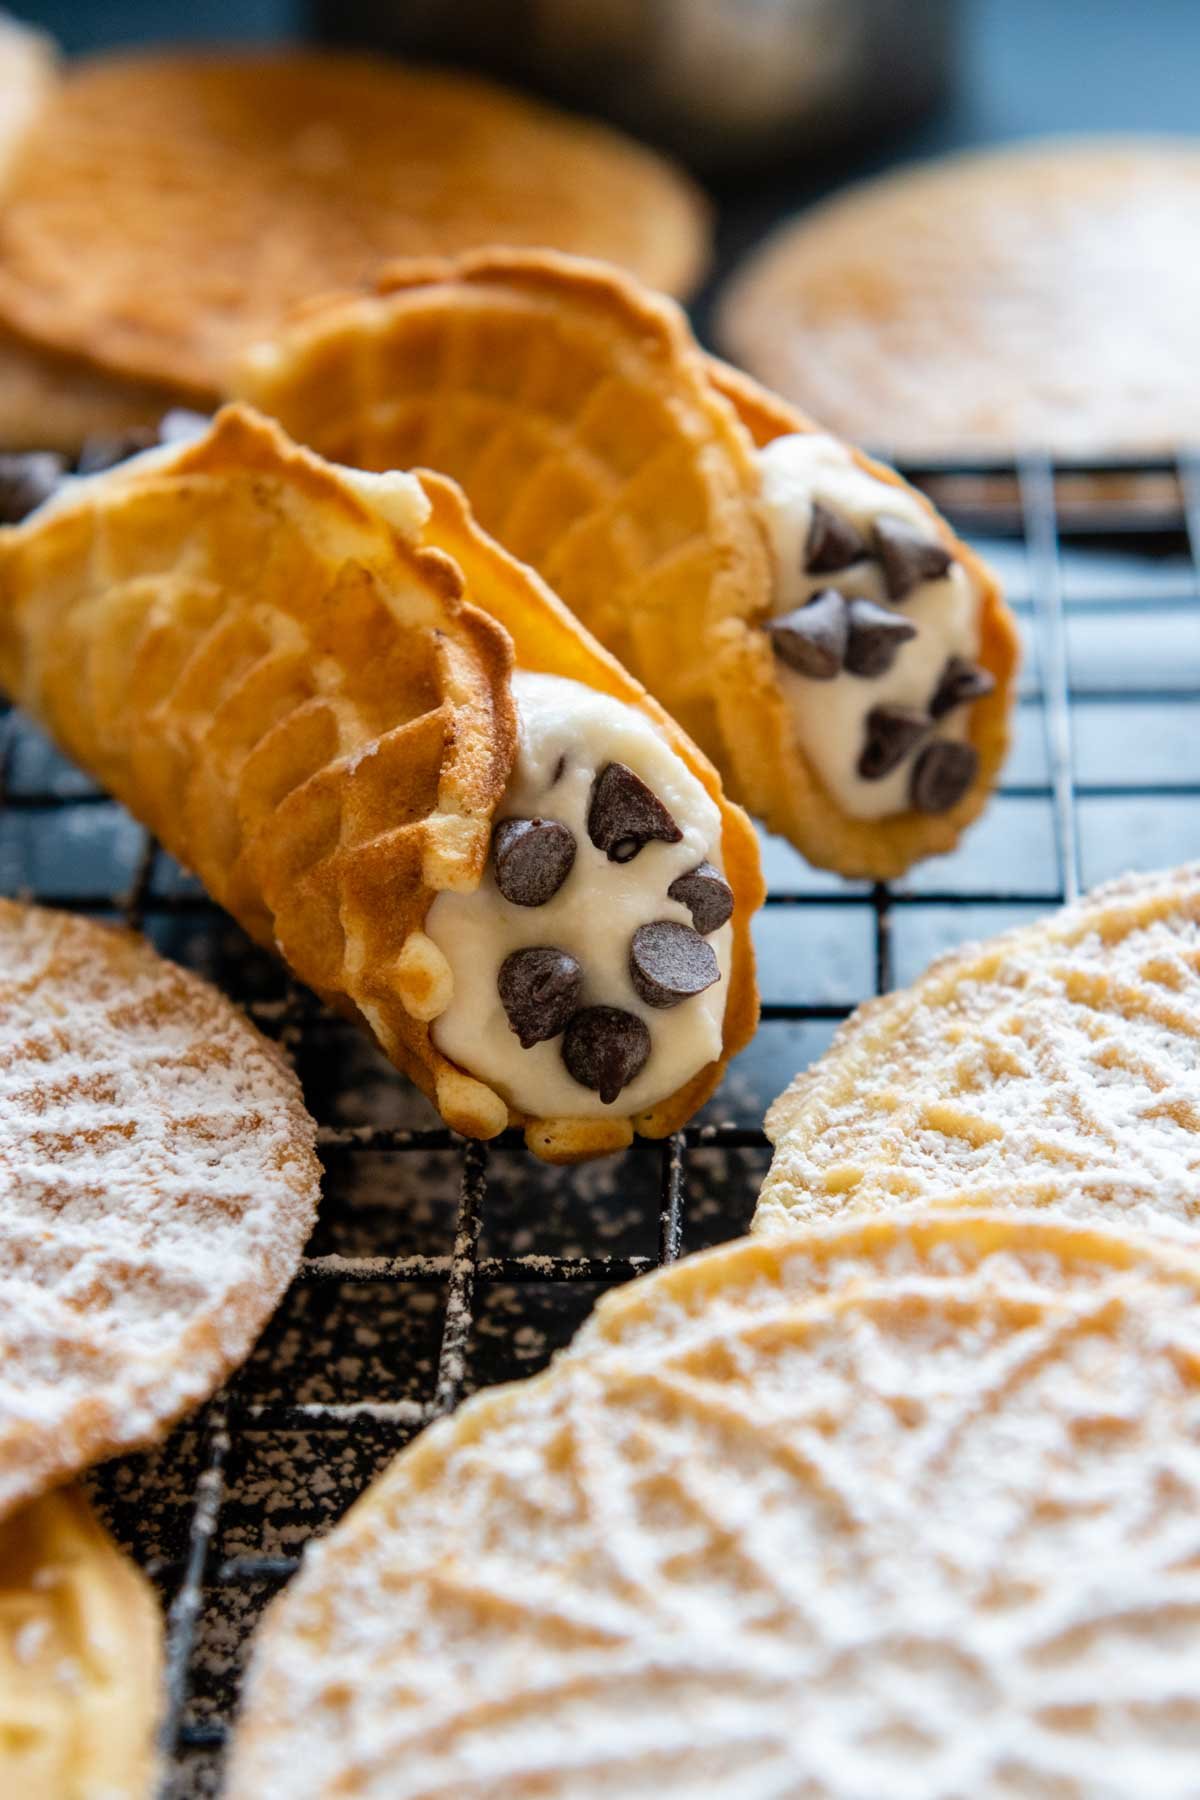
This pizzelle recipe can be creatively used to make gluten-free cannoli, cookie sandwiches, ice cream waffle cones or dessert bowls. Below I will share which is the best gluten-free flour to use, flavor variations, along with many expert tips!
I love making pizzelle cookies. My husband has celiac and I’ve never found a pizzelle recipe that was any good. This one is amazing. I made the lemon ones since he don’t like anise. Definitely a keeper! Thank you for sharing.
—Jerri
Free Guide! 5 easy tips for baking like a gluten-free pro!
Simple hacks for fail-proof gluten-free dishes every time!
Ingredient Tid Bits
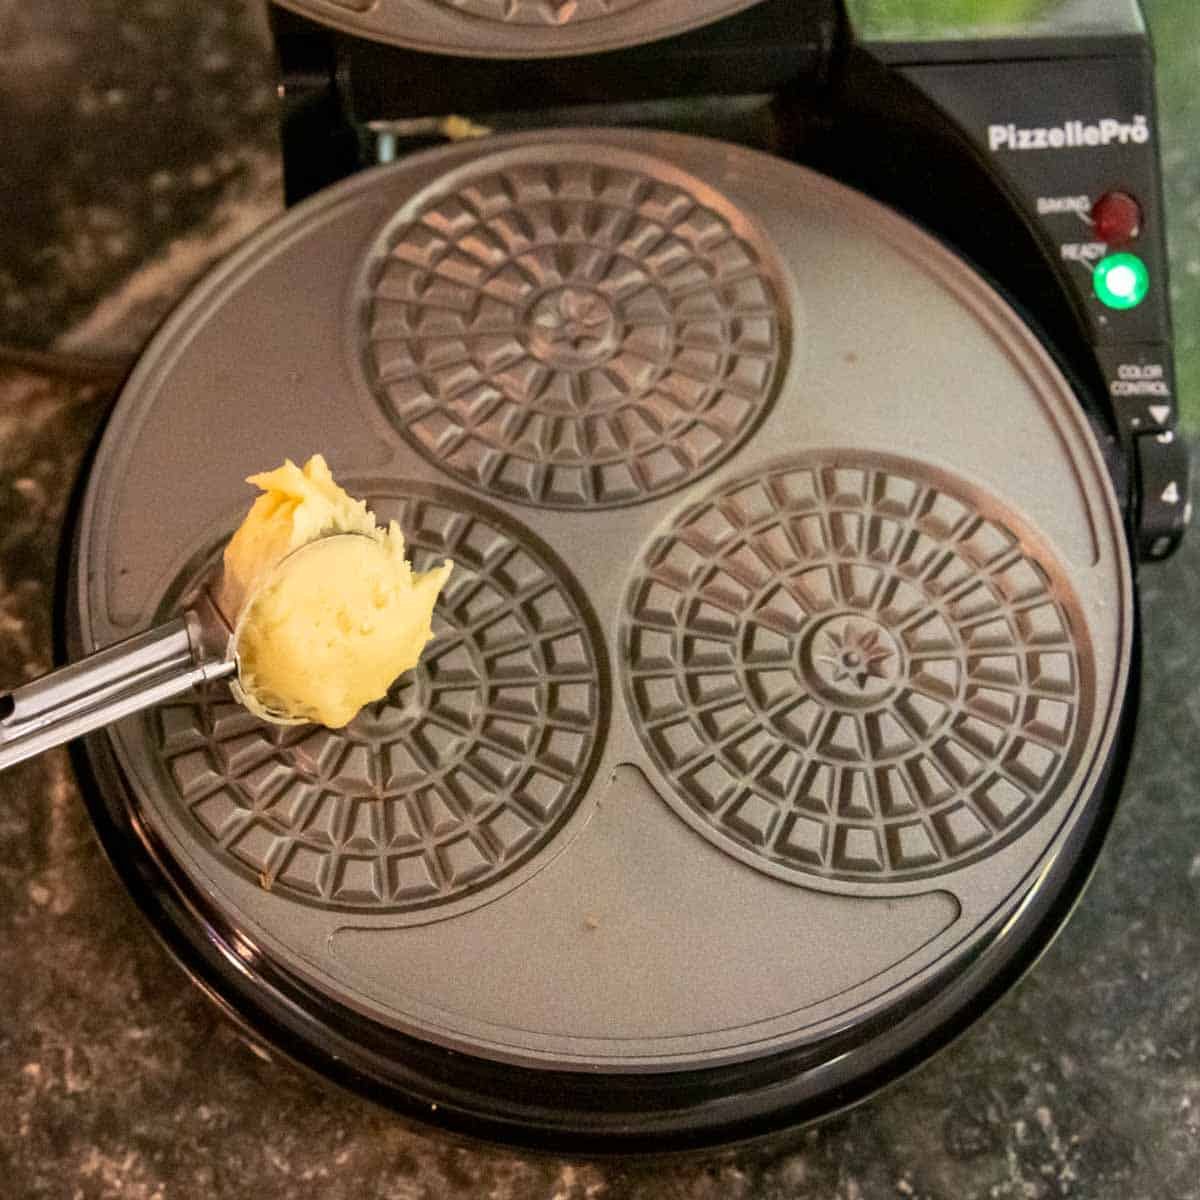
The basic pizzelle recipe ingredients are simple, affordable, and generally readily available. You will need a pizzelle maker or press to cook the batter on. If I had to go back and buy my press again, I would choose one that makes 1 or 2 larger ones, rather than mine that makes a few smaller-sized ones at a time.
Below are the basic ingredients, along with any workable substitutions for a dairy-free recipe. Jump to the recipe variations to learn the variety of ways these Italian cookies can be flavored.
- Eggs – I have not tested the recipe without eggs, but I have seen vegan recipes using egg substitutes, such as Just Egg.
- Butter – Some Italian recipes replace the butter with oil. I tried this as an attempt to thin the batter, but found the flavor lacking. Therefore, for a dairy-free recipe, I recommend using vegan butter sticks or coconut oil.
- Gluten-free flour – The brand of gluten-free flour used makes a huge difference! Use King Arthur Measure-for-Measure or Bob’s Red Mill 1-to-1 GF flour. Typically I recommend Cup4Cup gluten-free flour in all my baking recipes. However, this flour made the batter way too thick to work with.
- Baking powder – Adds light, airy crispness to the texture.
- Extract – I tested the recipe using vanilla and anise extract. I found the anise to have more flavor depth.
Important Note About Gluten-Free Flour
When creating this recipe, the type of gluten-free flour used makes a measurable difference in the batter’s consistency. Pizzelle making works best when it has a consistency like a thick pancake batter or thinner dough.
Using Cup4Cup gluten-free flour, which I typically recommend in baking recipes, made the batter into a thick dough. It was frustrating to quickly distribute on the pizzelle maker.
Therefore I experimented with other gluten-free flour blends (with xanthan gum) that contain less cornstarch. King Arthur Measure-for-Measure gluten-free flour yielded a better consistency. Bob’s Red Mill would also work, although I prefer the taste of King Arthur. I would check whatever blend you are using and make sure cornstarch isn’t in the mix.
Let’s Make This Together!
(Below shows step-by-step photos and modified instructions. For the complete recipe, along with ingredient amounts, scroll down to the recipe card.)
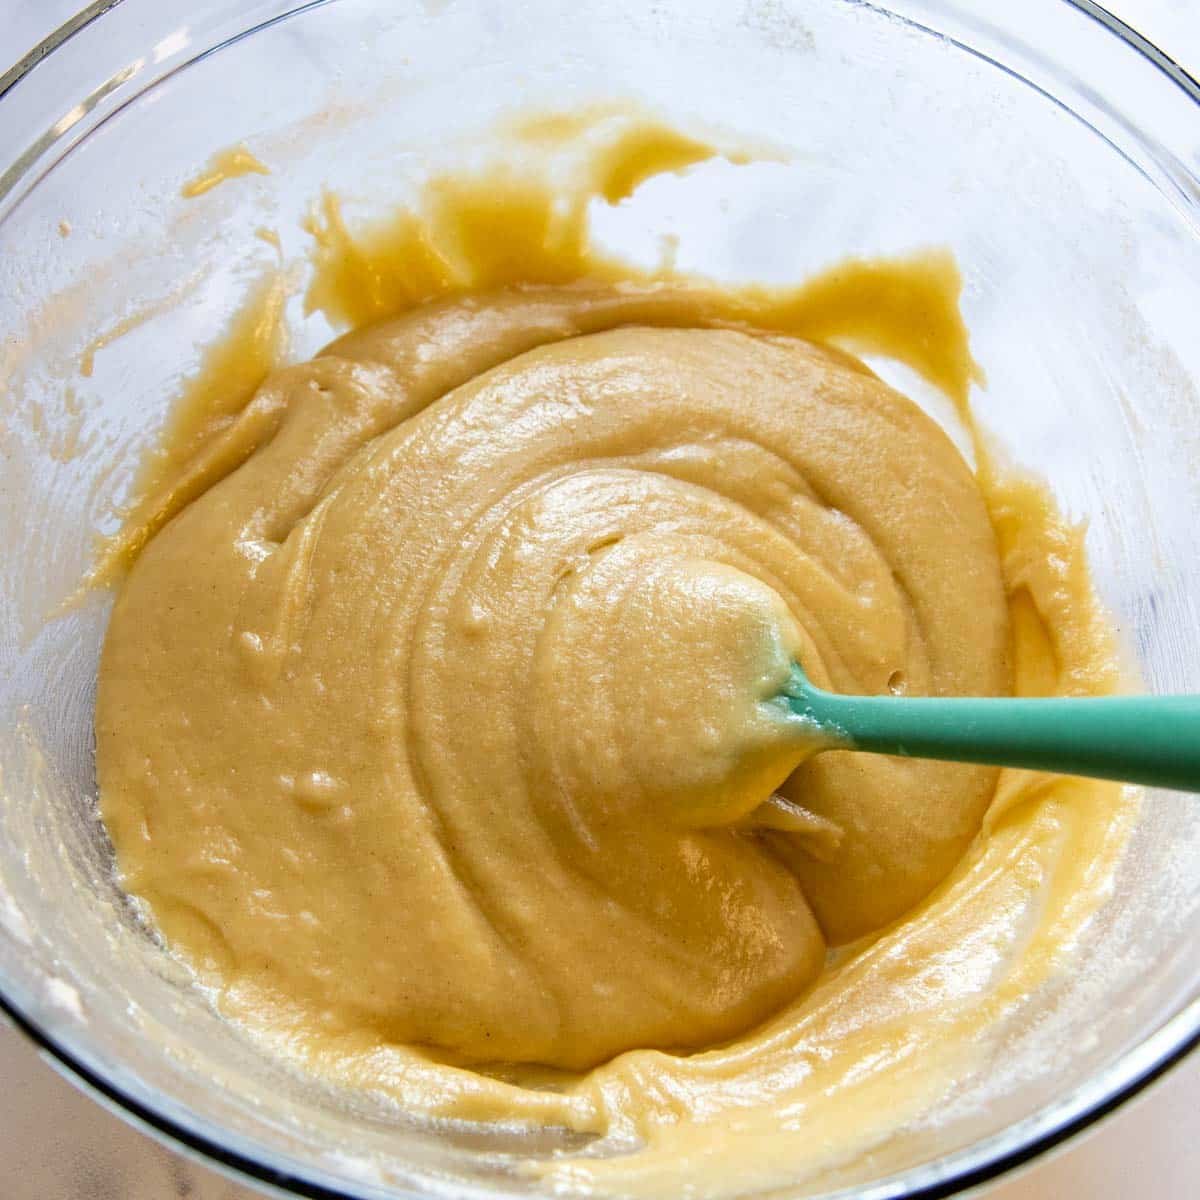
Mix the batter
Since the batter comes together quickly, first preheat your pizzelle maker. The surface should be naturally non-stick so there is no need to grease the iron.
In a large bowl whisk together the eggs with sugar until well combined then whisk in the cooled melted butter and anise or vanilla extract. That’s it!
Drop and cookie
The first couple pizzelles you may have to experiment with the amount of batter needed. Spoon the batter in the middle of the iron and then close securely. To distribute quickly, I recommend using a small or medium cookie scoop, depending on your maker’s size.
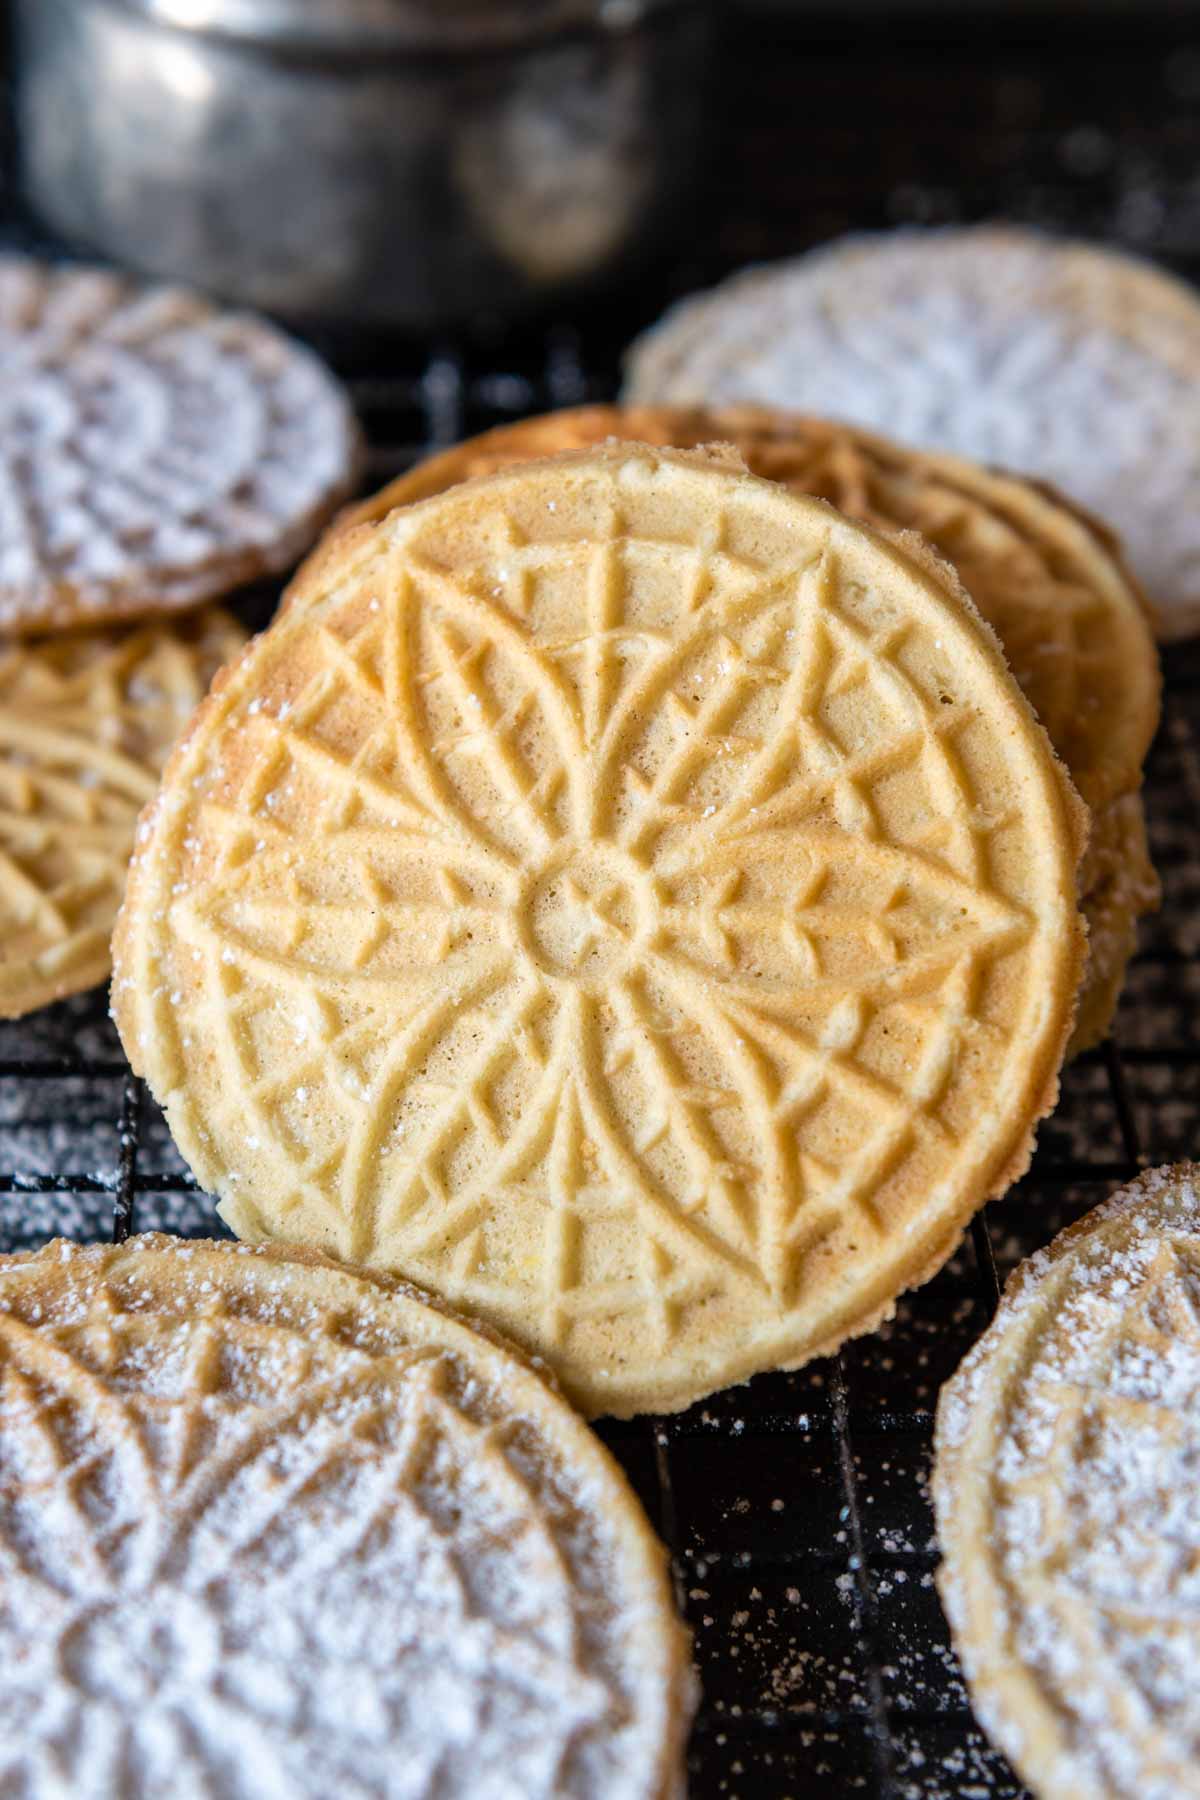
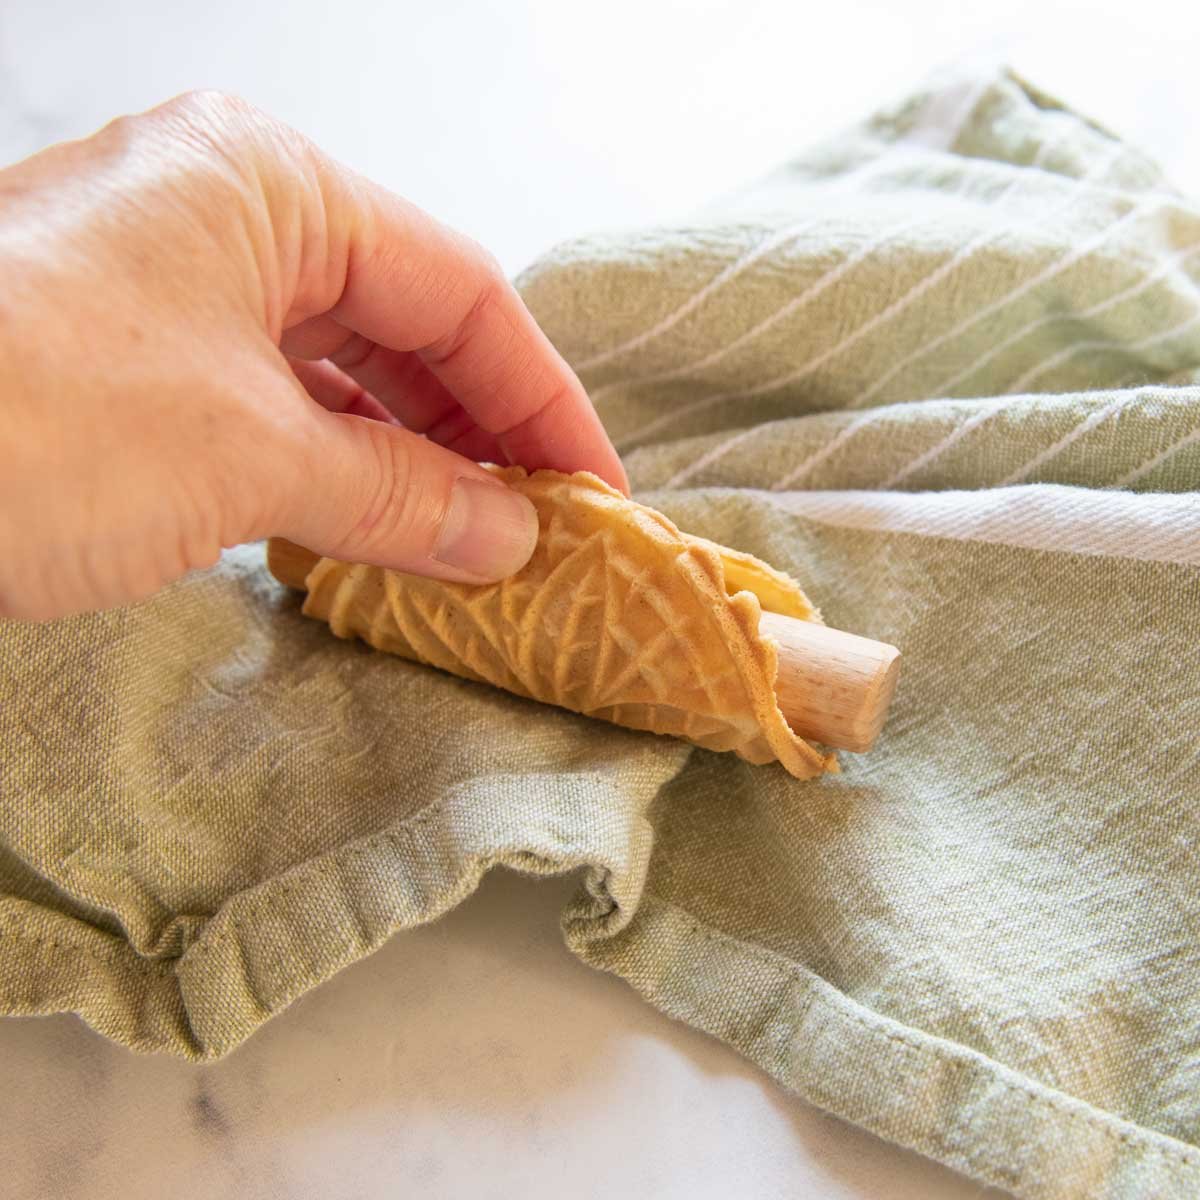
Once the maker indicates the pizzelles are done, transfer to wire rack to cool. If you plan on shaping the pizzelles, do this immediately. You may want to use a kitchen towel to protect your fingers. Dust the cookies with confectioner’s sugar before serving.
More Creative Ways To Enjoy This Recipe
Homemade pizzelles may be enjoyed many other ways than simply a light, crispy cookie. I particularly like to use them as “mock” gluten-free cannoli (filling and method included in recipe card).
- Cannoli – Immediately shape when the pizzelle comes off the iron using a cannoli mold, wooden handle, or even aluminum foil scrunched into a tube.
- Cookie sandwiches – Fill with ice cream, frosting, whipped cream, nutella, or the gluten-free cannoli filling.
- Waffle cone – Shape the hot pizzelles around a waffle cone mold or use shaped aluminum foil. Fill with ice cream or cream horn filling.
- Bowls or dessert “tacos” – Use a bowl mold, tube, or foil to make your preferred shape. Fill with fresh berries, ice cream, whipped cream, or a mixture.
- Chocolate dipped – Dip on half of the pizzelle in melted dark or white chocolate (see this post for the best way to temper chocolate) and immediately add festive sprinkles.
Best Method For Storing
How long pizzelles will they stay fresh and what is the best way store them? Good news! Pizzelles are easy to store and stay crisp for weeks!
My mother always stored them in airtight cookie tins, between sheets of waxed paper. They stayed fresh and delicious at room temperature weeks after Christmas.
Pizzelles made with gluten-free flour have a slightly shorter shelf-life and can be stored at room temperature up to 2 weeks or frozen up to 2 months. I don’t recommend refrigerating them, unless they are filled.
If you find they have become soft after storing, arrange them in on a cookie sheet in a single layer. Bake in a 300ºF oven for 3-5 minutes, or until crisp.
Pro Tips To Remember
- You do need a pizzelle iron. Unfortunately a waffle maker will not work.
- To make GF pizzelles, the type of gluten-free flour you choose matters! See the recommended brands listed above.
- If the batter becomes too thick during cooking, you can thin it out with a dash of water.
- Don’t worry about breaking off rough edges while they are still hot. Once they are cooled, the excess edges easily break off.
- Don’t waste time spreading the batter on the iron. Simply plop it in the middle and close. It will spread evenly on its own.
- To distribute batter quickly, I recommend using a small or medium cookie scoop, depending on your pizzelle maker’s size.
- If your cookies are not crisp, they were not left on the iron long enough. Error on the side of slightly overcooking rather than undercooking.
Save this recipe to your pinterest board!
Let’s be friends on Pinterest! I’m always sharing great recipes!
Did you make this recipe? I love hearing from you! Leave a star rating and comment below the recipe card. It helps others when searching for recipes and I appreciate feedback from our community. You will always hear back from me! -Melissa

Gluten-Free Pizzelle Recipe (Crisp Italian Pizzelles)
Ingredients
- 3 large eggs
- ¾ cup (150 g) granulated sugar
- ½ cup (113 g) butter, melted and cooled
- 1 tablespoon anise or vanilla extract
- 1 ¾ cup (249 g) gluten free all purpose flour blend, King Arthur Measure-for-Meaure gluten-free flour highly recommended
- 2 teaspoons baking powder
- powdered sugar, for dusting
Instructions
- Since the batter comes together quickly, first preheat your pizzelle maker. The surface should be naturally non-stick so there is no need to grease the iron.
- In a large bowl whisk together the eggs with sugar until well combined and the mixture starts to pale. Whisk in the cooled melted butter and extract. Stir in the dry ingredients.3 large eggs, ¾ cup granulated sugar, ½ cup butter, 1 tablespoon anise or vanilla extract, 1 ¾ cup gluten free all purpose flour blend, 2 teaspoons baking powder
- The first couple pizzelles you may have to experiment with the amount of batter needed. Spoon a small amount of batter (about 2 tsp) in the middle of the iron and then close securely.
- Once the maker indicates the pizzelles are done, transfer to wire rack to cool. If you plan on shaping the pizzelles for cannoli, do this immediately. Use a kitchen towel to protect your fingers and wrap around the mold. Dust the cookies with confectioner's sugar before serving. Store unfilled pizzelles in an airtight container at room temperature.
Notes
Dairy-Free Modification
You may also replace the butter with oil for a dairy-free recipe. However as word of warning, I tried this, but found the flavor really lacking. Therefore, for a dairy-free recipe, I recommend using melted vegan butter sticks or cup melted coconut oil, which will flavor the pizzelle cookie slightly.Flavoring Options
- Orange – 1 tablespoon orange zest with ¼ tsp orange or vanilla extract
- Spiced – ½ tsp ground cinnamon, ½ tsp ground cardamom with 1 tbsp vanilla extract
- Lemon – 2 tsp lemon zest with ½ tsp lemon extract
- Coconut – Replace butter with ½ cup coconut oil, 1 tsp vanilla extract, ½ tsp coconut extract.
Cannoli Shaping and Filling
This post contains affiliate links. My opinions are always my own. If you purchase a product through an affiliate link, I make a small commission – at no cost to you. Read full disclosure policy here.


Excellent GF Pizzelle Recipe. My daughter who has celiac disease was finally able to have pizzelles after 15 years. I followed the recipe using the vanilla extract because the basic recipe is just like my grandmother’s recipe I used to use with regular flour. The only addition I added is 1 Tablespoon of grated orange peel. Everyone loves my gf pizzelles. Thank you for the recipe.
I’m so happy to hear this, Judith! I appreciate you taking the time to leave this note.
Best,
Melissa
I love making pizzelle cookies. My husband has celiac and I’ve never found a pizzelle recipe that was any good. This one is amazing. I made the lemon ones since he don’t like anise. Definitely a keeper! Thank you for sharing.
Thanks Jerri! You made this Italian girl very happy! Pizelles are something no one should have to live without!
Best,
Melissa
I am very picky. I’ve made a higher rated recipe for GF pizzelles and was not impressed! I’m SO glad I gave your recipe a go! These were absolutely delicious. We did make them vegan because of food allergies, and subbed Aquafaba for the eggs (about 8 TBSP). They were perfectly crispy, even next day! I had other family exclaim how these were even better than store bought GF! Thank you so much for a winning recipe!
This makes me so happy, Tina! Thanks so much for taking the time to share!
Best,
Melissa