
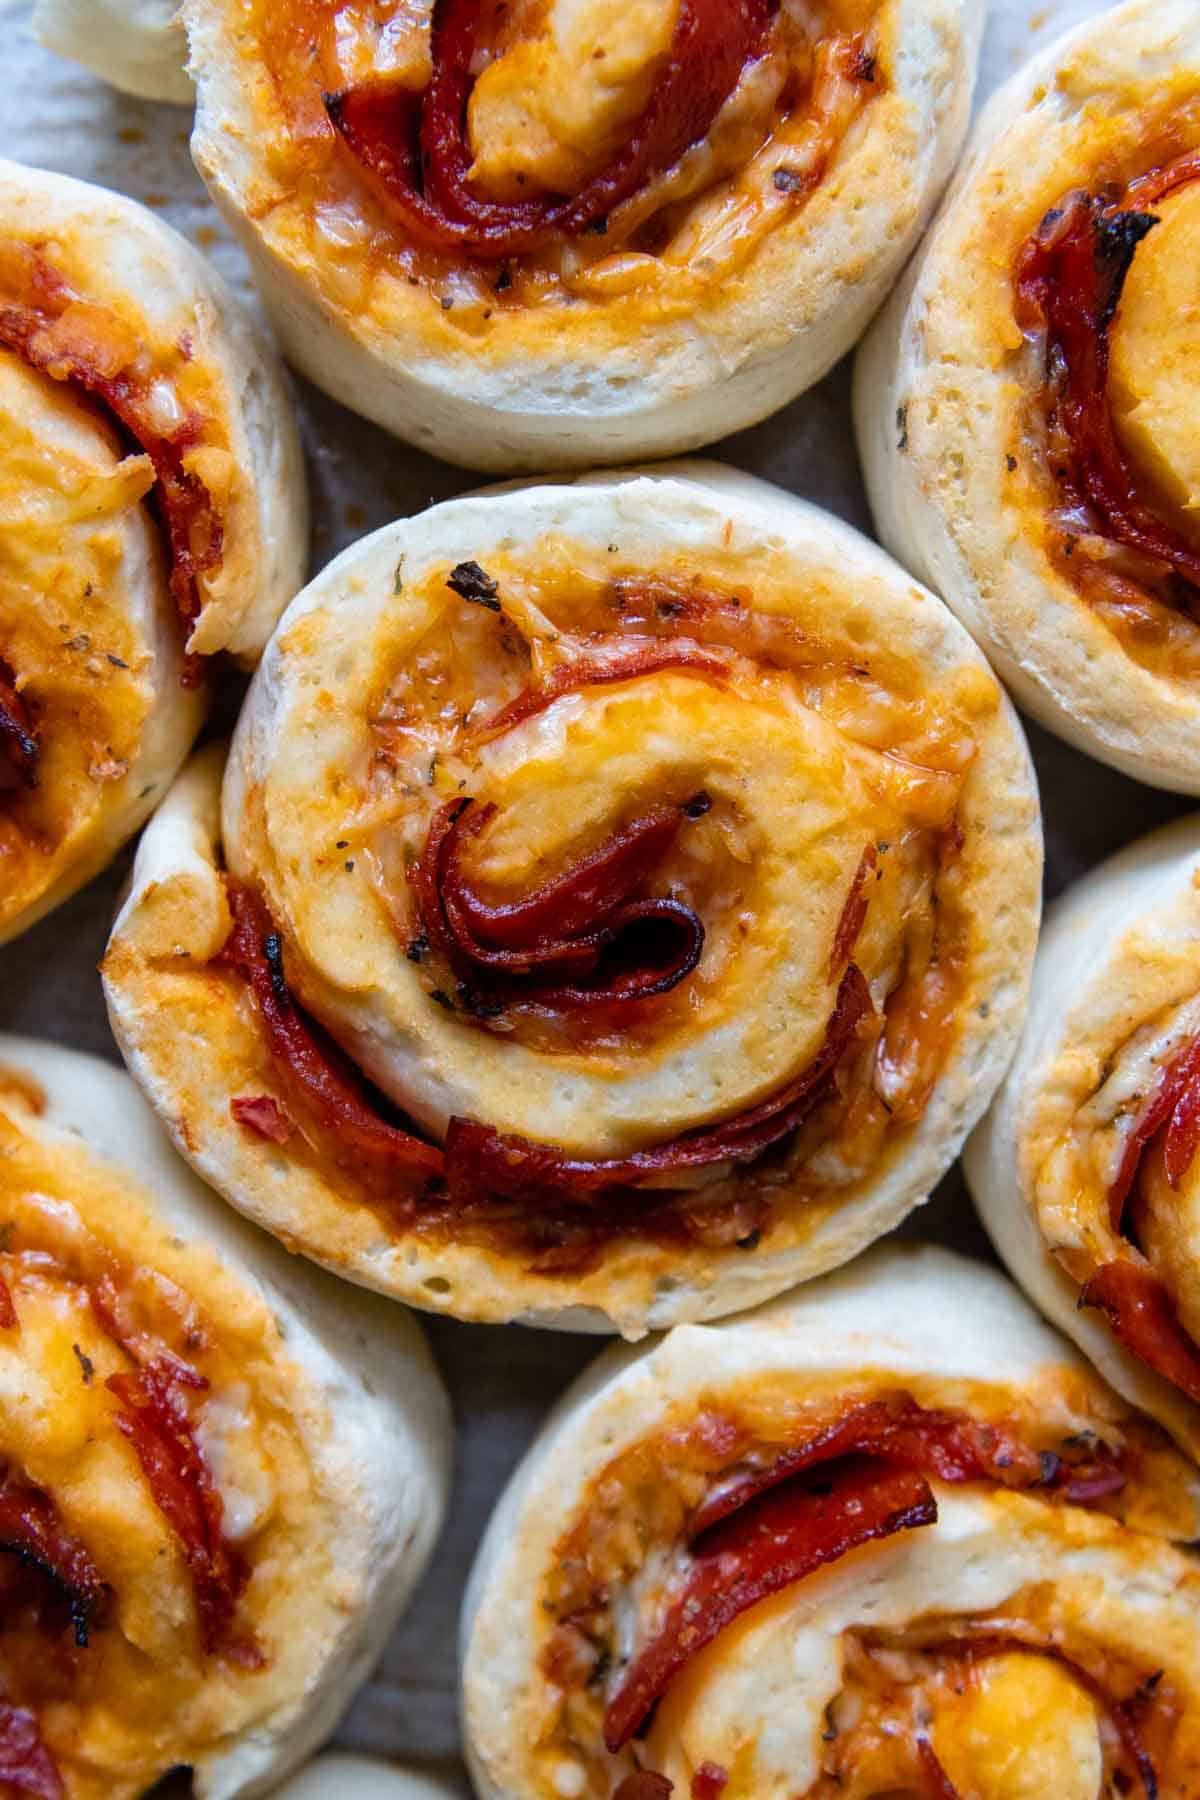
Enjoy homemade gluten-free pizza rolls with this easy, fool proof recipe ready in about one hour! A soft and doughy gluten free roll wraps around a cheesy, pepperoni center perfect for pizza night or a snack. Learn how to use simple ingredients to make the dough easy to work with, yet still fluffy and tender after it is baked!
Want to Save This Recipe?
Enter your email below & we'll send it straight to your inbox. Plus you’ll get affordable and easy gluten-free recipes delivered each week!
Gluten-Free Pizza Rolls with Pepperoni
If you loved pepperoni bread, pizza bites, or even Totino’s pizza rolls, then get ready to enjoy another recipe you thought had to disappear with a gluten-free diet!
Gluten-free pizza rolls may be a homemade recipe, but they are easy enough for even a novice baker to pull off! We enjoy these similar to how we indulge in pizza slices, served alongside a dinner salad, as an after-school snack for kids, or even a quick grab-and-go lunch.
The dough comes together in minutes and doesn’t even require a rolling pin to shape. Simply pat out in a large rectangle, spread on sauce, sprinkle with cheese, pepperoni, and roll. Slice for traditional pizza rolls or even shape into pepperoni bread.
To achieve an extra soft, yet rollable dough, the recipe relies on two essential gluten-free dough ingredients. Incorporating a little potato starch with the dry ingredients structures the dough without drying it out.
In addition, adding a touch of psyllium husk powder helps absorb moisture, something GF starches have a hard time doing. I use this magical ingredient in many well-tested gluten-free bread recipes because it also keeps dough pliable.
Read on to learn how to make gluten-free pizza rolls, including expert tips for rolling and slicing the dough, alternative variations, and the best way to freeze and reheat leftovers.
Free Guide! Receive a Free Gluten Free Dinners Cookbook
TOP 5 Highest Rated Recipes!
Ingredient Notes
- Gluten-free flour – Using a good gluten free flour makes or breaks the quality of GF baked goods. Cup4Cup gluten-free flour is what I tested the recipe with and use for all my baking. For more info and alternatives see, the Recommended Gluten-Free Flour section.
- Potato Starch (not flour) – Secret ingredient to make gluten-free breads soft and fluffy, just like these highly-reviewed gluten-free dinner rolls. Instead of relying on additional flour to structure the dough, I substituted another gluten-free starch. Use for best results, but tapioca starch may be substituted.
- Psyllium Husk Powder – Helps maintain moisture and enhances a soft texture. I recommend using psyllium in gluten-free breads to absorb moisture, making the dough pliable enough to be shaped without adding additional flour.
- Baking powder – I like to couple baking powder with yeast to assist the rise and make a light, airy texture, which is harder to achieve in gluten-free breads.
- Instant (Rapid Rise) Yeast – I would suggest buying this is bulk and storing in your refrigerator. It doesn’t require mixing with warm liquids to proof and can be mixed right into dry ingredients. To substitute active dry yeast add it to the warm water and let it sit for 5 minutes before adding to the dry ingredients.
- Oil – Helps coat the GF starches to eliminate a gritty, dry texture.
how to make Gluten-Free Pizza Rolls
(Below shows step-by-step photos and modified instructions. For the complete recipe, along with ingredient amounts, scroll down to the recipe card.)
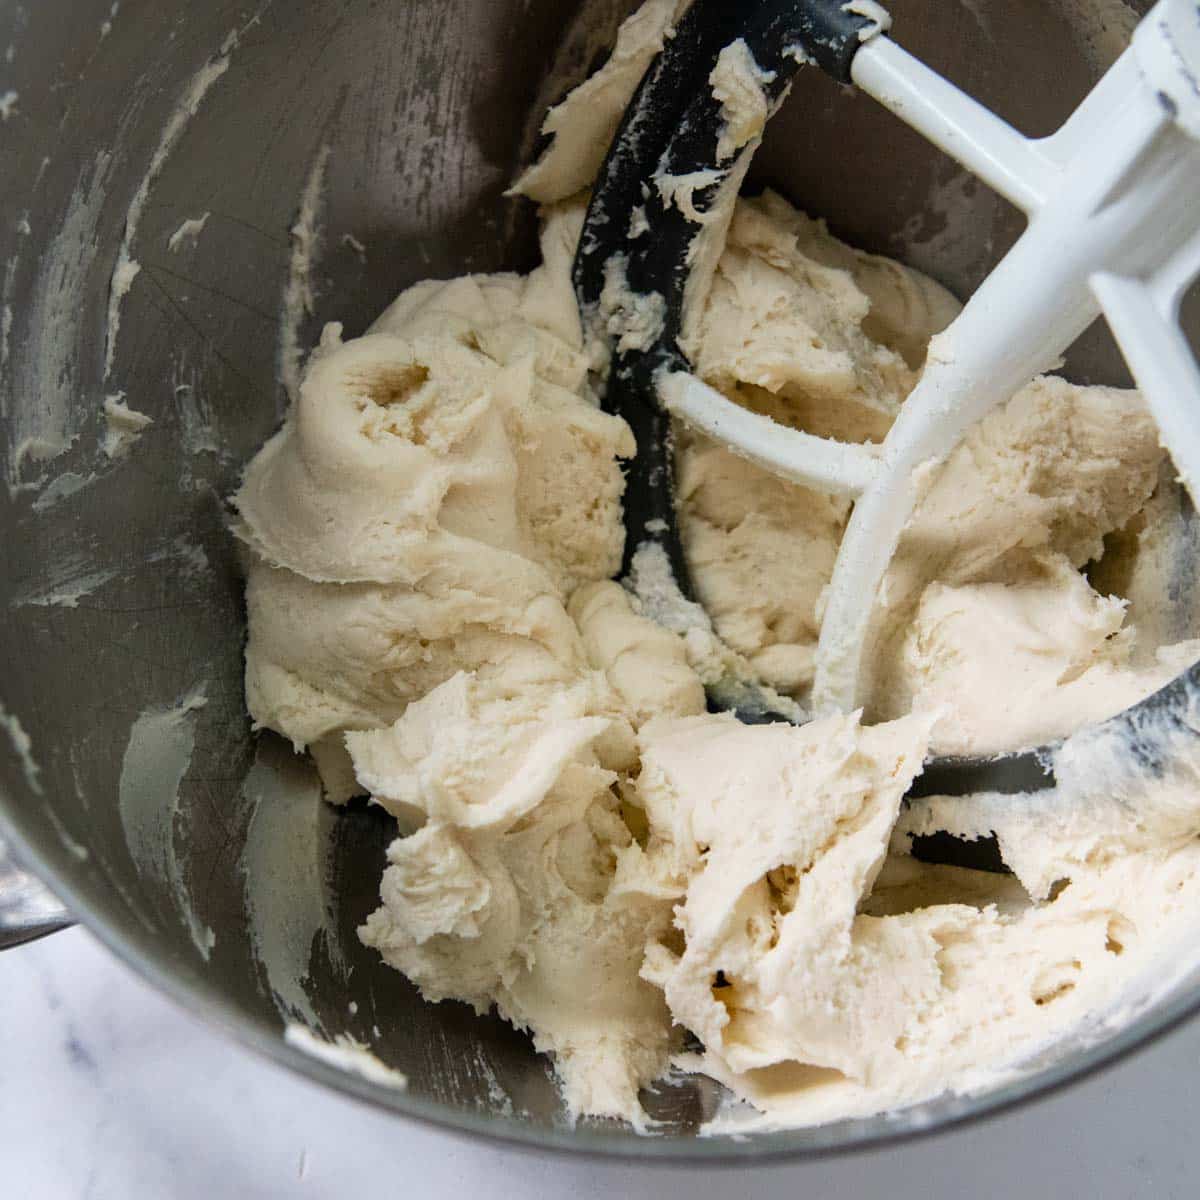

- I recommend using a stand mixer for this recipe because it uses a lot of flour and the dough gets pretty stiff. In a large stand mixer bowl, using a paddle attachment, combine the GF flour, potato starch, sugar, psyllium, yeast, baking powder and salt on low speed.
- Add the warm water, egg, and oil. Combine on low speed until blended. Increase to medium low speed and beat for 5 minutes, stopping to scrape down the bowl once or twice.
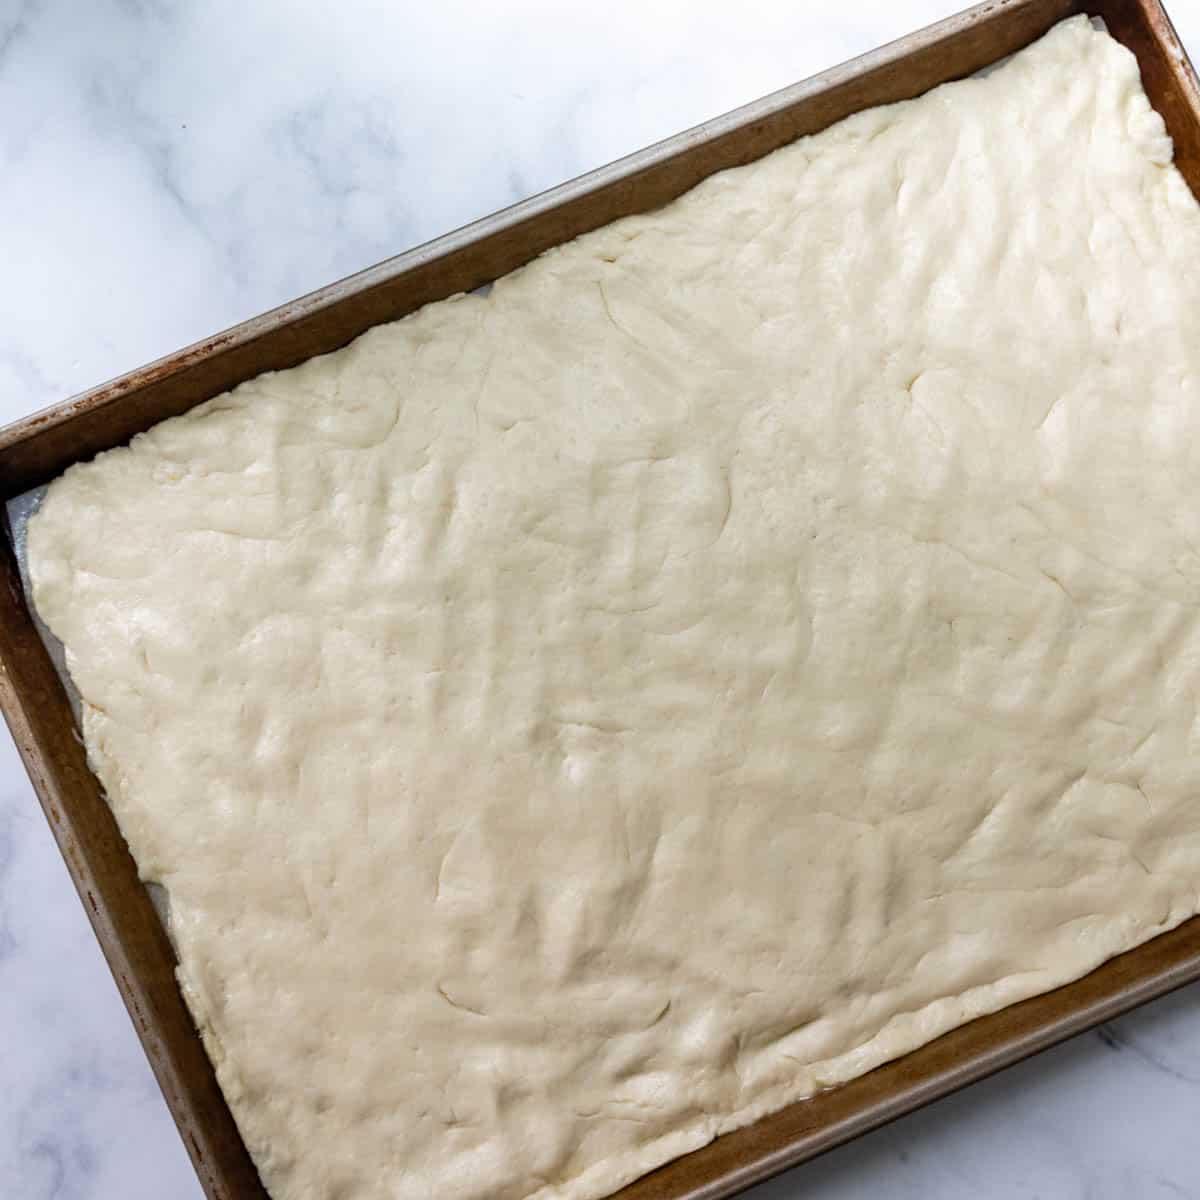
- Use a spatula to scrape the dough onto a 18X13-inch baking sheet lined with greased parchment. Spray your hands with nonstick cooking spray (or rub with a little olive oil) and evenly pat down the dough to fill the entire sheet pan. Try to the get the dough as evenly dispersed as possible.
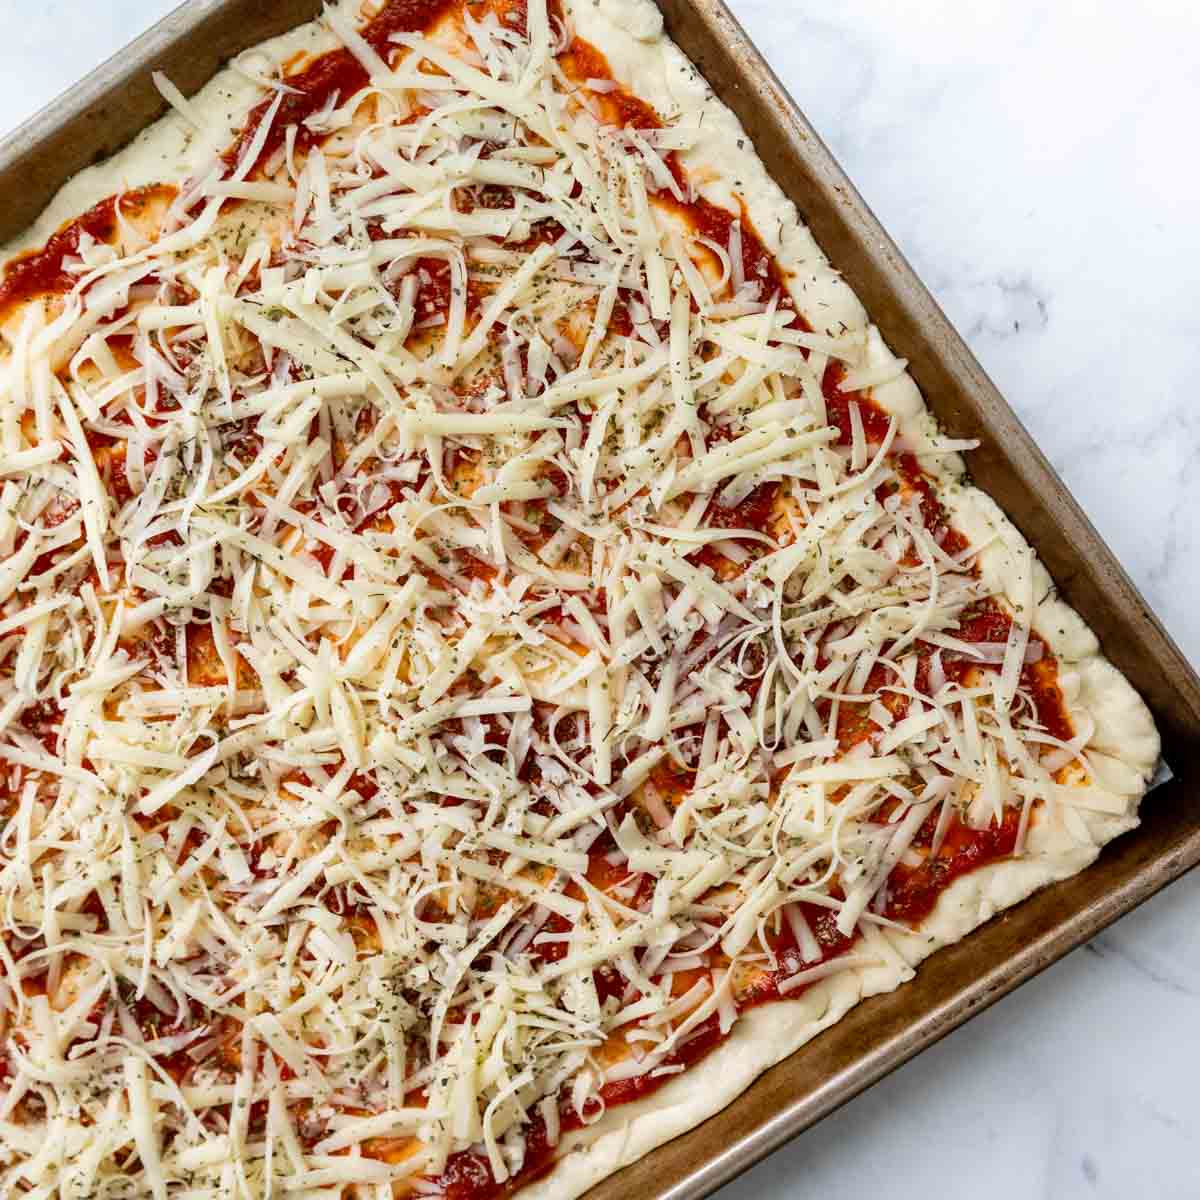
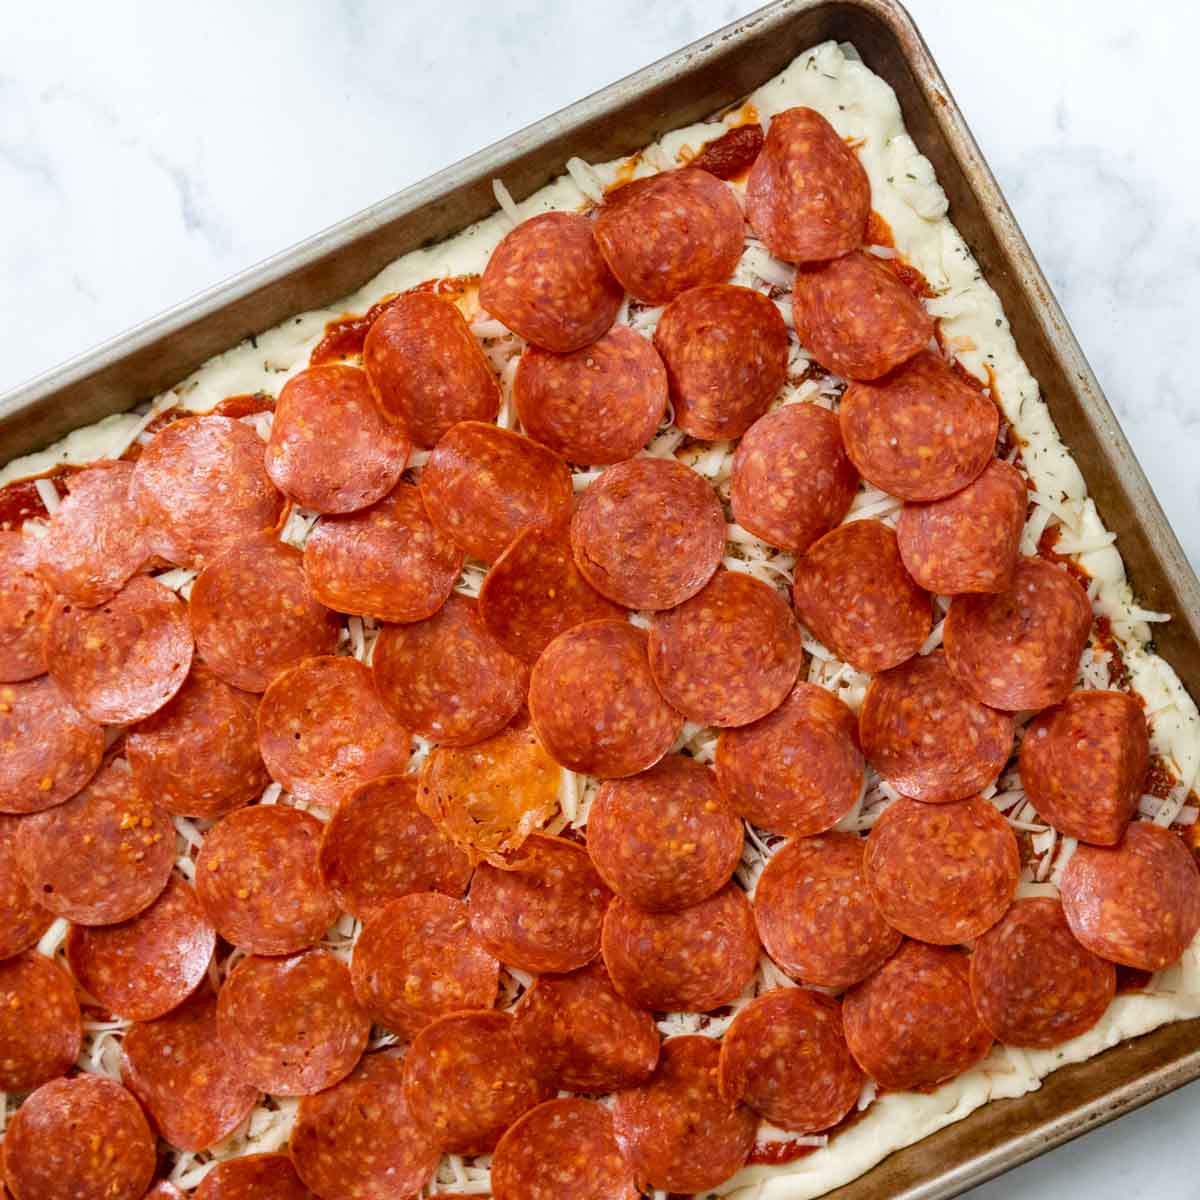
- Spread with the marinara sauce, leaving about ½-inch gap around the edges. Distribute the cheese over the marinara and then sprinkle with the Italian seasoning. Cover the mozzarella cheese with pepperoni slices.
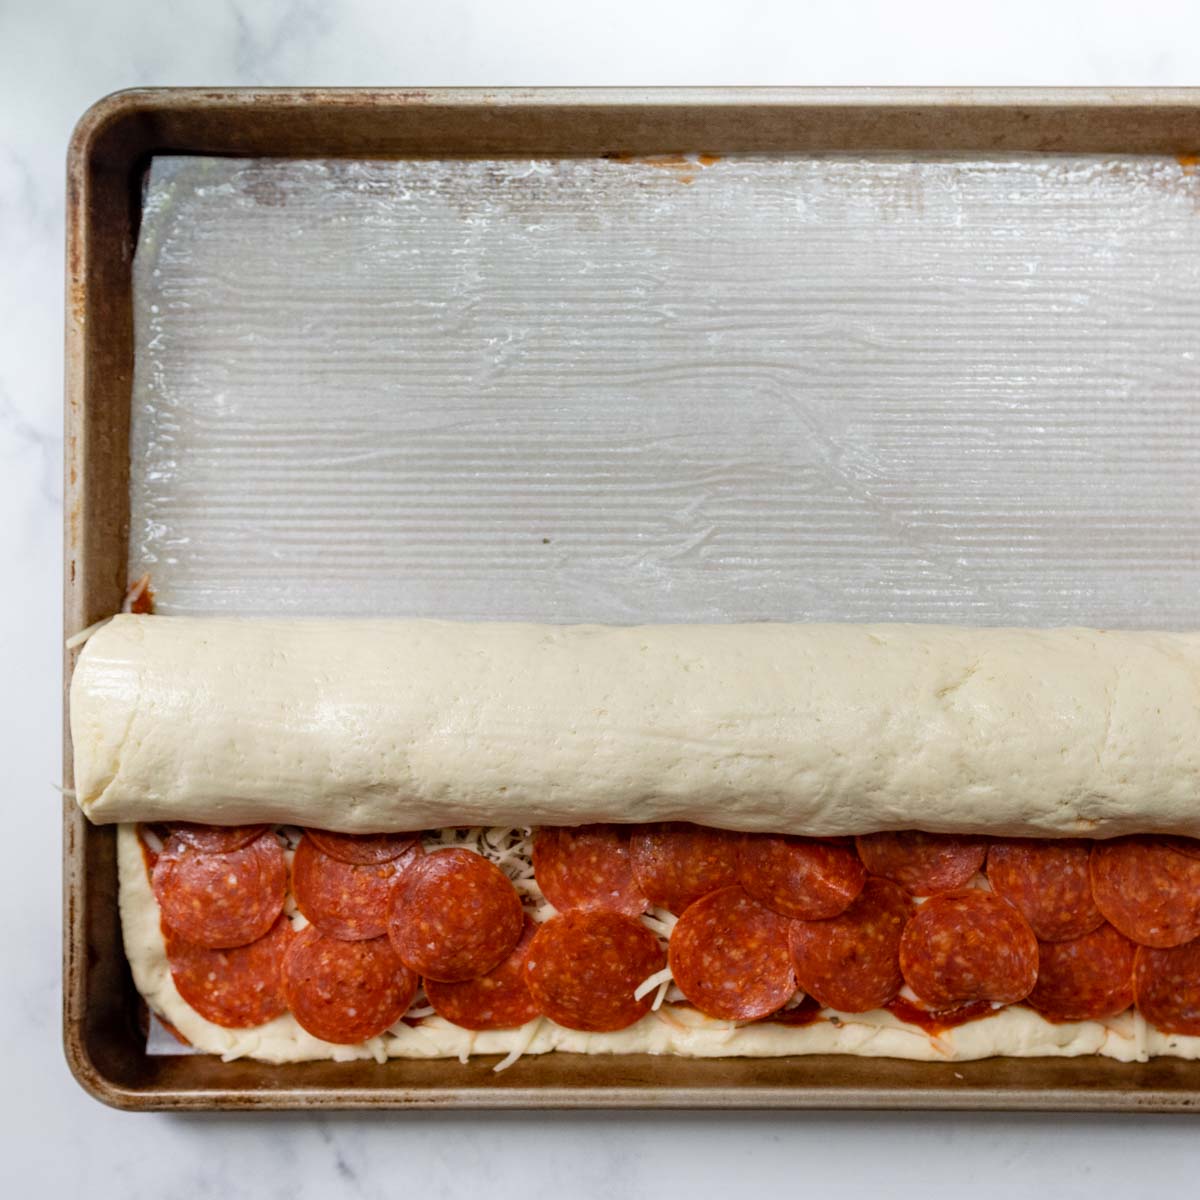
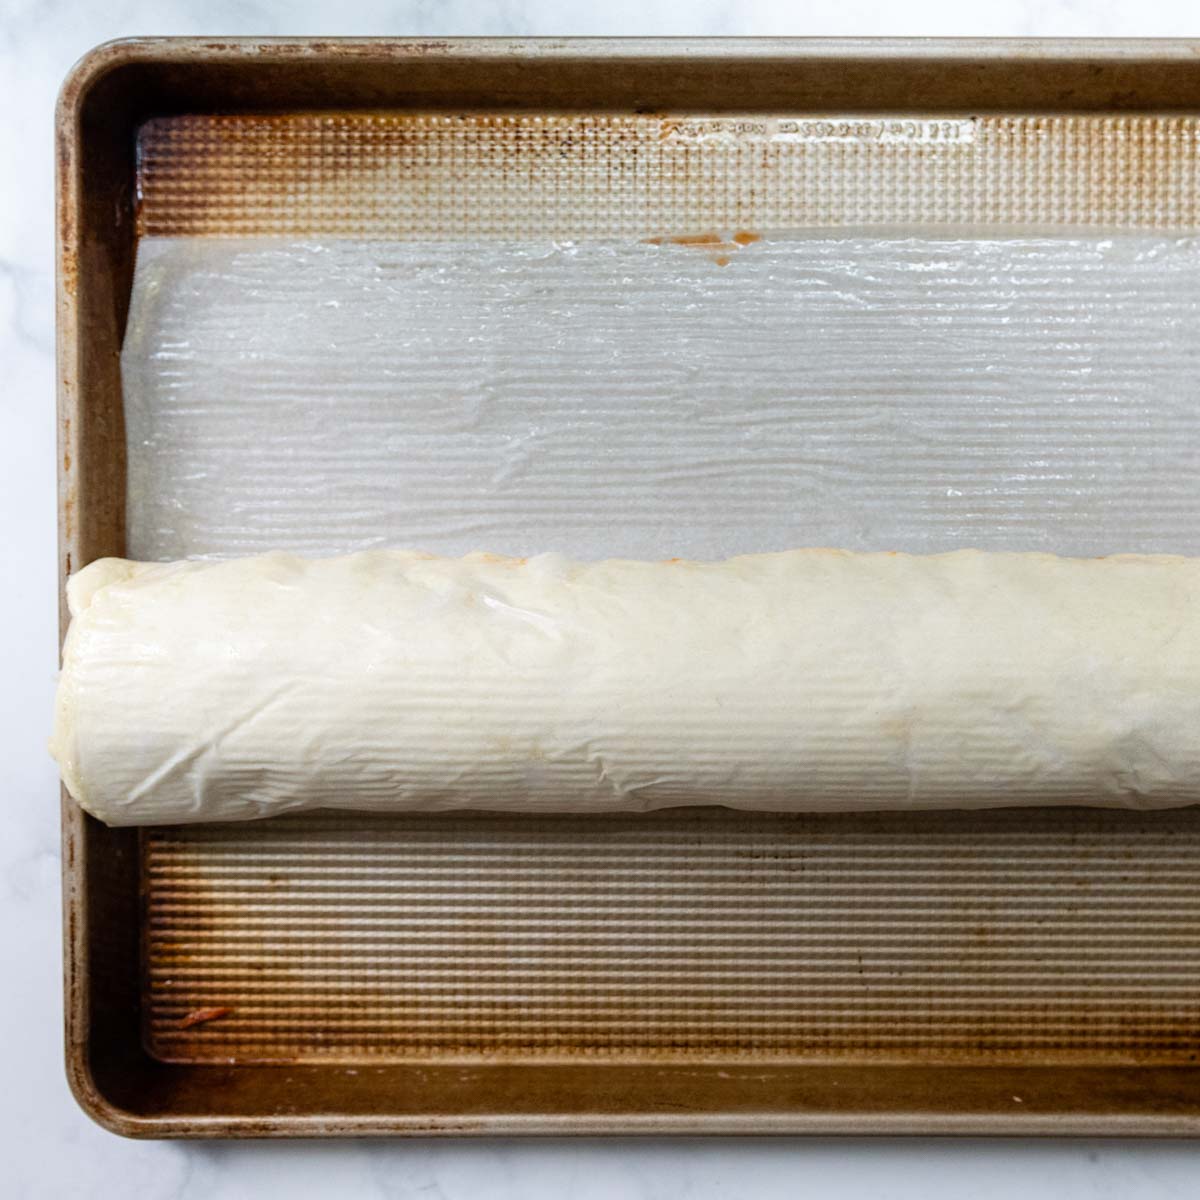
- Start with farthest long edge and roll towards you. Stop when you have about 3-4 inches of dough left closest to you. Take the parchment closest to you and lift it up to meet the roll. Roll the whole log, with the parchment, away so the seam is now against the baking sheet. Peel away the parchment.
- Use a long sharp knife to cut into 12 even slices, using a gently sawing motion. Once a slice has been cut through, move it to a greased 9X13-inch pan, positioning the rolls in 3 X 4 rows.
- Set the pan in a draft-free place to rise for 30 minutes. Meanwhile preheat the oven to 375℉.
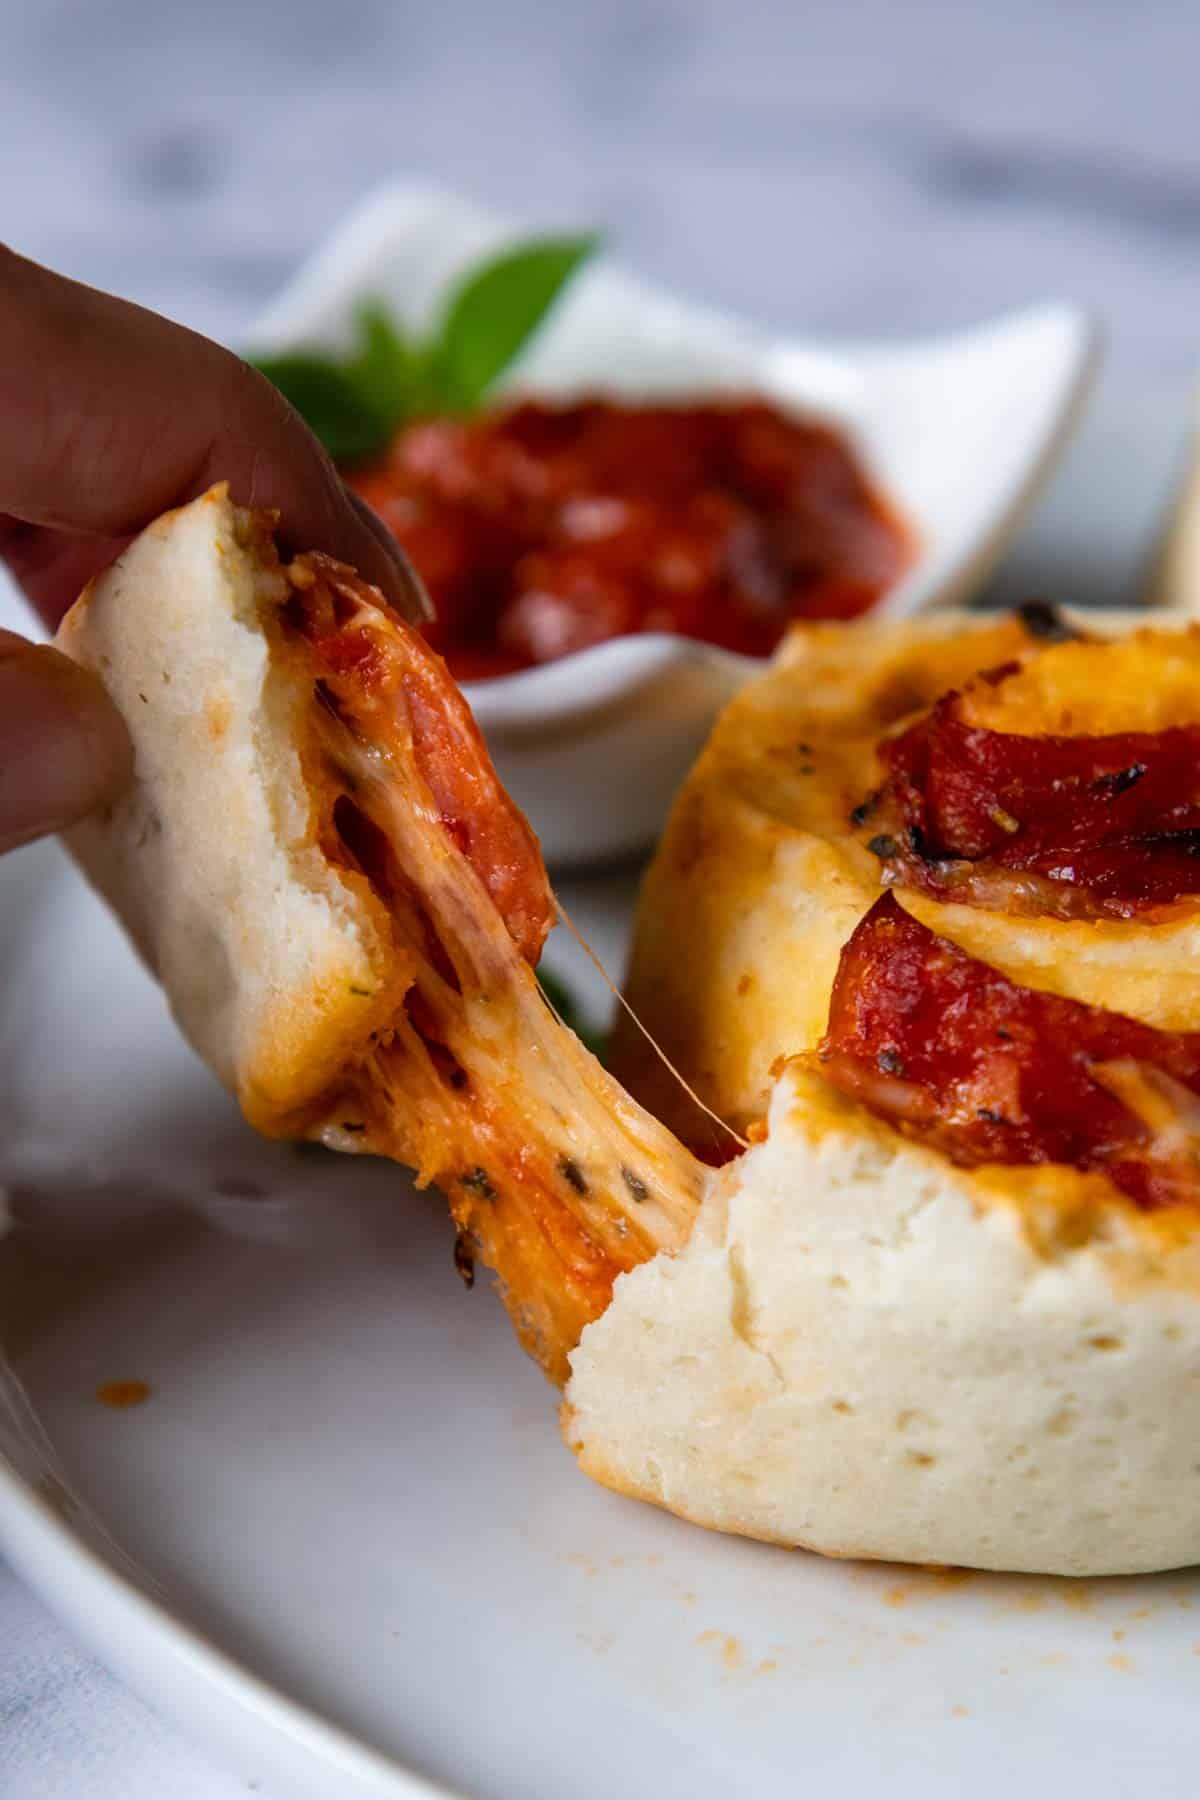
- Remove the plastic wrap and bake for 20-25 minutes, or until the internal temperature of the bread reaches 190℉. I use an instant read thermometer to check, which is perfect for GF breads because they can be tricky to know when they are done. Cool about 5 minutes before serving with additional pizza sauce for dipping.
Click here to see the
step-by-step web story instructions for this recipe!
Tips for Rolling
When making homemade pizza rolls there’s a balance of adding enough flour to make the dough easy to shape, but not so much that is dries out the crumb. I generally use less flour so the end product is very soft and tender, but rely on other techniques to assist with shaping.
For pizza roll dough greased parchment paper does the trick. To start off, lift the farthest long edge parchment and start to roll towards you. Once the entire length of dough is rolled toward you, peel off the parchment and continue to roll the dough.
Stop when you have about 3-4 inches of dough left closest to you. Take the parchment closest to you and lift it up to meet the roll. Roll the whole log, with the parchment, away so the seam is now against the baking sheet. Peel away the parchment and slice.
REcommended Gluten-Free Flour
I had already rigorously tested the best-performing gluten-free flour blend when developing this perfected gluten-free bread recipe. Therefore, when making gluten-free pepperoni rolls I reached for my preferred brand, Cup4Cup.
As far as taste, Cup4Cup is the clear winner. There is nothing “gluten free” tasting about it and landed on top in blind taste tests. As far as texture, the added cornstarch and milk powder makes for a soft, squishy crumb.
However, I know this blend can be pricier and hard to come by. Generally I find King Arthur Measure-for-Measure to be a good runner up if you don’t have Cup4Cup available.
I’ll be honest, I tested this recipe so much I ran out of time to test it with King Arthur as well. I do find that KA doesn’t absorb moisture quite as well as C4C, so you made have to add a couple tablespoons more.
Leave me a note in the comments if you try this recipe with another flour!
Gluten-free Pepperoni Bread
This recipe was actually inspired by a reader longing for old school gluten-free pepperoni bread recipe! Fortunately this gluten-free dough can also be used to replicate a classic recipe. Alternatively, the dough is so easy to work with, I also use it to make easy gluten-free calzones!
- Prepare the dough and roll the log as described in the pizza rolls recipe.
- Slice in half and position the two logs on the baking sheet about 6-inches apart. Coer and rise as directed.
- Before baking, gently brush the dough with an egg wash (1 egg beaten with 1 tbsp water). Bake as directed, being sure to check the internal temperature of the bread. It should be 190ºF.
- Cool for 10 minutes before slicing and serving.
More variations
Instead of making pepperoni rolls, use the gluten-free pizza rolls recipe to make other variations. Just like pizza toppings, the possibilities are endless!
Spread on the tomato sauce, sprinkle with mozzarella or any preferred cheese. Replace the pepperoni or add any of these toppings in addition to. Since the bake time is short, you may want to precook any veggies
- Bell peppers
- Olives
- Mushrooms
- Ham or Canadian bacon
- Bacon
- Sausage
Storage, Freezing, and Reheating
Since gluten-free baked goods have a tendency to dry out and lose moisture quickly, homemade pizza rolls with pepperoni are best enjoyed the day they are made. I recommend freezing and rewarming as directed below.
Freezing: Cool completely before storing. Wrap the cooled rolls individually in plastic wrap and transfer to a ziplock freezer bag. Freeze up to 2 months.
Rewarming: Thaw at room temperature for 1 hour if reheating in the microwave. Wrap in a slightly damp paper towel and warm for 30-60 seconds at 50% power.
Save this recipe for gluten-free pizza rolls to your pinterest board!
Let’s be friends on Pinterest! I’m always sharing great recipes!

Soft, Doughy Gluten-Free Pizza Rolls (Extra Easy)
Ingredients
- 3 ½ cups (516 g) gluten free all purpose flour, Cup4Cup GF flour highly recommended
- ½ cup (88 g) potato starch, not potato flour
- 2 tablespoons (26 g) granulated sugar
- 1 (9 g) packet (2 ¼ tsp) instant rapid rise yeast
- 1 ½ tablespoons (17 g) psyllium husk powder, What is psyllium husk?
- 1 teaspoon baking powder
- 1 teaspoon salt
- 1 ½ cups (360 g) warm water (110°F)
- 1 large egg, room temperature
- 3 tablespoons (40 g) olive oil
- ⅔ cup (151 g) marinara or pizza sauce, plus more for dipping
- 2 cups (450 g) freshly grated mozzarella
- Italian seasoning
- 54-60 slices pepperoni
Instructions
- Before you begin making the dough, turn the oven to 200ºF. Start to make the dough, but turn the oven off once it reaches temperature. This will serve as an extra warm place for the pizza rolls to initially rise. Grease a 9X13-inch baking pan with nonstick cooking spray. Line a 18X13 half sheet pan with parchment paper and grease with cooking spray. Set aside.
- In a large mixing bowl of a stand mixer using a paddle attachment, combine the GF flour, potato starch, sugar, psyllium, yeast, baking powder and salt on low speed.3 ½ cups gluten free all purpose flour, ½ cup potato starch, 2 tablespoons granulated sugar, 1 packet (2 ¼ tsp) instant rapid rise yeast, 1 ½ tablespoons psyllium husk powder, 1 teaspoon baking powder, 1 teaspoon salt
- Add the warm water, egg, and oil. Combine on low speed until blended. Increase to medium low speed and beat for 5 minutes, stopping to scrape down the bowl once or twice. The dough will be very stiff.1 ½ cups warm water (110°F), 1 large egg, 3 tablespoons olive oil
- Use a spatula to scrape the dough onto the prepared baking sheet with greased parchment. Spray your hands with nonstick cooking spray (or rub with a little olive oil) and evenly pat down the dough to fill the entire sheet pan. Try to the get the dough as evenly dispersed as possible.
- Spread with the marinara sauce, leaving about ½-inch gap around the edges. Distribute the cheese over the marinara and then sprinkle with the Italian seasoning. Cover the cheese with pepperoni slices.⅔ cup marinara or pizza sauce, 2 cups freshly grated mozzarella, Italian seasoning, 54-60 slices pepperoni
- To roll, start with farthest long edge and roll towards you. To start off, lift the parchment with the dough and start to roll. Once the entire length of dough is rolled toward you, peel off the parchment and continue to roll the dough. Stop when you have about 3-4 inches of dough left closest to you. (See photos in post.)
- Take the parchment closest to you and lift it up to meet the roll. Roll the whole log, with the parchment, away so the seam is now against the baking sheet. Peel away the parchment.
- Use a long sharp knife to score the log into 12 even slices. Then, go back and slice through the scores, using a gently sawing motion. Once a slice has been cut through, move it to the 9X13-inch pan positioned in 3 X 4 rows.
- Cover the pan with plastic wrap and place it in the turned off oven. Let rise for 15 minutes. Remove the pan from the oven and set in a draft-free place to continue to rise while the oven preheats to 375℉.
- Remove the plastic wrap and bake for 20-25 minutes, or until the internal temperature of the bread reaches 190℉. I use an instant read thermometer to check, which is perfect for GF breads because they can be tricky to know when they are done. Cool about 5 minutes before serving with additional pizza sauce for dipping.
- DID YOU MAKE THIS RECIPE?? DON'T FORGET TO LEAVE FEEDBACK AND RATE BELOW!
Notes
Storing, Freezing, and Rewarming
Since gluten-free baked goods have a tendency to dry out and lose moisture quickly, homemade pizza rolls with pepperoni are best enjoyed the day they are made. I recommend freezing and rewarming as directed below. Freezing: Cool completely before storing. Wrap the cooled rolls individually in plastic wrap and transfer to a ziplock freezer bag. Freeze up to 2 months. Rewarming: Thaw at room temperature for 1 hour if reheating in the microwave. Wrap in a slightly damp paper towel and warm for 30-60 seconds at 50% power.This post contains affiliate links. My opinions are always my own. If you purchase a product through an affiliate link, I make a small commission – at no cost to you. Read full disclosure policy here.


Hi Melissa!!! I love love your recipes you have the best recipes and love the videos!!!
I made these and they tasted great but looked awful lol and that’s on me! I’m just not sure what I did wrong. I did use a rolling pin to try and get it even before putting on the pan.. I had oil on my hands when rolling it together and had a lot of cracking in the dough and had trouble rolling it and I couldn’t get them to hold shape! Oh and I used Bobs red mill 1 to 1 flour.
Hi Pam,
Oh thank you so much, I’m glad you are enjoying the recipes! I usually just skip the rolling pin with GF dough and use greased fingers to pat it out and smooth. Also, BRM flour has a tendency to soak up a lot of moisture, so if that’s your preferred brand, I would cut back maybe 1/4 cup flour on this recipe next time. You can always add some of it back in if you feel like the dough is too wet.
Best,
Melissa
You need to update your ingredient description. This recipe is probably older but you need to realize that the internet is worldwide and different areas carry different GF flours. Cup4Cup has four different GF flours. One has the milk powder the others don’t. Milk powder is essential for bread baking but is bad if people are lactose intolerant. The other issue is the potato starch and xanthium gum. Many GF Flours have the potato starch and xanthium gum and other don’t; in the ingredient section so you should update your recipe if there is a need for additional potato starch or add in the xanthium gum or should it be eliminated in the recipe if it is an ingredient is in the flour.
Hi Dee,
Thanks for your notes. C4C recently changed their formula and the blue bag no longer has milk powder. I have tested the recipe with the new formula and works well. As far as the other C4C varieties, I link to one I recommend in the recipe. The all purpose GF flour blends do contain xanthan, so I don’t make a separate notation for this. For the potato starch, I’ve found replacing some of the GF flour with potato starch softens the texture, whether the mix contains it or not. Baking and testing recipes with GF flour can be quite frustrating because of all the variations of starches between the blends. I do my best to accommodate the differences, but it’s impossible to notate for all those factors. It would be so much simpler if there was only one flour!
Best,
Melissa
We have loved using this dough for calzones–my family adores them and is always excited when they are on the menu. I would like to try this dough as both pizza rolls (as written) and as pepperoni bread (as mentioned). If I use the dough for pepperoni bread, should I slash the top to let air escape, or just roll, rise, and bake?
Thank you, thank you for all your excellent GF recipes!
Great idea, Rachel! Yes, I would suggest slashing it once or twice before baking for pepperoni bread. Let me know how it turns out!
Best,
Melissa
These are the best pizza rolls I have made, gluten free or not! They are so easy to make and so delicious! My husband (who is not gluten free) asks for these at least three times a month
I was out of mozzarella the last time I made them so I skipped the marinara sauce and used sharp cheddar, and wow! so good this way too!
Oh, this makes me so happy Suzie! My favorite thing ever to hear is when non-GF people give a resounding stamp of approval! It means I did the recipe right! 🙂
Best,
Melissa
Are you able to make these up to the slicing and proofing, then cover and refrigerate for a day or 2, then bake?
Hi Mandy,
I’ll get back to you on this definitively, but I’m going to experiment with that for my cinnamon rolls recipe this weekend. However, I made the rolls, sliced, and then froze. I wouldn’t let them rise first. In your case, if you’d like to try it, I would do the same. Cover and refrigerate up to 24 hours, I think 2 days would be pushing it. When you are ready to bake I would let sit out for at least 1 – 1 1/2 to come to room temp and then rise.
Best,
Melissa
Cup4Cup is the flour blend you recommend, but it already has potato starch in it. Do we really add 1/2 cup more potato starch to this blend as stated in the instructions? I made the dough exactly as written and while it’s pretty good, the dough was very stiff and dry and it made me wonder if the added potato starch had anything to do with it. Thanks!
Hi Ella,
The dough should have some stiffness to be able to roll it, but not be dry. I’m wondering if too much dry ingredients were added? If not, you can cut back a little on the flour next time. How was it after baking?
I use the potato starch because it needs that much dry ingredients to yield a “shapable” dough. However, most recipes keep adding flour to achieve this, but it really dries out the dough after baking. Potato starch has a much softer texture and absorbs liquid so I find the baked results to be doughier and softer. I hope this helps!
Best,
Melissa
Hi Melissa, thank you for your reply! The rolls turned out fantastic! The dough was much firmer than I am used to which made me wonder about the extra potato starch, but I clearly jumped the gun because the final results cannot be argued with. We loved them and I will be baking another batch tomorrow. Thanks again!!
Oh, I’m so glad to hear! Thanks for taking the time to let me know!
Best,
Melissa