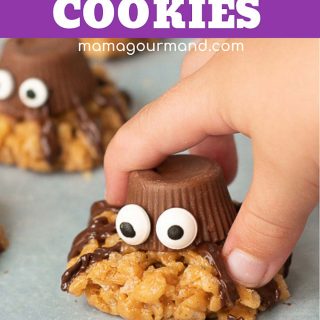
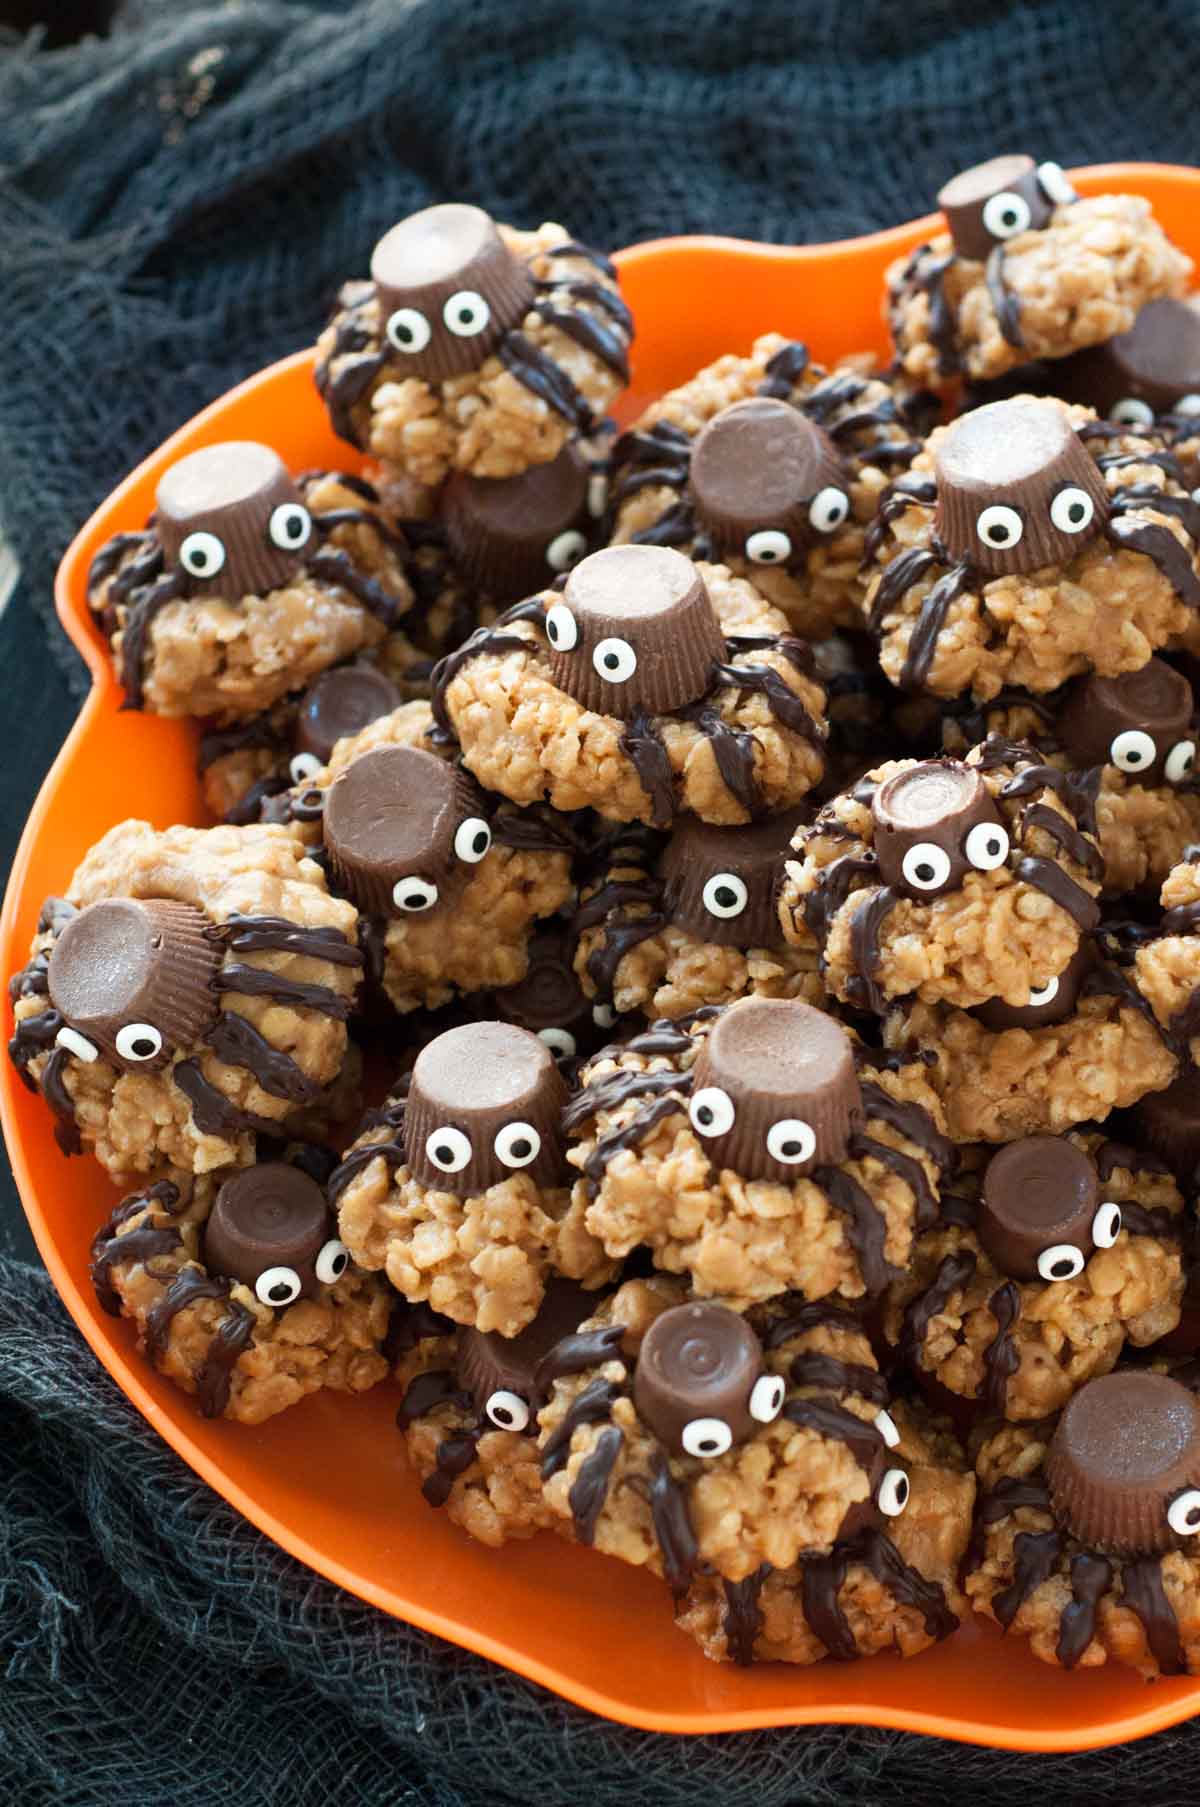
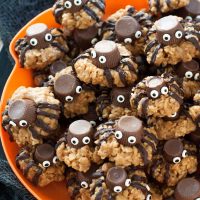
These cute and easy no bake spider cookies will be a hit with both kids and adults this Halloween. These fun, festive gluten-free Halloween cookies combine Reese’s peanut butter cups and crispy rice cereal for a cute treat all can enjoy!
Want to Save This Recipe?
Enter your email below & we'll send it straight to your inbox. Plus you’ll get affordable and easy gluten-free recipes delivered each week!
No Bake Spider Cookies – Easy Gluten Free Halloween Treat!
When looking for creative, cute ideas for a Halloween dessert, Pinterest is an endless sea of possibilities. However, what seems to be lacking are ideas the average busy parent can pull off.
These no bake spider cookies made with Rice Krispies will make you feel like a superstar! They take minutes to mix and drop, while the decorating is simple, yet adorable. Plus, like gluten-free sugar cookies, they are an allergen-friendly gluten-free Halloween cookie!
The bottom portion is a take super cute, spooky spider cookie recipe walks you through step-by-step on how to make the perfect Halloween treat, plus they’re easy enough for your kids to help with. Win win!
Free Guide! 5 easy tips for baking like a gluten-free pro!
Simple hacks for fail-proof gluten-free dishes every time!
Ingredient Tid Bits
If you are making these as gluten-free treat, make sure to read all the ingredient labels carefully. Not all brands of puffed rice cereal are gluten-free. While it is made primarily from rice, there are additives, such as malt flavor, which contains barley (a gluten-free no-no).
- Crisp rice cereal – More commonly known as “Rice Krispies,” but Kellogg’s brand IS NOT gluten-free. For gluten-free spider cookies use brands, such as Aldi, Malt-O-Meal, Wegmans, or Erewhon.
- Peanut butter – Creamy peanut butter, not natural, works best
- Miniature peanut butter cups (or Rolo candy) – Reese’s peanut butter cups are gluten-free, but not the unwrapped mini version. Rolo candy may also be used.
- Candy eyeballs – While these contain no wheat or derivative of wheat ingredients, they are processed in a facility that contains wheat.
Let’s Make This Together!
(Below shows step-by-step photos and modified instructions. For the complete recipe, along with ingredient amounts, scroll down to the recipe card.)
Prepping first is key!
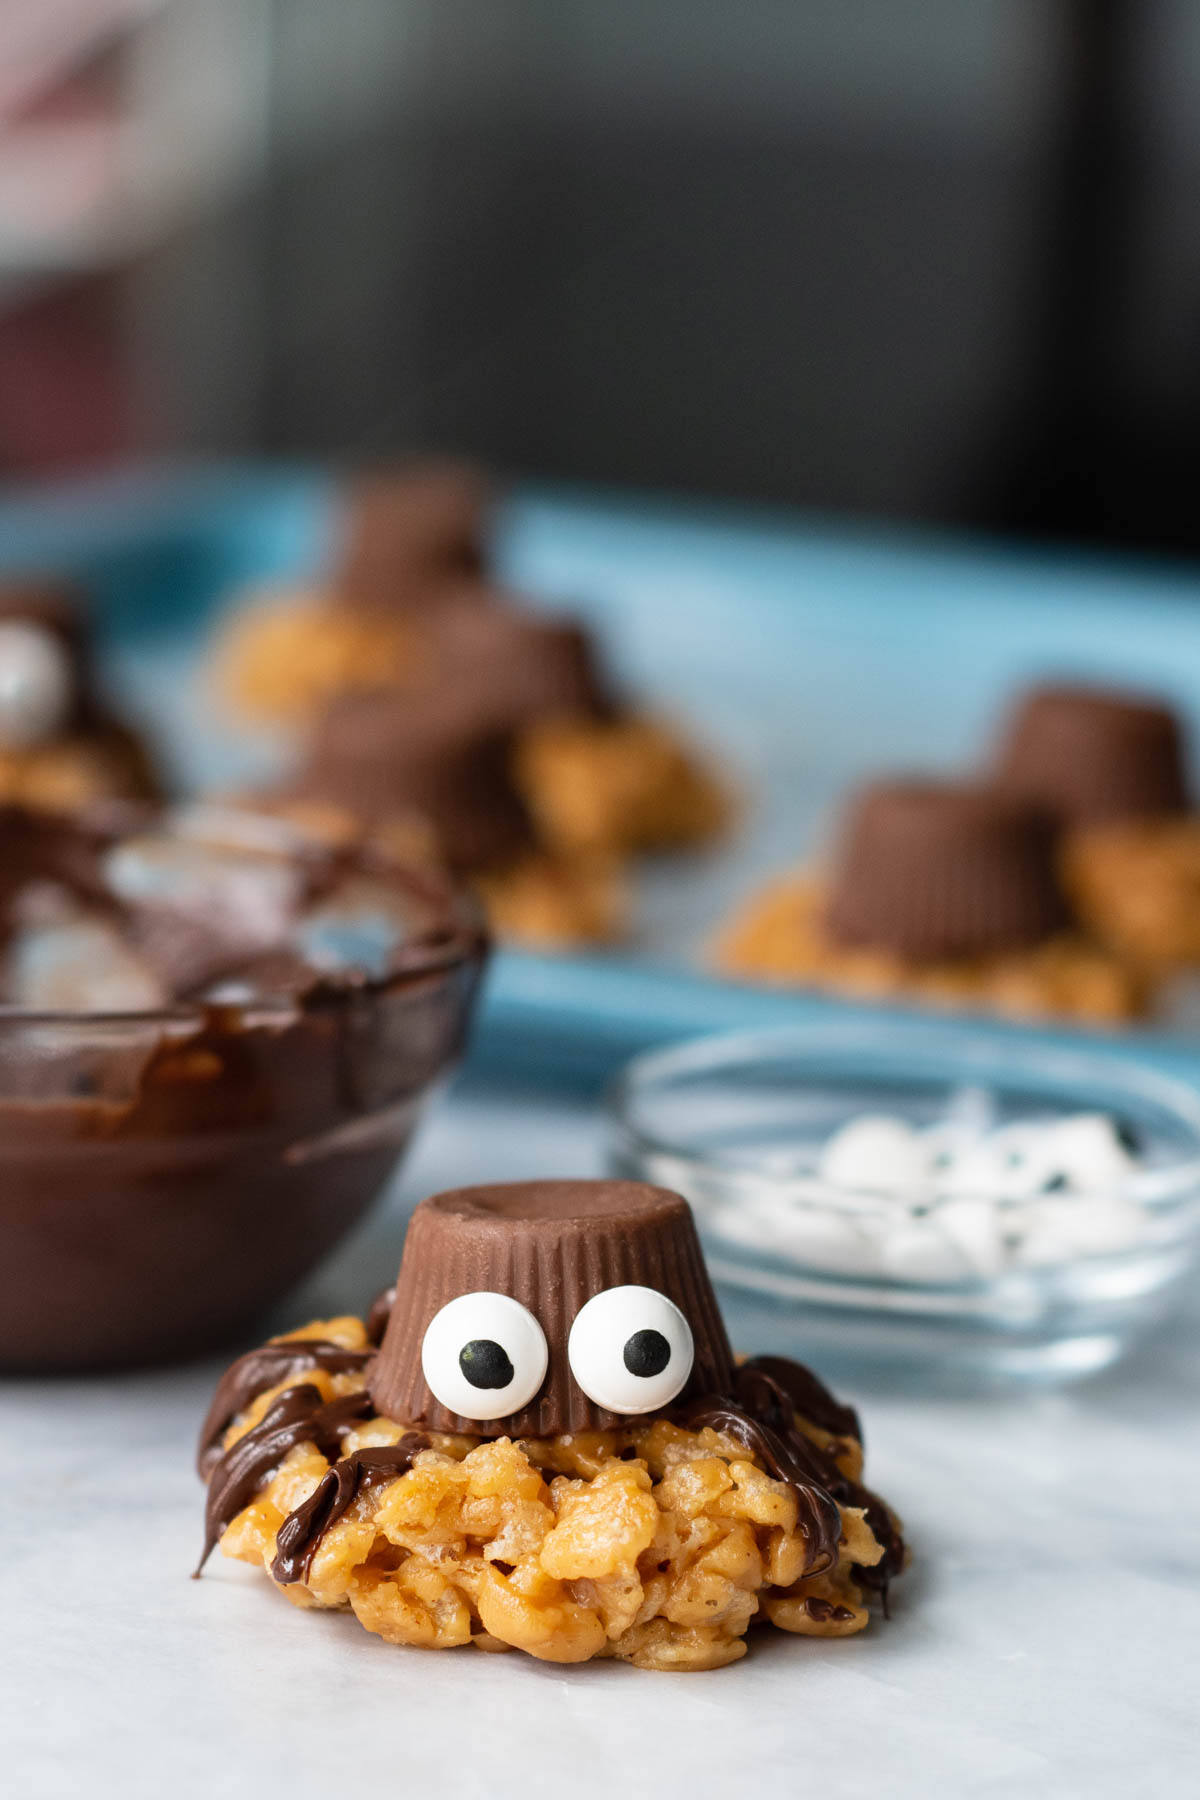
First prepare and measure ingredients – rice cereal, brown sugar, and peanut butter. Unwrap miniature peanut butter cups so they are ready to set on cookies immediately.

Combining no bake cookie mixture
First prepare and measure ingredients – rice cereal, brown sugar, and peanut butter. Unwrap miniature peanut butter cups so they are ready to set on cookies immediately.

Scoop out cookies and place on peanut butter cup
Immediately scoop cookies onto wax paper-lined baking sheets. Use a cookie scoop (quickest way) or roll into balls with hands. As soon as the no bake ball is on cookie sheet, press a peanut butter cup on top. Cool completely.


Time to decorate
Melt chocolate chips in a small microwave safe bowl. Use a toothpick to paint on 8 “spider legs.” Using the toothpick and melted chocolate, dot on spots to adhere spider candy eyes to.


Kid Helper Tips
Kids love making fun Halloween cookies! There are plenty of ways they can (legitimately) help make these no bake cookies!
- Once all the cookies are assembled, melt the chocolate chips. Now the kids can really take over drawing on the legs, making two dots for the eyes, and adhering the candy eyes on.
- These treats go a lot smoother if everything is measured before hand. Have them help measure the rice cereal, brown sugar, and peanut butter.
- The peanut butter cups need to be unwrapped first to be put on quickly. Have them unwrap at least 28 and place in a medium bowl. They can also be a “bonus” taste tester to make sure they are on point!
- The adult can roll spider bodies and place on prepared cookie sheets. The child can place the spider “head” (peanut butter cup or Rolo) on top.

Pro Tips To Remember
- Assembling the cookies goes fast and has to be done while everything is warm, so line two cookie sheets with wax paper, unwrap peanut butter cups, measure peanut butter and cereal before starting recipe.
- Using a medium cookie scoop (1.5 tablespoon size) really simplifies making quick, even-sized balls.
- Once the rolled ball is placed on cookie sheet, immediately top with peanut butter cup (kids can help with this task). The peanut butter cup needs to be placed on the warm rice krispie base so the chocolate will melt slightly and adhere to it.
- Once the cookies are assembled with peanut butter cup, you can decorate with legs and eyes as you have time.
- It’s okay if you don’t get them decorated all at one time. I did about half and finished the rest later. Just remelt bowl of chocolate in microwave when you’re ready to decorate again.
Save this recipe to your pinterest board!
Let’s be friends on Pinterest! I’m always sharing great recipes!
Did you make this recipe? I love hearing from you! Leave a star rating and comment below the recipe card. It helps others when searching for recipes and I appreciate feedback from our community. You will always hear back from me! -Melissa
Easy No Bake Spider Cookies
Ingredients
- ½ cup (170.5 g) corn syrup
- ¼ cup (55 g) packed light brown sugar
- 1 cup (258 g) creamy peanut butter
- 1 teaspoon (1 tsp.) vanilla extract
- 3 cups (56 g) crisp rice cereal, read label for gluten-free (see recipe notes)
- 28 (26) miniature peanut butter cups or Rolo candy, read label for gluten-free (see recipe notes)
- ¼ cup (90 g) semi-sweet chocolate chips
- 56 (52) candy eyeballs, read label for gluten-free
Equipment
Instructions
- Prepare everything first. Line two cookie sheets with wax paper, unwrap peanut butter cups, and measure peanut butter and cereal. Set aside.28 miniature peanut butter cups or Rolo candy, 3 cups crisp rice cereal
- In a medium saucepan, over medium heat, combine the corn syrup and brown sugar. Bring just to boil, stirring constantly. Remove from heat and stir in peanut butter and vanilla.½ cup corn syrup, ¼ cup packed light brown sugar, 1 cup creamy peanut butter, 1 teaspoon vanilla extract
- Immediately stir in cereal and drop 1 ½ inch balls on lined cookie sheets. TIP: Using a medium cookie scoop makes this very easy, but you can also roll balls with your hands. Place ball on cookie sheet, flatten slightly with fingers, and immediately press peanut butter cup on top, pushing down slightly.
- Once all the cookies are formed, refrigerate the cookie sheets for a few minutes to set chocolate. Meanwhile, melt chocolate chips in a microwave-safe bowl for 30 seconds – 1 minute, stirring every 15 seconds.¼ cup semi-sweet chocolate chips
- Use a toothpick dipped into melted chocolate to paint on 8 spider legs. Then use the toothpick to place small chocolate dots on peanut butter cups where eyes will go. Use chocolate dots to "glue" eyeballs on.
- Refrigerate pans for 5-10 minutes to harden chocolate and then store cookies in airtight container.
Notes
Gluten Free Ingredients
While are crisp rice cereal is often referred to as “Rice Krispies,” the Kellogg’s brand that makes this IS NOT gluten-free. For gluten-free rice cereal, use brands such as Aldi, Malt-O-Meal, Wegmans, or Erewhon. Miniature wrapped peanut butter cups or Rolos, which are needed for this recipe are gluten-free. However, unwrapped minis and seasonal shaped ones, such as pumpkins, are not. Recipe adapted from Six Sisters’ StuffThis post contains affiliate links. My opinions are always my own. If you purchase a product through an affiliate link, I make a small commission – at no cost to you. Read full disclosure policy here.


Used this for a speech in school and it was pretty good. I had a little trouble since I had to microwave instead of boiling. It turned out okay and was tasty.
Thanks for sharing, Lily!
Yummy
Glad you liked it! Thanks, Aphrodite!
Best,
Melissa
I made these for a Halloween party for my 20 year old son and his friends who go to college 30 minutes from our house. Drawing the spider legs and “gluing” the eyes on was way to time consuming for me!! And I didn’t have the patience to draw good legs. Fortunately I had a 10″ spider to put next to the plate to explain what they were… Also I ordered the eyes that were recommended and they weren’t a hit – I found a bunch on the used plates. So because of the time they took and the eyes not being tasty, I threw the recipe away. Fast forward two weeks and my son asked to have a a birthday party with even more friends and requested these. So, I am now calling this a five star recipe for taste. I will make them without the legs and eyes for his birthday party. And keep the recipe this time. I used Aldi’s rice cereal and Aldi’s pb cups. My husband and I are gluten intolerant but my son and his friends are not.
Hey Liz,
I usually make these with the kids, and I agree, in real life the legs aren’t so perfect, but I don’t sweat it. The kids have fun with it. If I was making them all by myself, I agree, the decorating part could be a little tedious. I’m glad you enjoyed the cookie, though, and especially your son. Thanks for taking the time to let me know!
Best,
Melissa
These are a fun and delicious recipe to make with your kids or grandkids. I’m gathering all the ingredients to make them for our new neighbors as a Halloween treat!
Agreed, Betty! What a great treat to share with others. I’m sure they will be so grateful!
Best,
Melissa
Did you use sweetened or natural peanut butter?
Hi Kate,
I used sweetened creamy peanut butter. I haven’t tested it with natural peanut butter. The texture might be slightly different, but I don’t see why it wouldn’t work.
Best,
Melissa
Miniature peanut butter cups are not gluten free. Regular size ones are but minis are not.
Hi Mindy! Thanks so much for the heads up. I used an off-brand one that didn’t have any gluten in the ingredients, but may have been processed on shared equipment. I’ll update the recipe to make sure people know to check.