
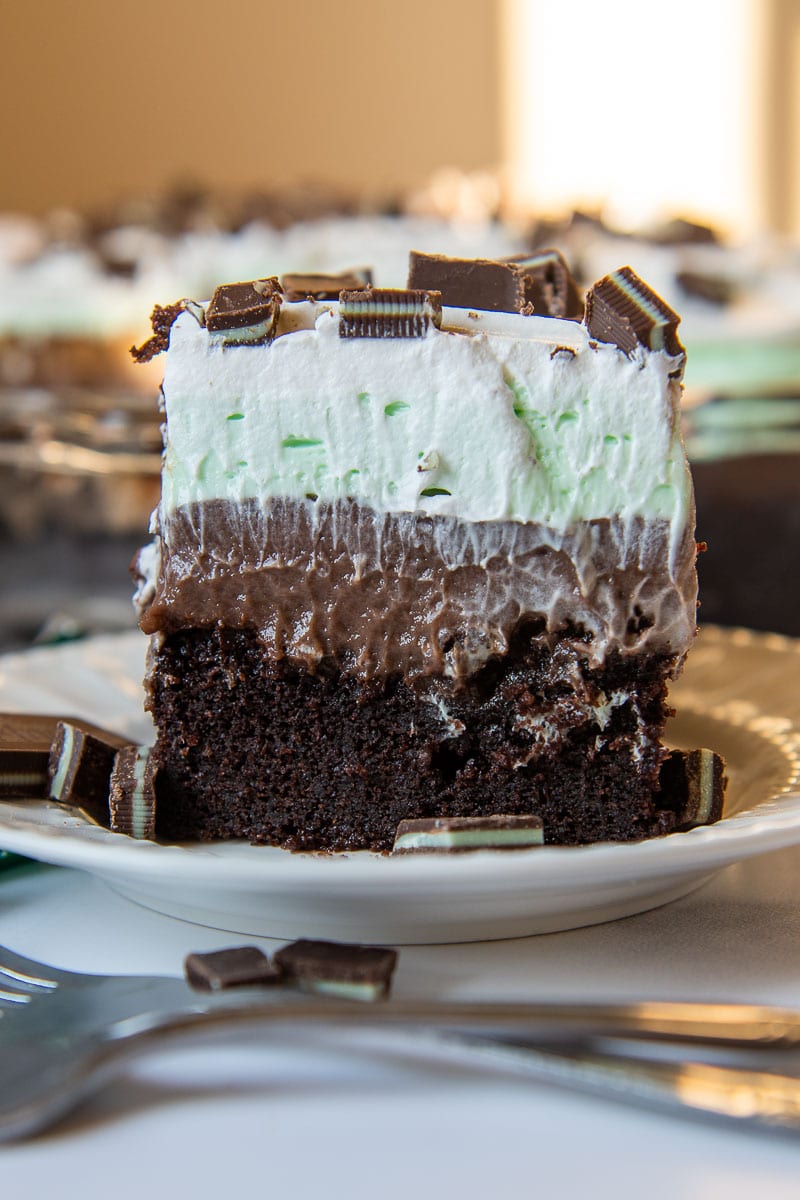
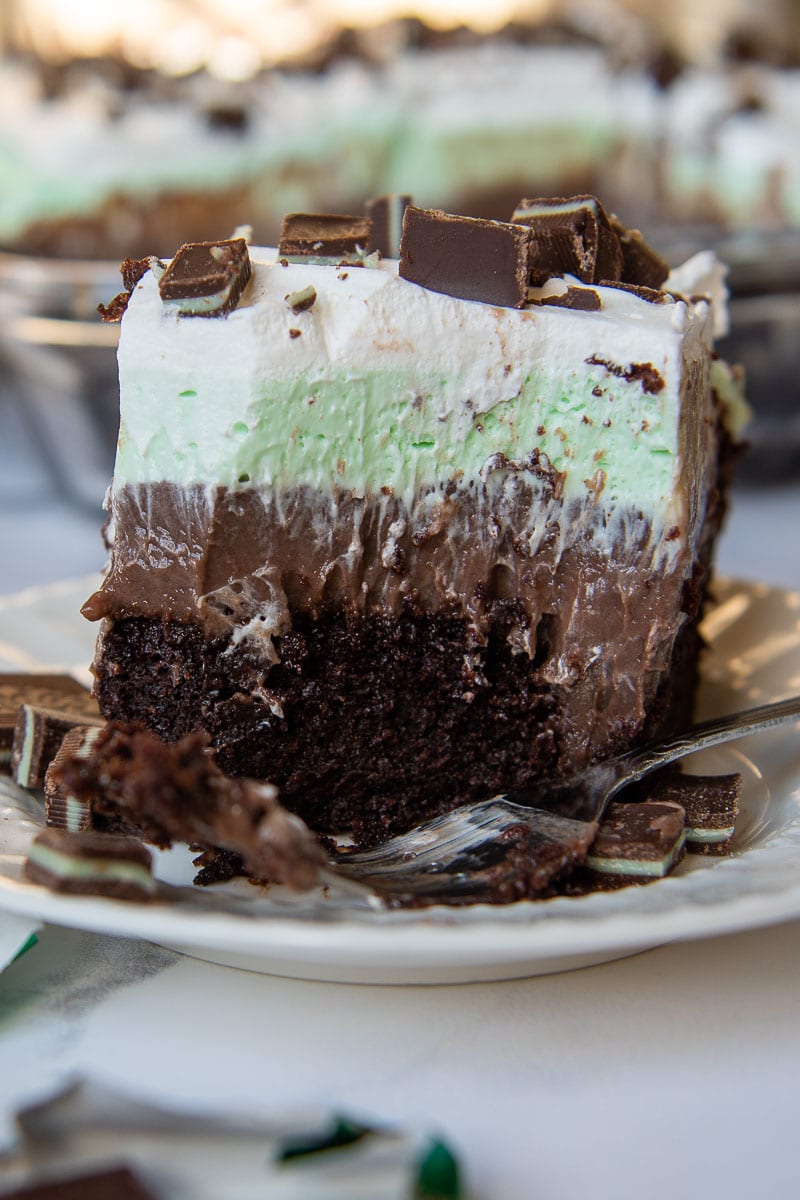
Andes Mint Chocolate Pudding Poke Cake is a cool, creamy dessert with chocolate cake, pudding poured on top, and a thick layer of mint Cool Whip topping. Andes mint cake is perfect for birthdays, special occasions, or St. Patrick’s Day.
Andes Mint Chocolate Pudding Poke Cake is inspired by a very popular dessert in our family called PUNCH BOWL CAKE. This family recipe has the same mint chocolate flavors, but supersized and served in a punch bowl. (Kind of like trifle for giants.)
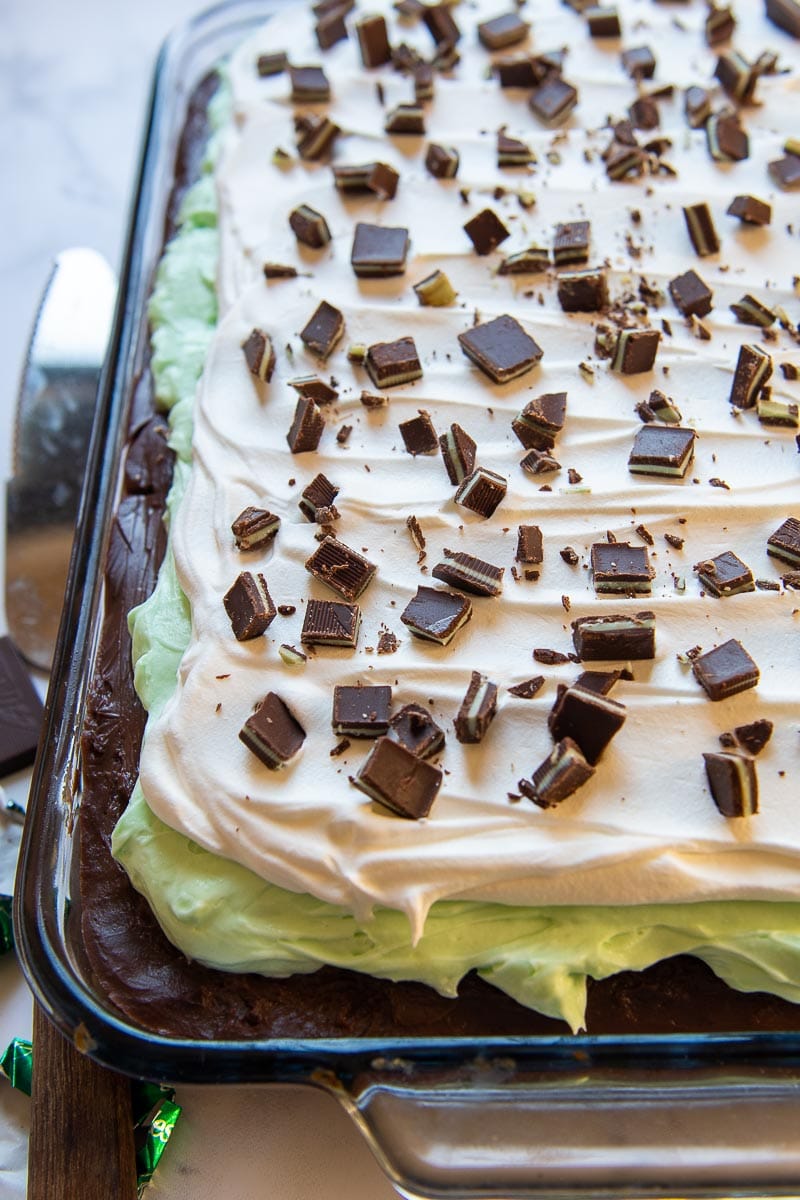
Chocolate pudding poke cakes get their extra moist texture from warm pudding seeping into the cake. Then all that rich chocolate is perfectly complemented with layers of cool mint Cool Whip topping and crushed Andes chocolate candies.
For this Andes mint cake recipe I wanted to maintain the inspired flavors, but served in a more reasonable-sized variation. Another change comes from the addition of cream cheese. It gives an extra boost of creamy, tangy flavor, while adding a variance of texture in the topping layers.
If you can’t get enough of chocolatey mint desserts (I don’t blame ya!), I bet this cool and creamy chocolate mint pie recipe is calling your name as well!
(Original recipe for Original Punch Bowl Cake appears at bottom of post)
Want to Save This Recipe?
Enter your email below & we'll send it straight to your inbox. Plus you’ll get affordable and easy gluten-free recipes delivered each week!
Ingredients needed
Chocolate Pudding Poke Cake uses cook and serve chocolate pudding, so the pudding is warm as it is poured on the cake. A homemade pudding, made from scratch, will also work. Although instant pudding would be slightly easier, it might not soak in the cake as well.
For the chocolate cake, use a cake mix, prepare a homemade chocolate cake, or for a gluten free adaptation, make moist gluten free chocolate cake recipe.
- Chocolate cake – Baked in a 9X13 pan.
- Chocolate Pudding – The recipe calls for 3 small boxes, but this can be reduced if you’d like a thinner layer of pudding.
- Cool Whip
- Mint Extract
- Powdered Sugar
- Cream Cheese – Regular or light
- Milk
- Green Food Coloring – Optional
- Heavy Cream
- Andes Chocolate Mints – For decorating and a boost of mint chocolate flavor. Crushed mint Oreos would also work well.
Free Guide! 5 easy tips for baking like a gluten-free pro!
Simple hacks for fail-proof gluten-free dishes every time!
How To Make Andes Mint Chocolate Pudding Poke Cake
Plan ahead to allow time for the chocolate pudding to seep into the cake and cool. If preparing this cake for a party, it’s best made the day before.
- Prepared the chocolate cake mix, gluten free chocolate cake, or the from scratch recipe below. Bake in a 9X13 baking dish.
- While the cake is cooling slightly, prepare the chocolate pudding. I prefer the cook and serve boxes for taste and ease, but you may also substitute a homemade recipe or instant chocolate pudding.
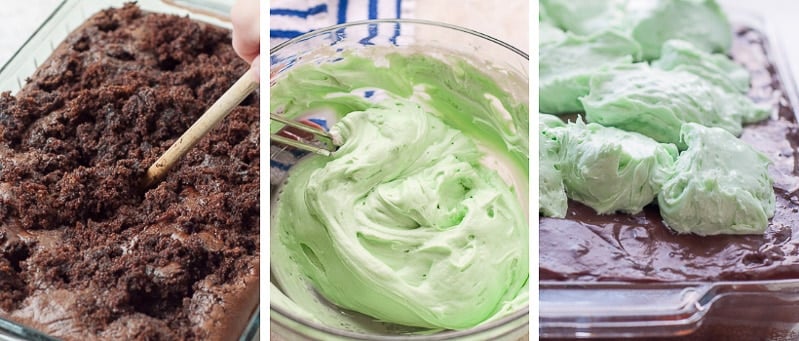
- Use the handle of a wooden spoon to pretty much destroy the top of the cake. Don’t worry! The hot pudding will be poured over the holes, seeping into the cake in an even layer.
- Securely press down plastic wrap on top of the pudding and refrigerate until cool.
- Prepare the Andes mint topping by beating together cream cheese, powdered sugar, mint extract, heavy cream, and green food coloring. Gently fold in 1 cup Cool Whip topping.
- Spread on top of cooled pudding layer. Spread remaining Cool Whip on top and sprinkle with Andes Mints.
Tips and Tricks for Making Chocolate Pudding Poke Cake
- It’s best to use cook and serve pudding so it will be warm when you pour it over the cake. This helps it soak into the cake more. Instant pudding uses cold milk so it will more or less sit on top.
- For best results, make the pudding as the cake cools slightly. However, if you need to bake the cake ahead of time, it’s fine to pour the warm pudding over a cooled cake. It might not saturate the cake as much, but it won’t affect the taste.
- Beat the mint cream cheese layer for a full 3 minutes. Mixing at a high speed for a longer time will give the heavy cream in the mix needed time to add volume and airiness.
- This recipe makes 3 thick layers – cake, pudding, and a mint cream topping. For a less gregarious dessert, cut back on the amount of pudding or halve the amount of cream cheese and whipped topping.
- For added mint flavor add 1/2 teaspoon mint extract to remaining Cool Whip before spreading on top.
SAVE THIS ANDES MINT CHOCOLATE PUDDING POKE CAKE TO YOUR PINTEREST BOARD!
Let’s be friends on Pinterest! I’m always sharing great recipes!

Andes Mint Chocolate Pudding Poke Cake
Ingredients
Chocolate Cake (or substitute 9X13 box cake mix)
- 2 cups (250 g) all purpose flour or gluten free all purpose flour, (for GF cake, I highly recommend Cup 4 Cup gluten free flour)
- 2 cups (400 g) granulated sugar
- ¾ cup (64.5 g) unsweetened cocoa powder
- 2 teaspoons (2 tsp.) baking powder
- 1 ½ teaspoons (1.5 tsp.) baking soda
- 1 teaspoon (1 tsp.) salt
- 1 teaspoon (1 tsp. ) espresso powder, optional
- 1 cup (244 g) milk
- ½ cup (109 g) oil, canola, vegetable, or any preferred
- 2 (2) large eggs
- 2 teaspoons (2 tsp.) vanilla extract
- 1 cup (250 g) boiling water
Chocolate Pudding
- 3 boxes (3 boxes) (small 3.4 oz) Cook and Serve (NOT INSTANT) chocolate pudding,, see recipe note
- 6 cups (1.46 kg) milk
Mint Cream Layer
- 2 – (8) ounce packages cream cheese, softened
- 1 cup (120 g) powdered sugar
- 1/4 cup (59.5 g) heavy cream
- 2 teaspoons (1 tsp. ) peppermint extract
- 6 drops (6 drops) green food coloring
- 8 ounce (226.8 g) thawed Cool Whip whipped topping,, divided
- Andes Mints, chopped
Instructions
- Preheat oven to 350º F. Spray a 9X13 pan with cooking spray.
- Add flour, sugar, cocoa, baking powder, baking soda, salt and (optional) espresso powder to a large bowl or the bowl of a stand mixer. Whisk thoroughly to combine or, using your paddle attachment, stir on low speed until combined well.2 cups all purpose flour or gluten free all purpose flour, 2 cups granulated sugar, ¾ cup unsweetened cocoa powder, 2 teaspoons baking powder, 1 ½ teaspoons baking soda, 1 teaspoon salt, 1 teaspoon espresso powder
- Add milk, vegetable oil, eggs, and vanilla to flour mixture and mix together on medium speed until combined. Reduce speed to low and carefully add boiling water to the cake batter. Once the water is mixed in increase to high speed for 1 minute.1 cup milk, ½ cup oil, 2 large eggs, 2 teaspoons vanilla extract, 1 cup boiling water
- Pour batter in prepared baking dish and bake for 45-50 minutes or until toothpick inserted in middle comes out clean. Cool slightly while pudding is prepared.
- Make chocolate pudding according to directions on box. If not pouring the pudding on the cake immediately, press a piece of plastic wrap against the top of the pudding to prevent a skin from forming.3 boxes (small 3.4 oz) Cook and Serve (NOT INSTANT) chocolate pudding,, 6 cups milk
- After the cake has cooled 15-20 minutes, poke holes every inch with wooden spoon handle. The cake will look pretty destroyed, but don't worry it will all be covered up. Pour the warm pudding over the warm cake. Smooth with rubber or offset spatula. Press a large piece of plastic wrap onto the pudding and refrigerate for 3 hours – overnight.
- For the mint cream layer, beat cream cheeses, powdered sugar, heavy cream, mint extract, and food coloring together with a mixer until very light and fluffy, about 3 minutes. Fold in 1 cup of whipped topping. Spread evenly on top of cooled pudding layer.2 – (8) ounce packages cream cheese, 1 cup powdered sugar, 1/4 cup heavy cream, 2 teaspoons peppermint extract, 6 drops green food coloring
- Cover mint cream layer with remaining Cool Whip. Sprinkle chopped andes mints on top. Cover and refrigerate leftovers.
Notes
Tips and Tricks
- It’s best to use cook and serve pudding so it will be warm when you pour it over the cake. This helps it soak into the cake more. Instant pudding uses cold milk so it will more or less sit on top.
- For best results, make the pudding as the cake cools slightly. However, if you need to bake the cake ahead of time, it’s fine to pour the warm pudding over a cooled cake. It might not saturate the cake as much, but it won’t affect the taste.
- Beat the mint cream cheese layer for a full 3 minutes. Mixing at a high speed for a longer time will give the heavy cream in the mix needed time to add volume and airiness.
- This recipe makes 3 thick layers – cake, pudding, and a mint cream topping. For a less gregarious dessert, cut back on the amount of pudding or halve the amount of cream cheese and whipped topping.
- For added mint flavor add 1/2 teaspoon mint extract to remaining Cool Whip before spreading on top.
ORIGINAL PUNCH BOWL CAKE RECIPE:
Ingredients:
2 layer chocolate cake
2 large (5 oz. boxes) cook and serve chocolate pudding
6 cups milk
2 8 oz. containers whipped topping (Cool Whip)
mint extract
green food coloring
special equipment: punch bowl or large trifle bowl
Directions:
- Cook pudding according to directions. Cool and refrigerate until pudding is completely cold.
- Bake cake according to directions in two cake layer pans. Cool and cut each layer horizontally to make 4 total layers. Set aside.
- In a large bowl fold together whipped topping, mint extract, and green food coloring. Add the extract and coloring until you feel like it’s minty enough and has a tinted “mint” color.
- Assembly: Layer one cake layer at bottom of bowl. Top with one-forth pudding and one-forth mint whipped topping. Repeat 3 more times, ending with cool whip. Garnish top with sprinkles or chocolate curls.
This post contains affiliate links. My opinions are always my own. If you purchase a product through an affiliate link, I make a small commission – at no cost to you. Read full disclosure policy here.
This post contains affiliate links. My opinions are always my own. If you purchase a product through an affiliate link, I make a small commission – at no cost to you. Read full disclosure policy here.


I struggled with this recipe. I used Torani Creme de Menthe syrup because that is what I had on hand to make mint ice cream and shakes. I put about 6 tablespoons in 1 block of cream cheese with sugar and heavy cream and when I beat it I could not get it to be fluffy and it mostly tasted like cream cheese (and yes looked like toothpaste). I can’t imagine using 2 blocks of cream cheese. So I ditched the cream cheese mixture entirely and went with whipped cream and about 1/4+ cup of Creme de Menthe syrup. It was much better and simpler. I also didn’t have a deep enough pan – a 4″ deep pan would probably work better than a standard cake pan. So I didn’t use all the pudding and I couldn’t put the plain whipped cream on top until I served it. But my husband took care of the extra pudding before it even had a chance to chill. So no problem there! Family loved it.
Hi Lee,
So sorry the recipe didn’t go as planned! I haven’t tried the Torani Creme de Menthe with the cream cheese, so I can’t speak to what might have gone wrong there. The minty whipped cream sounds like a great improvisation though! I just made this cake again for my son’s bday (he always requests it) and it does seem like everything isn’t going to fit in the pan. I always question if I should half the cream cheese and pudding amounts, but once it’s all layered and eating it, it’s spot on! Thanks for the feedback.
Best,
Melissa
Missi, I made it, it turned out great! I even used the cake recipe to make it taste so much better! The only thing different I would do next time is use a glass 9×13 pan, instead of a metal one. I noticed my glass ones are a little bit longer. I had way to much pudding to use all of it, so I had leftovers.
Nothing wrong with eating leftover pudding! And yes, the glass 9X13 is better because you can see the layers too. Glad you liked it!
I made this yesterday for my husband to take to work. It looked beautiful but I have to mention that I thought the mint in the cream cheese mixture reminded me of toothpaste. The recipe is good, however, if I make this again I would not add the mint to cream cheese but just add it to the cool whip with the green food coloring. I think you could really do this recipe without the cheesecake altogether. The cake recipe is a really good recipe
Hi Kathy,
I think that sounds like a great idea! You can also decrease the mint amount or use peppermint extract instead of mint.
Best,
Melissa
Melissa, original recipe is added now. Enjoy!
Hi Melissa! I’ll get that on the post hopefully today. I did want to include it, I just wasn’t sure how I was going to go about putting two recipes on one post. 🙄 I wanted everyone to have this recipe in time for St. Patrick’s Day. Thanks for writing!