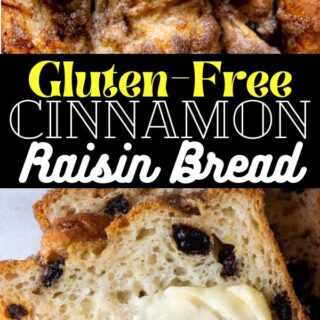
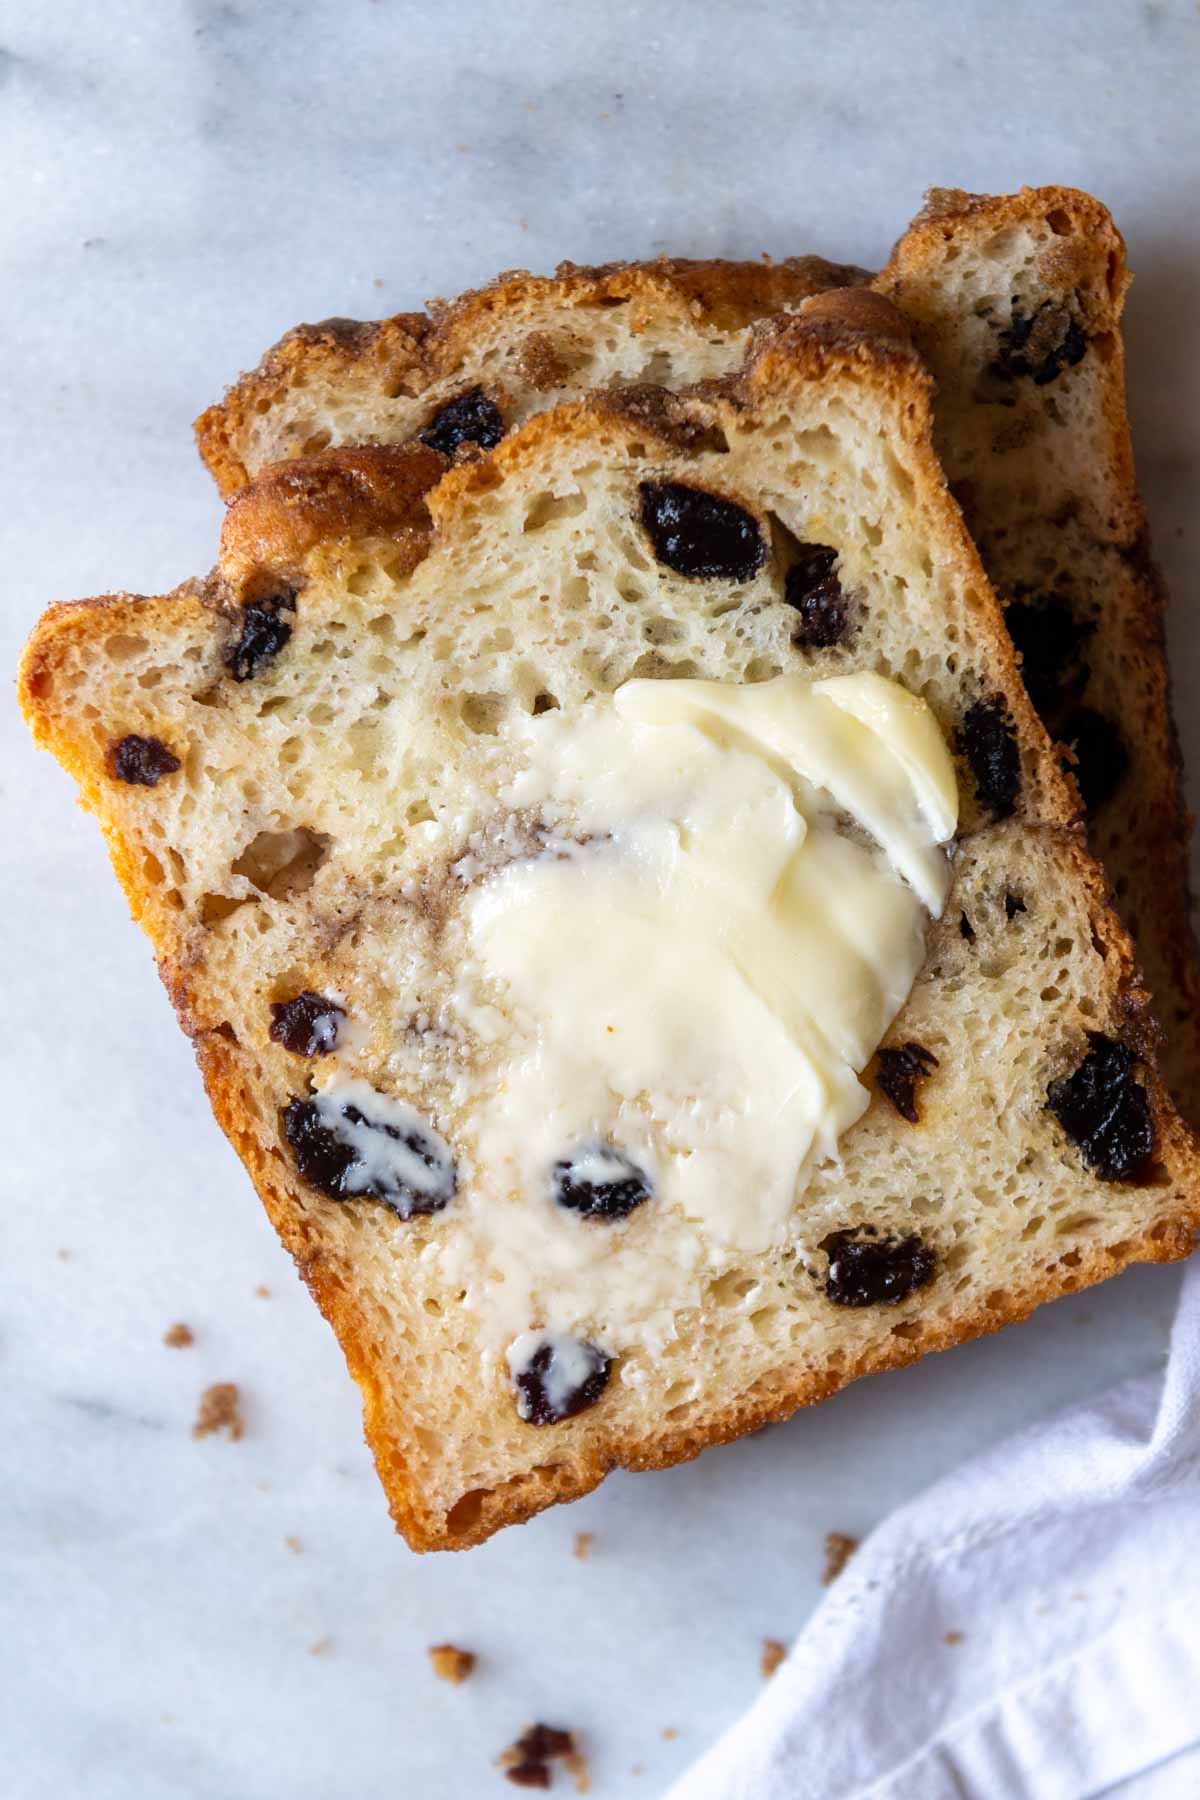
Enjoy a soft, buttery slice of easy gluten-free cinnamon raisin bread without the effort! This mix, dump and bake recipe starts with the softest GF bread dough, enhanced with plump raisins and a double layer of cinnamon swirl. It’s simple enough for even the most novice gluten-free bakers to pull off with impressive, delicious results!
Want to Save This Recipe?
Enter your email below & we'll send it straight to your inbox. Plus you’ll get affordable and easy gluten-free recipes delivered each week!
Easy Gluten-Free Cinnamon Raisin Bread Recipe
Whether you don’t have extra time to make exceptionally soft gluten-free cinnamon rolls or sticky, gooey GF monkey bread, are looking for sliceable breakfast bread, or miss this classic treat, gluten-free cinnamon raisin bread checks a lot of boxes!
When creating this gluten-free raisin bread recipe I wanted to avoid complex steps, such as multiple rises and rolling out dough Of course, I couldn’t sacrifice the ideal sweetness, soft fluffy texture, and taste so I turned to one of my most widely-shared recipes for the bread dough base – 5-star gluten-free bread!
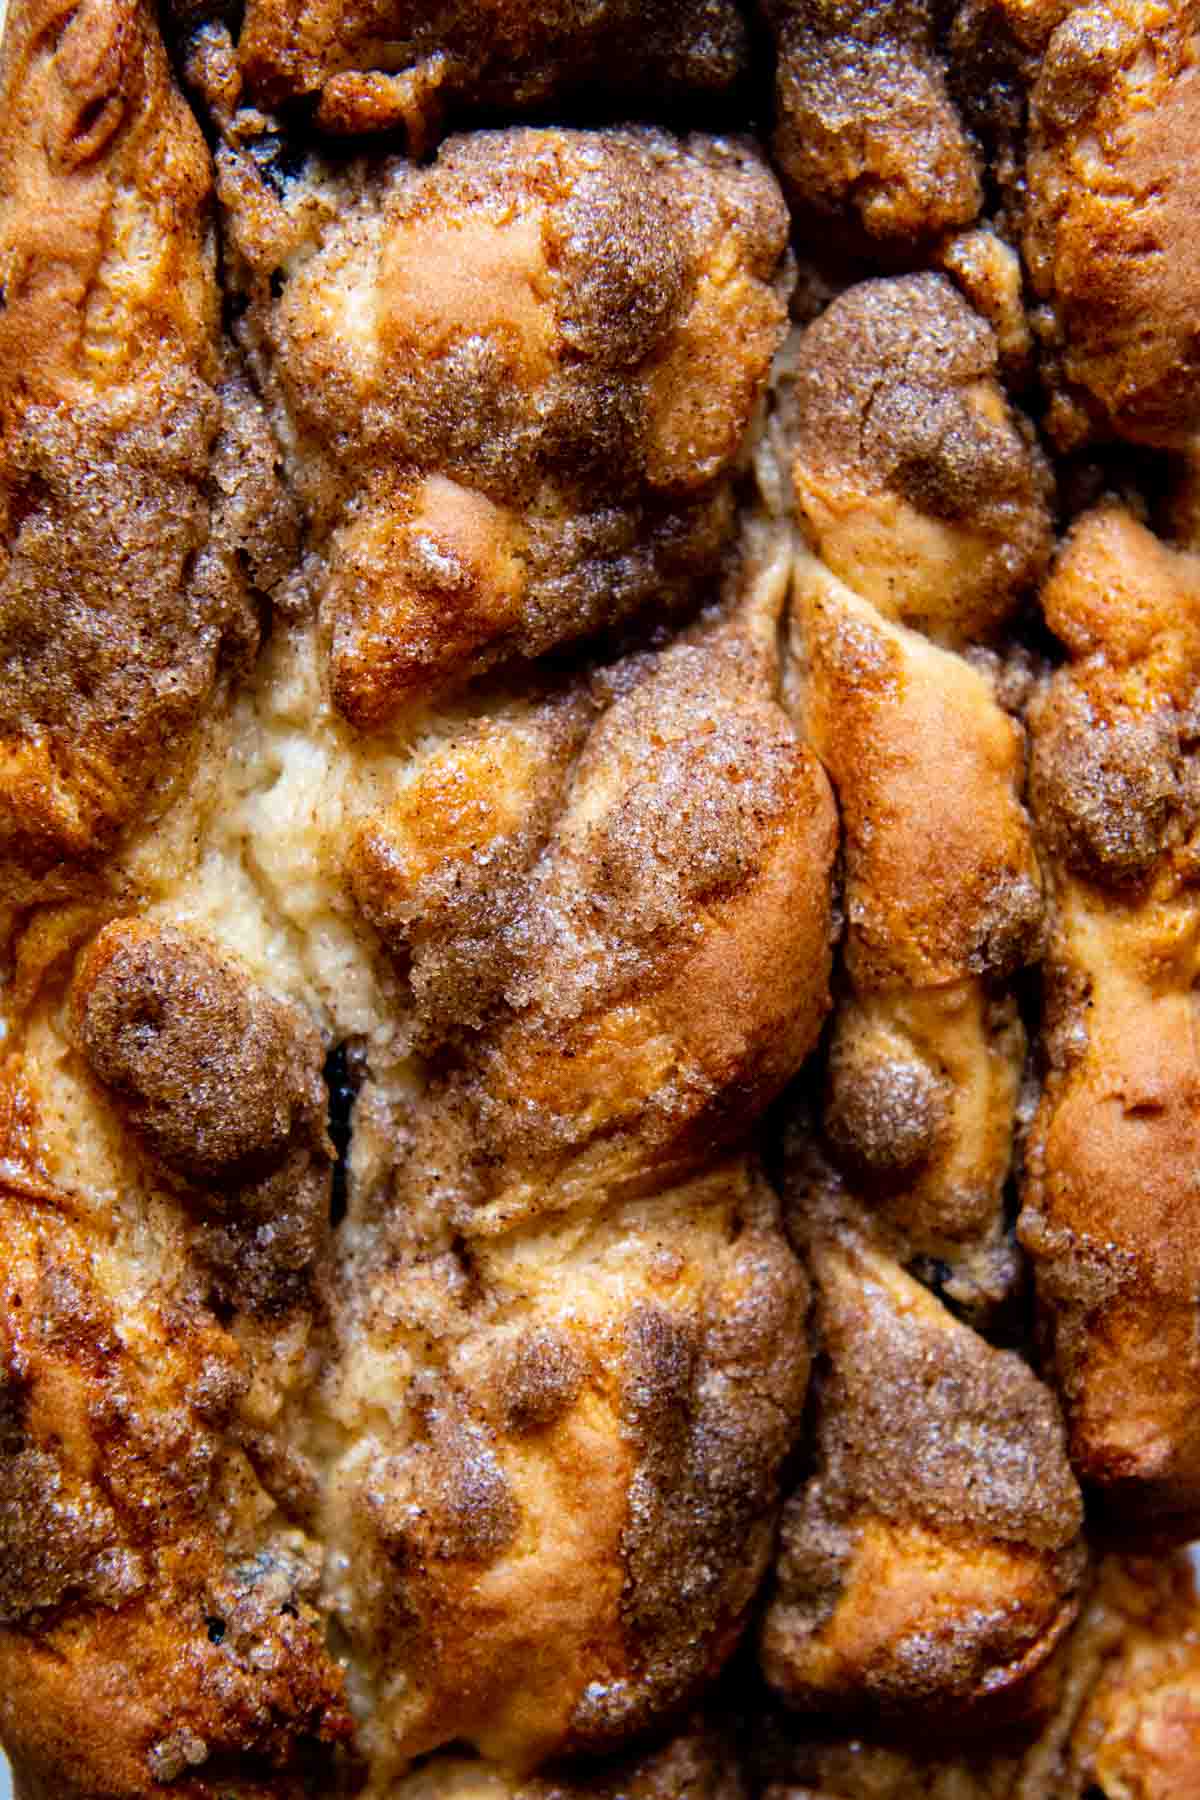
To make the dough, the process is the same. Simply mix all the ingredients in a large bowl and pour into the pan. To maximize the best old fashioned flavor, the dough is layered with two doses of cinnamon-sugar mixture and an entire cup of juicy raisins sprinkled throughout.
Below I share how to make GF cinnamon raisin bread, step-by-step, with bonus notes, such as how to adapt the recipe for dairy-free, know when the bread is done baking, and multiple ways to enjoy this treat besides toast!
Free Guide! Receive a Free Gluten Free Breakfasts Cookbook
TOP 5 Highest Rated Recipes!
Ingredient Tid Bits
- Gluten-free flour – Unfortunately not all flour blends are created equal and they make or break the raisin bread quality. I highly recommend using Cup4Cup GF flour. See my everything guide to gluten-free flour for how other brands compare with taste and texture.
- Psyllium Husk Powder – I’ve made the bread multiples with and without the psyllium husk powder. It doesn’t affect the taste, but it does help maintain moisture and prevents the bread from becoming crumbly. Some brands will turn breads darker, or even purplish in color, so I recommend using this particular one.
- Instant (Rapid Rise) Yeast – I love using instant yeast because it requires no proofing. Simply mix with the dry ingredients and let the dough rise.
- Honey – Granulated sugar may be substituted, but it will result in a slightly drier texture.
- Oil – Use any preferred oil, such as vegetable, coconut, or canola oil. Alternatively, substitute the same amount of melted butter, but not for gluten-free dairy-free bread.
Let’s Make This Together!
(Below shows step-by-step photos and modified instructions. For the complete recipe, along with ingredient amounts, scroll down to the recipe card.)
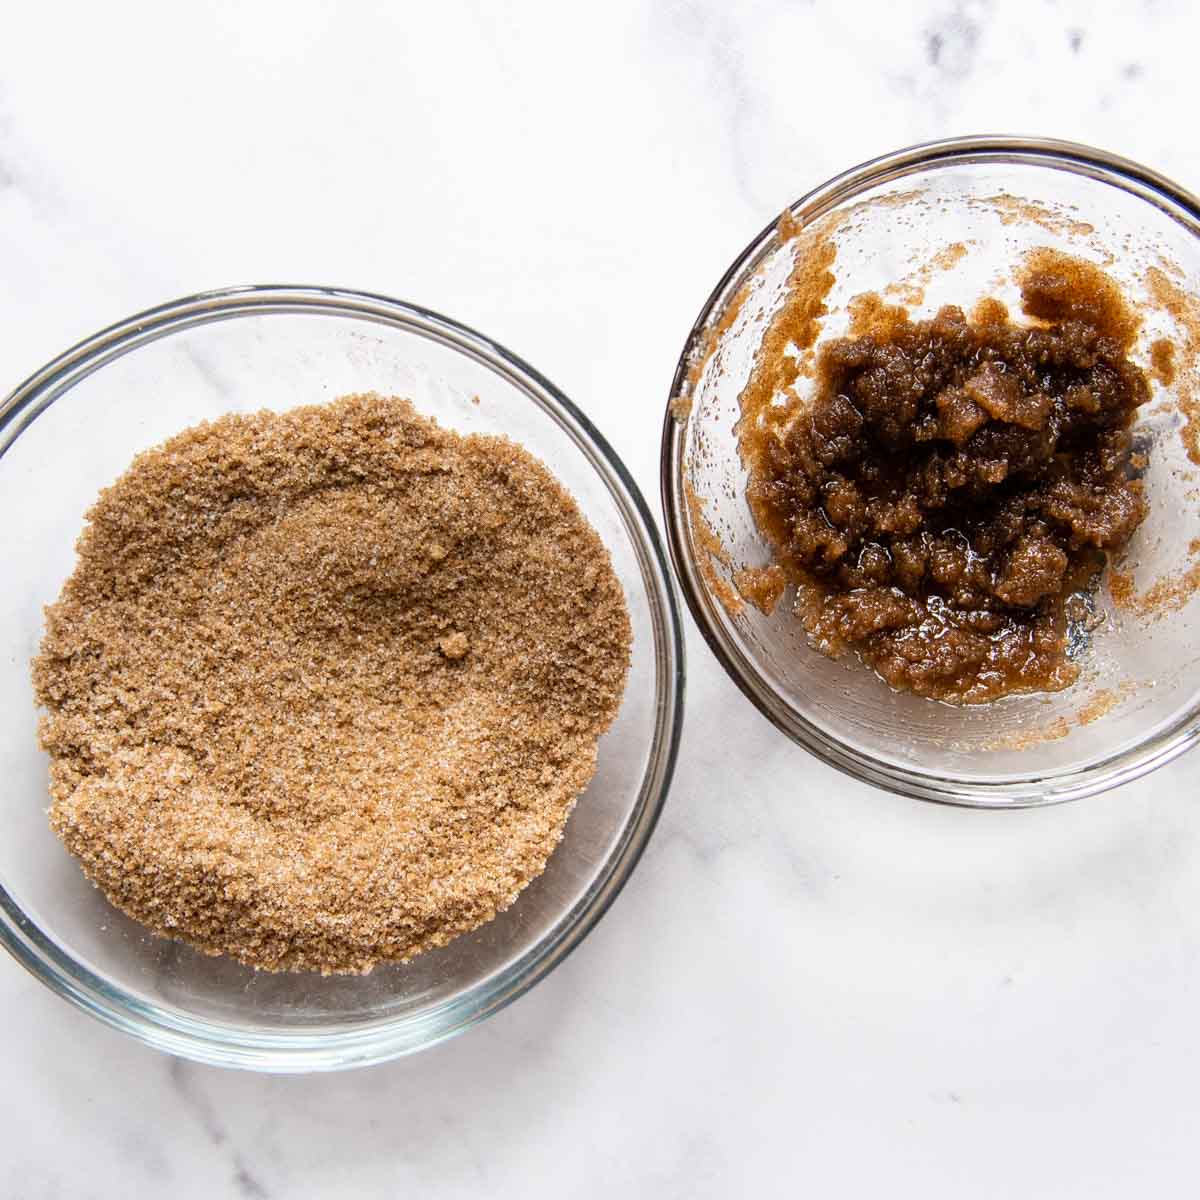
- Begin by making the cinnamon sugar mixture. Stir together brown sugar, granulated sugar, and cinnamon. Transfer 4 tablespoons of this mixture to another bowl and then stir in melted butter. The dry mixture goes in the bread, while the butter one is used on top.
- For the bread, use a stand mixer with paddle attachment and combine the gluten free flour, yeast, psyllium husk powder, baking powder, and salt on low speed until combined.
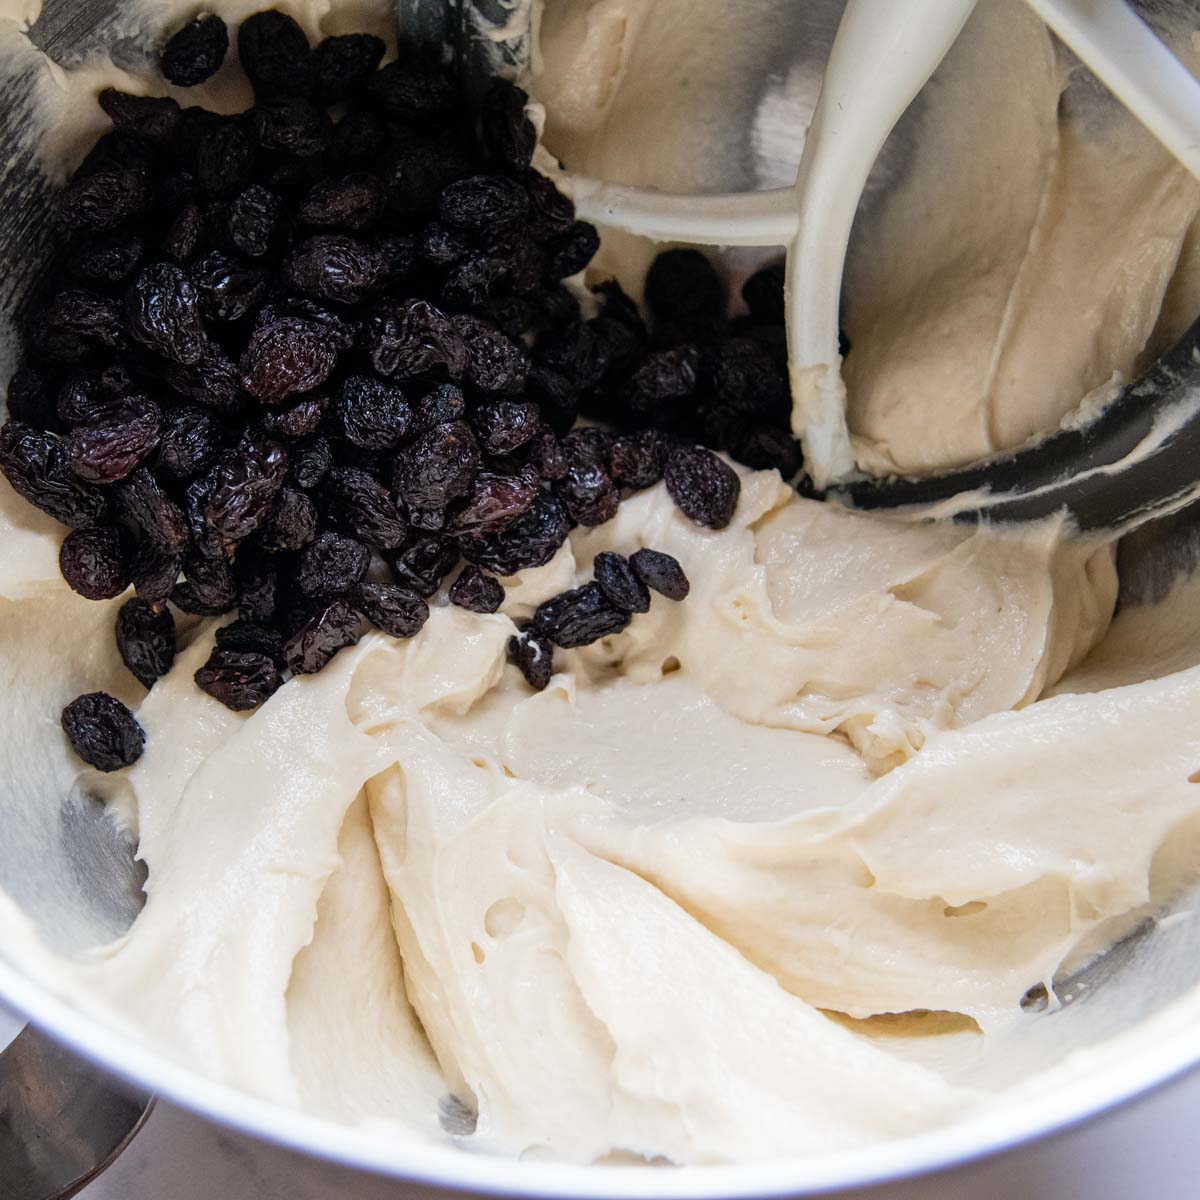
- Add warm water, eggs, honey, and oil. Mix on low speed to let the dough come together, about 1 minute. Increase speed to medium and beat for 5 minutes, scraping down paddle and bowl halfway through. The batter will be thinner, slightly thicker than cake batter. Stir in the raisins.
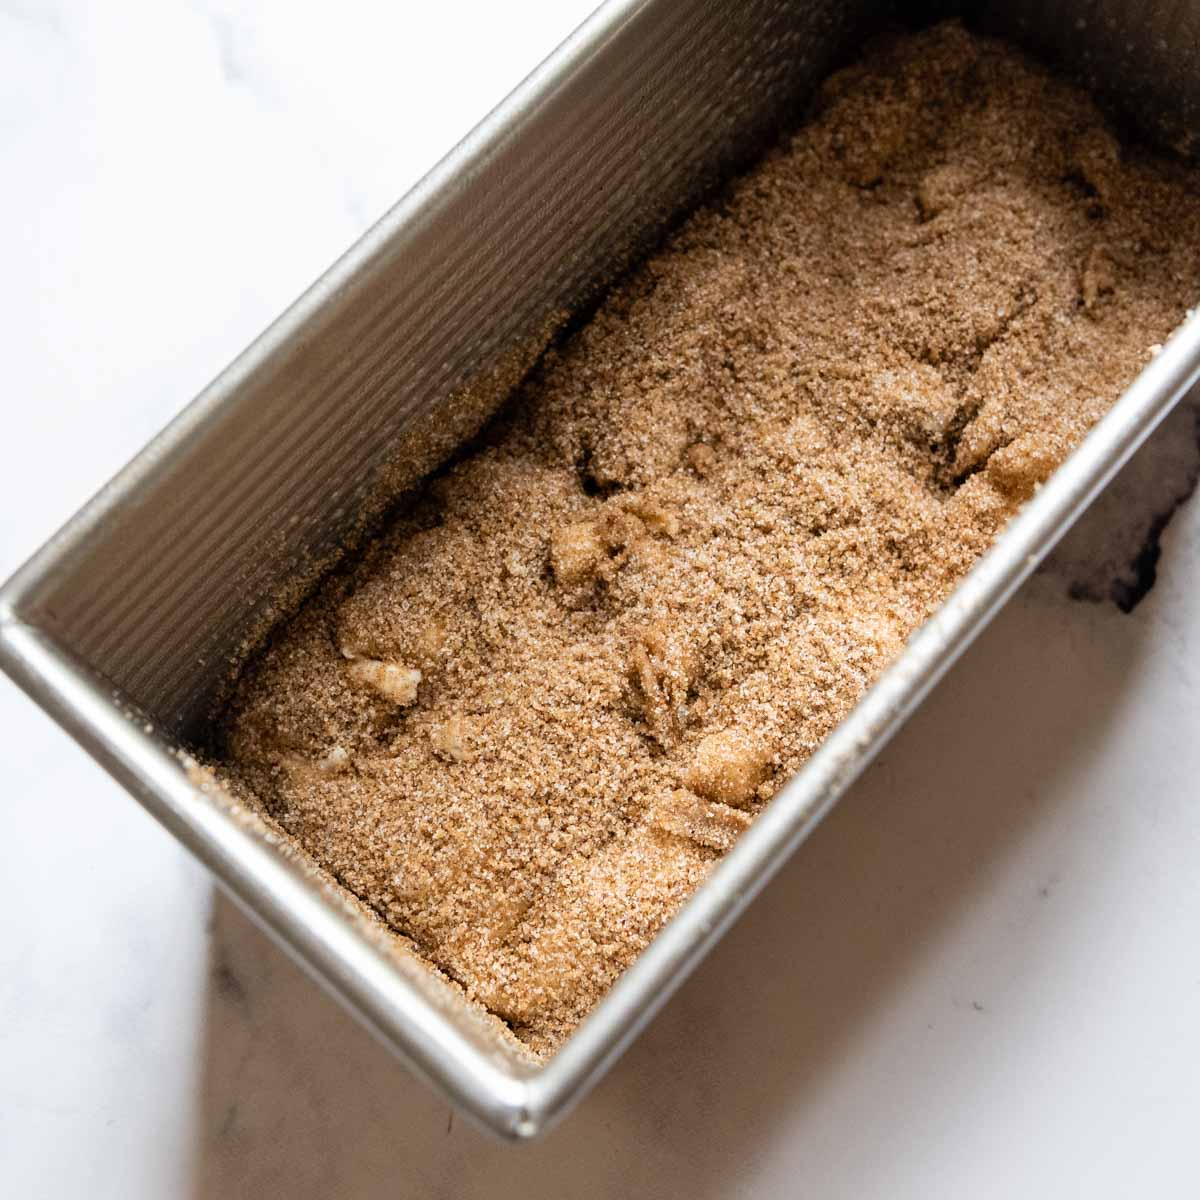
- Grease a loaf pan. Pour in half the batter and smooth evenly. Sprinkle the dry sugar mixture over the top. Use a butter knife to gently swirl the mixture in.
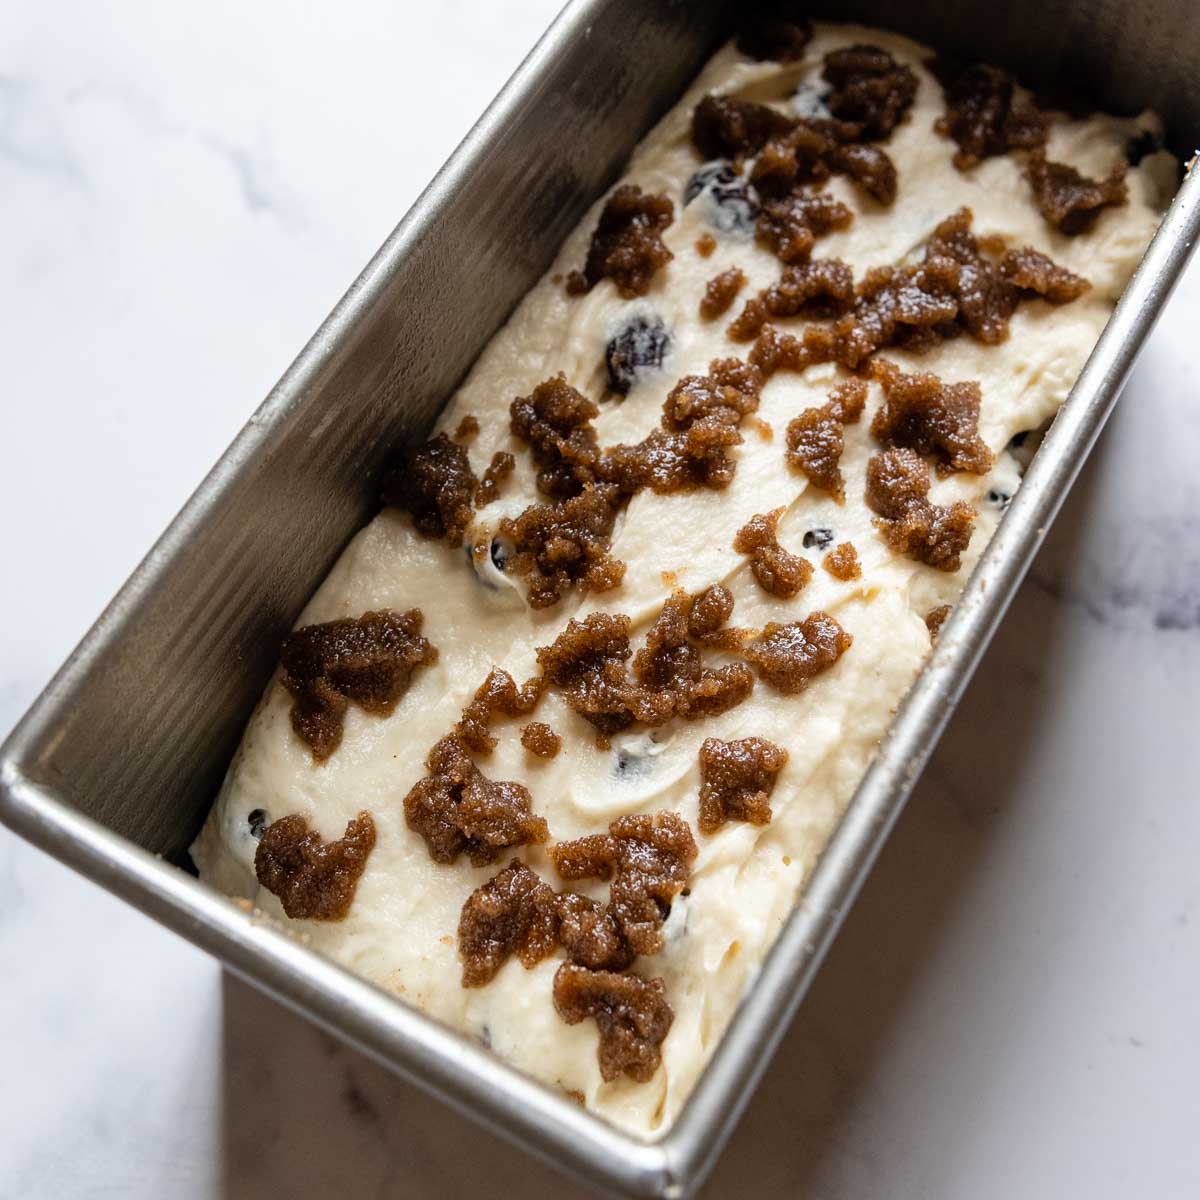
- Dollop the remaining batter over the top and gently smooth. Sprinkle the butter sugar mixture over the top. Use a knife to swirl again, piercing all the way down to the bottom of the pan. Swirl in one direction and then repeat in the opposite direction.
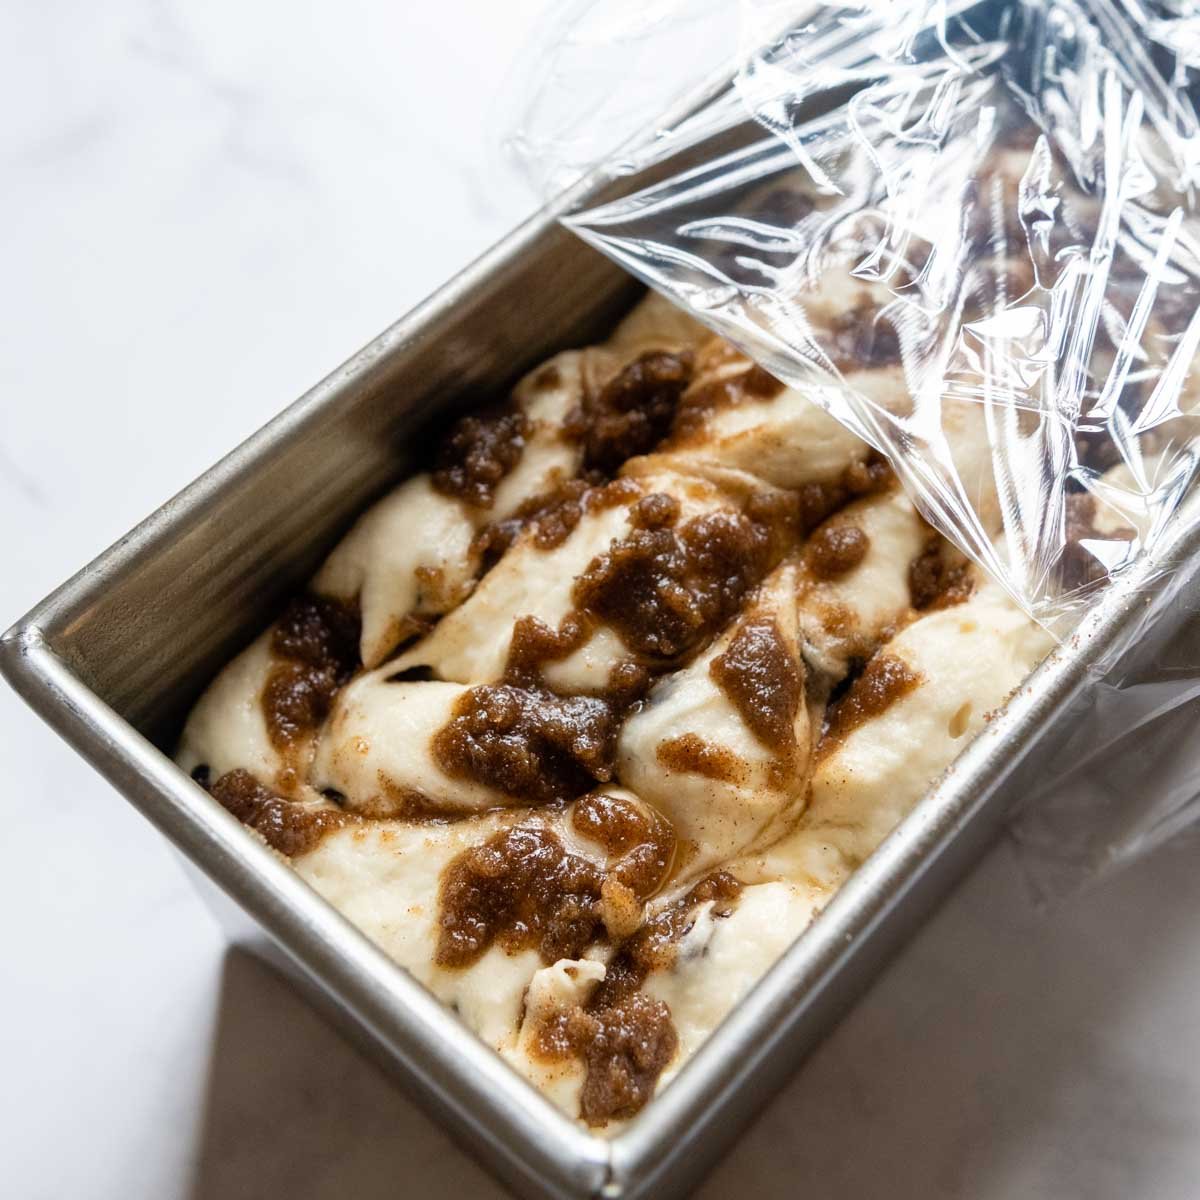
- Cover with a large, greased piece of plastic wrap. Set in a warm, draft-free place to rise until the bread reaches two-thirds to the top of the pan, about 20 minutes. Meanwhile, preheat oven to 350°F.
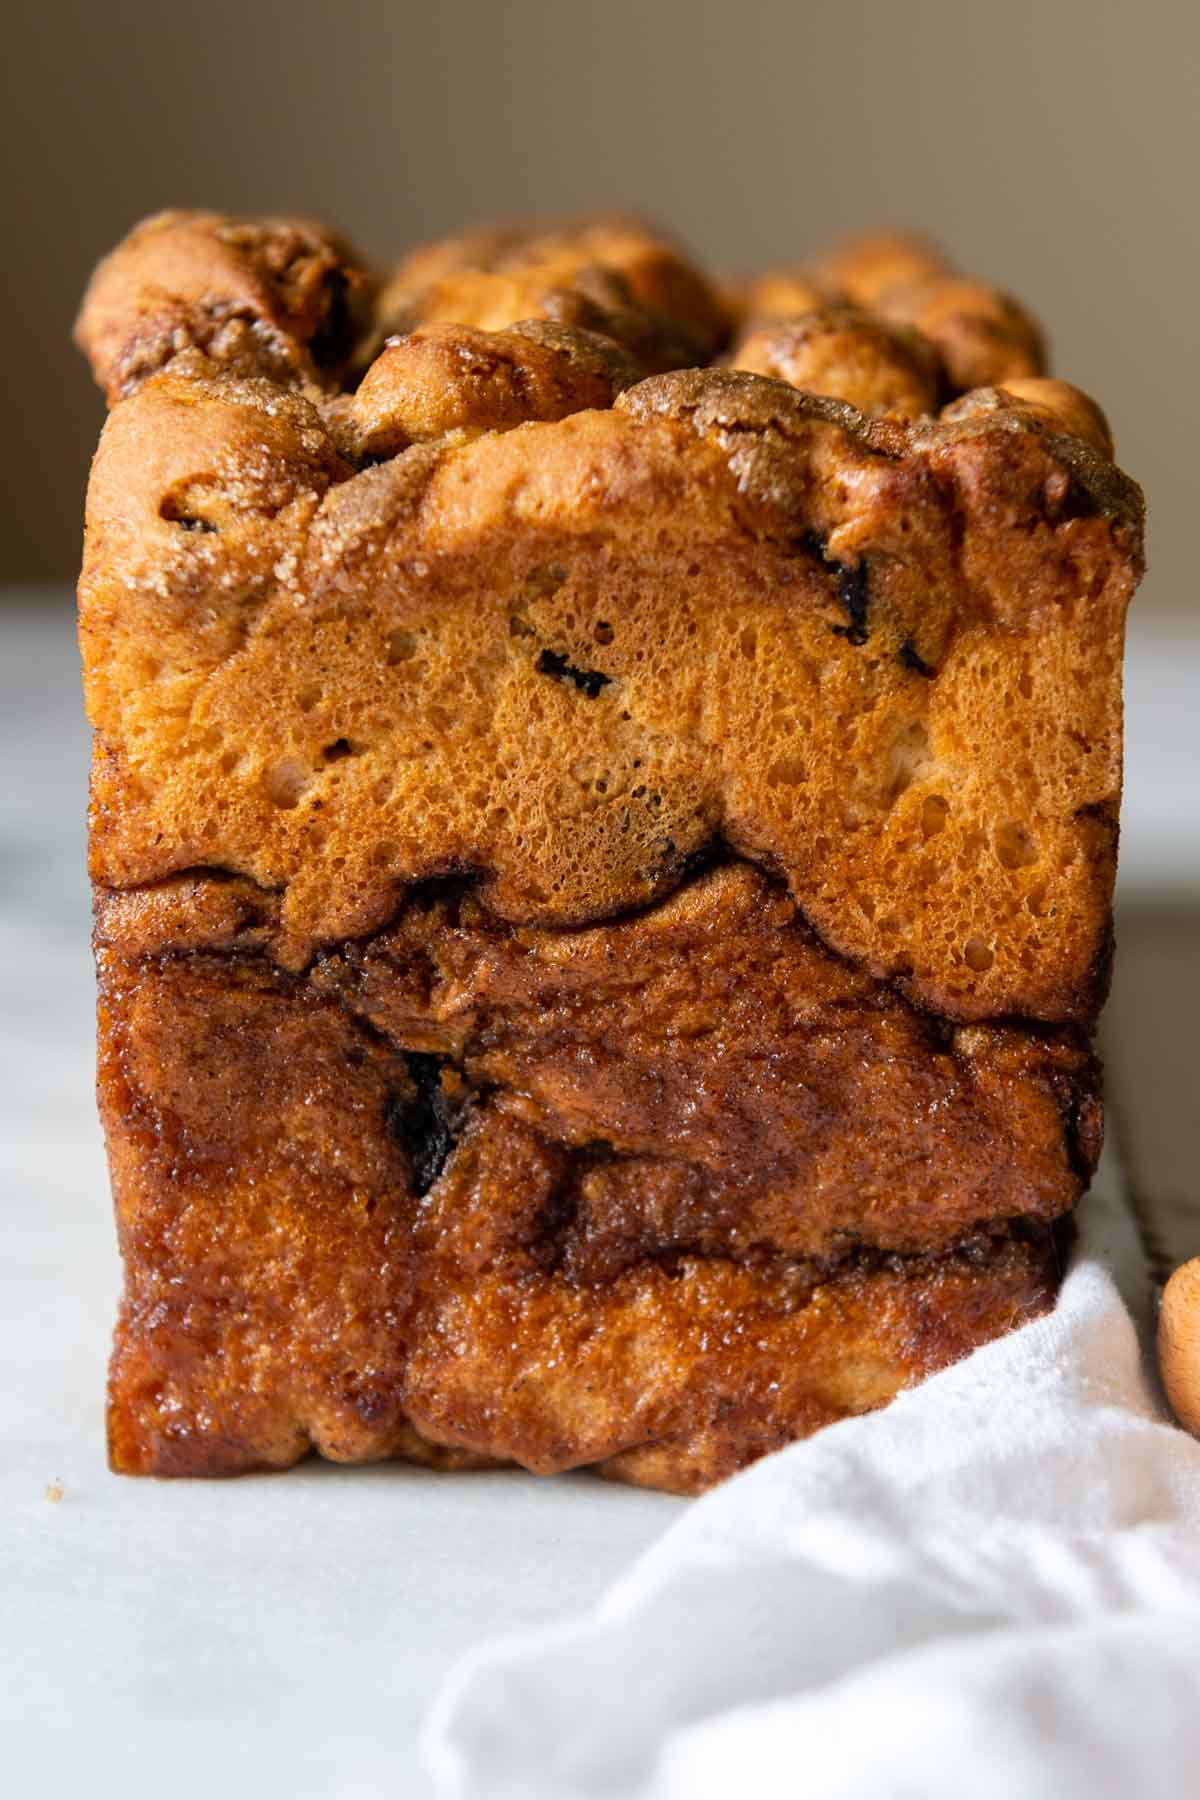
- Bake the bread or 50-55 minutes, tenting a piece of foil loosely over the bread halfway through. The internal temperature of the bread should read 190-200°F. (See How to Know When GF Bread is Done)
- Allow the loaf to cool for 10 minutes in the pan and then remove to a wire rack. Allow bread to cool at least 1 hour before slicing. For best results, serve the bread slightly warm or toasted. Chilled, cold bread has an adverse effect on texture.
Recommended Baking Pan
This gluten-free bread recipe yields a lot of bread dough, so the loaf pan volume is important! For best results, I highly recommend investing in a small pullman loaf pan, which measures 9X4X4-inches.
It handles the amount of dough perfectly, conducts heat evenly throughout baking so the entire loaf bakes uniformly, and yields an authentic sandwich bread shape, perfect for slicing!
If you do not have a pullman pan on hand, a 9X5-inch loaf pan will also work, but a 8X4-inch pan may cause the bread to overflow in your oven and should be avoided.
How to Know When GF Bread is Done
I highly recommend using an instant read thermometer to check the temperature when baking gluten free. Typically, the bread will “look” done before it’s actually done adequately baking.
If you pull the bread too soon the liquids won’t have time to evaporate and it will be gummy and dense, instead of soft and fluffy.
The internal temperature should reach 190-205ºF. Checking quickly with an instant read thermometer will help the bread retain valuable heat while the temp is being read. A Thermoworks Thermapen does this efficiently and accurately.
Do I have to plump raisins first?
When testing the recipe, I experimented with hydrating, or plumping, the raisins in hot water before adding it to the bread dough. Some recipes recommended this step to ensure, soft, plump raisins.
Fortunately, though, I found it made no difference on the end result. The bread contains enough liquid and steam to naturally do this through the baking process. So, save yourself an extra step and time!
Variations and more uses
- Make a quick glaze frosting for the top. Mix together ¼ cup powdered sugar, 1 tsp milk, and ¼ tsp vanilla extract.
- Use leftovers to make gluten-free french toast or french toast casserole.
- Let the cubed bread slightly dry out and make easy gluten-free bread pudding.
- Replace the raisins with dried cranberries or currants.
- Use for griddled sandwiches, such as hot ham and cheese.
- Similar to cinnamon rolls, raisin bread makes an amazing side dish for chili!
Save this recipe to your pinterest board!
Let’s be friends on Pinterest! I’m always sharing great recipes!
Did you make this recipe? I love hearing from you! Leave a star rating and comment below the recipe card. It helps others when searching for recipes and I appreciate feedback from our community. You will always hear back from me! -Melissa

Easy Gluten-Free Cinnamon Raisin Bread (No Roll or Knead)
Ingredients
Cinnamon Swirl
- ¼ cup (59 g) light brown sugar, packed
- ¼ cup (50 g) granulated sugar
- 1 tablespoon ground cinnamon
- `1 tablespoon (14 g) melted butter
GF Bread
- 3 cups (438 g) (gluten free all purpose flour, (Cup4Cup gluten free flour highly recommended – see recipe notes for DF)
- 1 (9 g) packet (2 ¼ tsp) instant rapid rise yeast
- 1 tablespoon (11 g) psyllium husk powder (optional), helps with bread moisture & structure (what is psyllium husk?)
- 1 teaspoon baking powder
- 1 teaspoon salt
- 1 ½ cups (360g) warm water (110°F)
- 2 large eggs, room temperature
- ¼ cup (85 g) honey
- ¼ cup (53 g) oil , any preferred
- 1 cup (170 g) raisins
Instructions
- In a small bowl mix together the brown sugar, sugar, and cinnamon. Remove 4 tablespoons of the sugar mixture and transfer to another small bowl.¼ cup light brown sugar, ¼ cup granulated sugar, 1 tablespoon ground cinnamon
- Stir in the melted butter into the portion that was removed. Set both bowls aside.`1 tablespoon melted butter
- To make the bread dough, use a stand mixer with paddle attachment. Mix together gluten free flour, yeast, psyllium husk powder, baking powder, and salt on low speed until combined.3 cups (gluten free all purpose flour, 1 packet (2 ¼ tsp) instant rapid rise yeast, 1 tablespoon psyllium husk powder (optional), 1 teaspoon baking powder, 1 teaspoon salt
- Add warm water, eggs, honey, and oil. Mix on low speed to let the dough come together, about 1 minute.1 ½ cups warm water (110°F), 2 large eggs, ¼ cup honey, ¼ cup oil
- Increase speed to medium and beat for 5 minutes, scraping down paddle and bowl halfway through. The batter will be thinner, slightly thicker than cake batter. Stir in the raisins.1 cup raisins
- Grease a 9X4 loaf pan (preferred) or 9X5-inch loaf pan. Pour half the batter in the pan and smooth evenly. Sprinkle the dry sugar mixture (without added butter) over the top. Use a butter knife to gently swirl the mixture in.
- Dollop the remaining batter over the top and gently smooth. Sprinkle the butter sugar mixture over the top. Use a knife to swirl again, piercing all the way down to the bottom of the pan. Swirl in one direction and then repeat in the opposite direction.
- Spray a large piece of plastic wrap with nonstick cooking spray. Lay the plastic, greased side down, over the pan.
- Set in a warm, draft-free place to rise until the bread reaches two-thirds to the top of the pan (do not let it go over this point because it rises more in the oven). This should take about 15-20 minutes. Meanwhile preheat the oven to 350°F.
- Remove plastic and bake bread on middle rack for 50-55 minutes, tenting a piece of foil loosely over the bread halfway through. The internal temperature of the bread should read 190-200°F.
- Allow the loaf to cool for 10 minutes in the pan and then remove to a cooling rack. If using a 9X4-inch pullman pan, it's best to lay the bread on it's side to cool. Allow bread to cool at least 1 hour before slicing. For best results, serve the bread slightly warm or toasted. Chilled, cold bread has an adverse effect on texture.
Notes
Dairy Free Modification
Replace the butter in the cinnamon swirl with plant-based, dairy-free butter.Psyllium Husk Powder
I’ve made the bread multiples with and without the psyllium husk powder. It doesn’t affect the taste, but it does help maintain moisture, prevents the bread from becoming crumbly, and makes it softer. Psyllium husk powder is very affordable to buy, lasts a long time, and greatly improves GF breads texture because it helps absorb moisture. I recommend the psyllium listed in the ingredients because the lighter color doesn’t affect the bread. Some powders are darker, which will make GF baked goods a grayish, purple color.How to Know When Bread Is Done
I highly recommend using an instant read thermometer to check the temperature when baking gluten free. Typically, the bread will “look” done before it’s actually done adequately baking. If you pull the bread too soon the liquids won’t have time to evaporate and it will be gummy and dense, instead of soft and fluffy. The internal temperature should reach 190ºF-200ºF.Freezing / Storing
Gluten-free bread does not have the shelf life like normal bread. Refrigerating will dry it out, and is not recommended. It may be wrapped tightly and left at room temperature, but will lose optimal taste and texture quickly. For best results, slice and freeze the bread after it has completely cooled (at least 3 hours). Pull slices as needed from the freezer to defrost or toast from frozen. I recommend to slightly warm the bread (toasting or in the microwave) before enjoying again.This post contains affiliate links. My opinions are always my own. If you purchase a product through an affiliate link, I make a small commission – at no cost to you. Read full disclosure policy here.


This makes a lovely loaf of bread! Made it with KA bread flour, so skipped the psyllium powder. It’s a keepr of a recipe!
Thanks, MG, for sharing! I appreciate it!
Best,
Melissa
Great
Thanks for saying this, Krystal!
Best,
Melissa
I made this recipe for a friend who is gluten free. I could not trial it ahead of time to see if it was good because I have a corn allergy and there is cornstarch in the flour. That being said, my friend absolutely loved it and his wife who is not gluten free said it tasted like real bread! They thought it was delicious. Thank you for sharing this recipe. I followed your directions exactly and definitely felt using a thermometer was needed in order to make sure the bread was done. I know I will be making this again for my friends!
This is incredibly kind of you, Michele! Thank you for sharing this recipe with your friends. So wonderful to know they enjoyed it.
Best,
Melissa
Made this for a friend and will try again soon as mine was a little too wet and so it sunk a bit after baking. I uses my own flour blend (from America’s Test Kitchen cookbook) and the weight of that blend is a little different. Regardless, the smell of this was heavenly and I ate an end piece and it was yummy. Learning to bake G-F (for a dear friend) is an adventure and your videos help so much. Thanks!
Hi Colleen,
Oh, I’m glad you liked it! We can get this to work with your flour blend! Next time I would cut back on the water by 1/4 cup. That will help build out the structure so it doesn’t sink.
Best,
Melissa
Your recipe is a breath of fresh air, especially for a GF, wheat and dairy free intolerant person. I also wonder if your editor noticed several places where a word or two extra have been added that confuses the reading of the sentence. For instance, in the Diary-Free instructions, one of the “in” words could be dropped for easier reading; here’s where the “in” could be added: “I’ve made the bread -in- multiples with and without…”
I especially love this sentence, “If you pull the bread too soon, the liquids won’t have time to evaporate and it will be gummy and dense, instead of soft and fluffy.” This is soo true! Thank you for your encouraging words and recipes!
Hi Sherry,
Thank you so much for writing and the input. I’m happy you enjoyed the bread and I will do a once over on the copy. Have a great holiday!
Best,
Melissa
I have gf bread flour to use up. I need to alter the recipe? If so how?
Hi Barbara,
I don’t think you need to do much, but I would leave out the psyllium husk powder from the recipe. Enjoy!
Best,
Melissa
I love this bread. Easy to make and yummy. I did however double the cinnamon. Also I use King Arthur Bread Flour.
Thanks for sharing, Cori. I appreciate it!
Best,
Melissa
Great recipe, thank you!!!
Thank you for commenting!
Best,
Melissa
I just pulled mine out of the oven. Is it normal for the cinnamon mixture along with the rasins to sink to the bottom? I did accidentally mix all of the cinnamon and brown sugar mixture together.
Hi Angela,
You mean the topping / swirl mixture sank to the bottom? How was the crumb of the bread? It sounds like the mixture might have been a little too thin. Which GF flour did you use?
Best,
Melissa
The bread was so good I double checked that I did not use regular four by accident
LOL, that’s quite the compliment! Thanks for taking the time to share. 🙂
Best,
Melissa
This was an excellent bread. I loved it. So easy to make and was delicious. Thank you
You are so welcome, Debbi! I appreciate you taking the time to let me know!
Best,
Melissa
I made this recipe for a friend. It looked so beautiful when it came out of the oven! The rise I got out of it was superb! My friend liked it so much that she asked me to make it again. Thanks for this wonderful recipe!
Thank you so much, Tracy! I really appreciate you taking the time to put a smile on my face!
Best,
Melissa
👍🏼😊
Made this for the first time and it did not disappoint! Tastes like the real thing! Has amazing nooks and crannies! I made several adjustments as follows:
– Used 300g Caputo FioreGlut Flour and 138g Regular rice flour blend.
– Sugar, brown sugar and cinnamon WEIGHT measurements are off (I always do bread by weighted measurements). I only used half and it was perfect.
– Skipped the melted butter. Seemed unnecessary.
– Swapped 150g buttermilk for that amount of water (because I had it and another recipe called for milk and a third recipe called for buttermilk so I opted for the partial swap)
– Soaked raisins for 10 minutes then strained, before adding to mixture. Once again, the cup measurement and weight measurement were pretty far off. By weight pre-soaking, I used almost 2 cups of raisins.
Tastes amazing untoasted and toasted. Baked to interior temperature of 210. (Recipe said to 190 but gluten free bread is done at 200-220F internal temp. Regular bread is done at 180-200F depending on the bread type).
Thanks for all your helpful notes, Leanne! I’m so glad you enjoyed the bread. I’m perplexed by the weight measurements, though. I’m not sure why they were so off for you. I also don’t have a weight listed for the tablespoon of cinnamon, so I’m curious where you saw those measurements?
Best,
Melissa
Hi Melissa! I did the tablespoon of cinnamon. I have no idea why the weights were off either for the sugar, brown sugar and raisins. The raisins seemed perfect amount though. I’ve been baking gluten free for 22 years. The recipe is great and I’ve shared your link with many people. 💕
Thank you so much, Leanne! I really appreciate it 🙂 I try so hard to get everything accurate so I just wanted to double check there wasn’t some sort of glitch. I hope you try many more recipes!
Best,
Melissa
I don’t have a stand up mixer. Can I mix this by hand?
Hi Claudette,
It depends what GF flour you are using. The only I recommend, Cup4Cup, contains a lot of cornstarch so it makes the batter very stiff. If you used a hand mixer it would go into the blades and wouldn’t work very well. King Arthur is a little easier to mix, but there’s a tradeoff with the baked texture. What would you be using?
Best,
Melissa
Bob Red Mills GF and mixing by hand.
Hi Claudette,
You can certainly try, but it will be an arm workout! You will have to make sure the mixture is well-combined and no flour pockets remain.
Best,
Melissa
Is there a substitute for the eggs.
Hi Shirley,
I haven’t personally used it, but other readers have used egg replacers in other bread recipes with success, such as Neat Egg.
Best,
Melissa
Thank you.
This recipe is so easy to follow, and the bread is delicious. I will definitely make this again. Thank-you. Can I add a little more cinnamon swirl?
Hi Linda,
Yes, that wouldn’t be a problem at all! Enjoy!
Best,
Melissa
Melissa, my adult daughter has severe Celiacs and when I made and served this to her, she just couldn’t quit raving about it! I took a second loaf and sliced it once cooled. I inserted a folded sheet of butcher paper between each slice and froze the loaf. Now she asks for a slice or two every time she comes over! Makes me so happy to have your great recipe(s) to make her so happy!
Thank you so much Cindy! This really made my day. Thanks for sharing 🙂
Best,
Melissa
I made this recipe because of the simplicity and it did not disappoint! I will definitely make again. Thank you!
Thank you so much! I appreciate you taking the time to let me know!
Best,
Melissa
I’m not a fan of raisins, is it possible to substitute chocolate chips?
For sure, Shannon! That sounds like a great idea!
Best,
Melissa
Thanks, I’ll give it a try and let you know how it comes out!
This recipe is fabulous! Even my husband couldn’t tell it’s GF! Thank you – it’s a keeper. 🙂
Aww, yes! That is the best compliment ever and my number one goal!
Best,
Melissa
Instead of using psyllium can I use Konjac?
Hi Debbie,
I have not heard of this. Do you use it with other bread recipes? I’m intrigued!
Best,
Melissa
yes!