
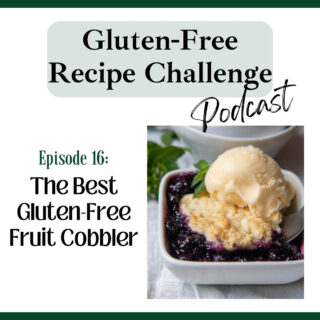
In episode 16 learn how to make an easy gluten-free fruit cobbler with a juicy blueberry base dolloped with soft, buttery, and perfectly sweet biscuits. Join Melissa as she shares many pro tips, the best ingredients and methods for gluten-free baking success. This audio recipe for gluten-free blueberry cobbler is not only guaranteed to be a summer hit, but can be made with fresh or frozen berries!

Listen to this episode, along with the full audio library, on iTunes, Spotify, Stitcher, TuneIn, or your favorite podcast player.
Recipes and Resources Mentioned
Recommended Equipment
Recommended ingredients
Follow Along
Don’t forget to subscribe to our weekly newsletter! Besides receiving an immediate GLUTEN-FREE BAKING BONUS, this weekly newsletter gives you direct access to the newest recipes, helping you with menu planning and exclusive tips!
Transcript
Hey everyone. I’m Melissa Erdelac, host of the Gluten-Free Recipe Challenge podcast and creator behind the gluten-free website, Mamagourmand. Here we take beloved recipes you thought you’d never enjoy again and transform them into easy copycat versions just as good as the originals.
I used to be so gung-ho on U Pick Farms. Back when it was certifiably crazy for me to have anything to do with up pick farms. It would be 92 degrees with 100% humidity, and I would show up with four small kids, some fruit snacks and a few bottles of water, which huge recipe for success. Obviously, it only takes about like eight seconds to burn through a pack of fruit snacks. So use your imagination how the next few hours went.
Now that my kids are older, I can still occasionally convince them to go blueberry picking with me, but only if I lay on enough guilt and tell ’em I will eat every single dessert I make single-handedly.
Now we’re on the cusp of blueberry season here in Indiana, so the kids are either going to watch me eat an entire pan of blueberry cobbler or get their shit together and finally pay their dues.
Today I will go through the recipe of how to make a blueberry cobbler, but you could use this recipe with other fruits like strawberries, raspberries, cherries, apricots, peaches, plums, or you could do any mixture of those fruits.
It also works with frozen fruits, and you don’t have to thaw to make it, you just mix it together with the filling ingredients while it’s still frozen.
Frozen fruit does release more liquid though as it bakes, so you might wanna add a little bit more corn starch to the filling and increase the baking time, 10 to 15 minutes. When you’re increasing the baking time the cobbler topping might become too brown before the filling is thickened underneath, so if that happens, just loosely tent some foil over the top for the last 15 minutes or so.
So what are you gonna need for this recipe? For the fruit filling, you’ll need blueberries, or you could use any other fruit. You could use fresh or frozen blueberries. You need sugar. For blueberries in particular, I use about a fourth of a cup of sugar. If you’re using other fruits that are more tart, you might wanna add a little bit more. Or if you have sweeter fruits, you might wanna add a little bit less.
To thicken the sauce I use corn starch, but you can also use an equal amount of instant tapioca or two tablespoons of tapioca flour as well. And then just a little bit of lemon juice in the fruit filling. And this just kind of brings a little bit of an acidic flavor so the sweetness isn’t overwhelming.
For the cobbler topping, you’ll need gluten-free all-purpose flour, and I use and recommend Cup4Cup gluten-free flour. But if you need a dairy-free recipe, I would recommend King Arthur Measure for measure, because Cup4Cup does have a little bit of milk powder in it.
You’ll also need baking powder, salt, butter. But this recipe is also a great vegan recipe as well, because it contains no eggs. So if you want to make a dairy free or vegan cobbler, then just substitute plant-based butters sticks, and you’ll need milk too. And the same thing for that. You can use almond milk or any other dairy-free milk that you prefer.
And then to serve ice cream or whipped cream. And if you’re doing dairy-free, you could use coconut whipped cream.
Okay. To make your recipe preheat your oven to 350 and grease a 8X8 baking dish, or any two quart baking dish. You could use a little bit of butter at the bottom, which I prefer for more flavor or just non-stick cooking spray.
Then you’re going to make the fruit filling first, just so it has time to mix with the sugar, and it releases some of that juices while you’re making the topping. So in a large bowl, combine four cups of berries, one fourth cup of sugar, one tablespoon of corn starch, and one teaspoon of lemon juice, and just mix it all together and then put it in your prepared pan and it’ll sit for a few minutes while you make the cobbler topping.
To make this topping, first whisk together the dry ingredients. Whisk together one and one third cup of gluten free flour, a third of a cup of sugar, one and a half teaspoons of baking powder and a fourth of a teaspoon of salt.
Then take one third cup of chilled butter and chop it into pieces, and work that into the flour mixture. To do this, you could use a pastry blender, fork, or you could just use your fingers and kind of mix the butter into the flour until they’re small crumbly pieces throughout. And if you go to the recipe post, you can see what the mixture should look like at this point.
After that, you just stir in one third cup of milk, and you mix that until there’s no dry flour pockets remaining. And then that’s it. That’s your cobbler topping. It’s really easy to mix together.
Now what you’re gonna do is you need almost like little biscuits to place over the berries. So I take about, I don’t know, like fourth of a cup scoops, and you just pat them into flat rounds and place them on top of the fruit filling. You will use enough rounds to cover the fruit filling, but if the filling is showing through, that’s fine. It doesn’t matter. It’s not gonna completely cover the top.
The next thing I like to do before I bake it, and this is kind of the same as what you would do for a strawberry shortcake, is I brush the top of the cobbler biscuits with a little bit more milk, and then sprinkle coarse sugar on the top.
Then go ahead and put it in the oven for 35 to 40 minutes. Bake it until the biscuits just start to turn golden brown, and then the fruit underneath is bubbly. If you wanna test that the biscuits are cooked through all the way, then just insert a toothpick in the middle and it should come out clean.
You wanna serve the cobbler while it’s still warm, but don’t serve it directly from taking it from the oven.
You want it to sit for, I don’t know, I would say at least 20 minutes. That way the fruit mixture has time to cool down a little bit and thicken more, and then you could go ahead and serve it with ice cream or whipped cream.
If you wanna make this ahead of time, you have a couple options. One thing you could do is make everything, don’t bake it, wrap it up well, and then put it in the freezer unbaked. When you’re ready to serve it, then take it directly from the freezer to bake, unwrap it, and then put it in the oven and it’ll need about 20 minutes extra to bake.
And this is another time that you might want to loosely tent some foil over the top, because the fruit mixture is going to take longer to first thaw and bake before the top biscuits are ready.
You can also bake the cobbler, let it cool completely, and then wrap it up well and freeze it. When you’re ready to eat it, I would thaw it completely, overnight, you can thaw it in the fridge, take it out and let it come to room temperature before baking again. Once you’re ready to bake, bake it in a 250 oven for about 20 minutes or until it’s warmed through.
So that’s all for this episode. Remember, you could always find the full printable recipe on the show notes page, and to get to it, just click on the link provided in whatever podcast app you’re listening on, or you could go to my recipe website mamagourmand.com and click on the podcast tab. And the show notes will include the full recipe, any tips I’ve mentioned or recommended ingredients.
Leave a Reply