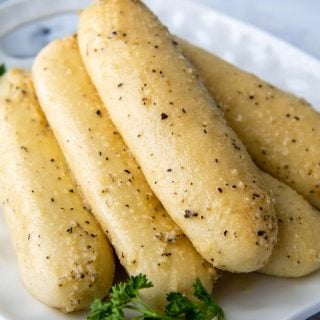
Soft Gluten-Free Breadsticks (Extra Easy)
The best homemade gluten-free breadsticks recipe will make you forget those soft Olive Garden breadsticks ever existed! This easy recipe with a garlic topping is not only gluten-free, but dairy-free as well!
Servings 13
Calories 164kcal
Ingredients
- 3 cups (438g) gluten-free all purpose flour (Cup4Cup gluten-free flour highly recommended)
- 2 tablespoons (25g) granulated sugar
- 1 packet (2 ½ tsp, 9g) instant rapid rise yeast
- 1 tablespoon (11g) psyllium husk powder helps with bread moisture & structure (what is psyllium husk?)
- 1 teaspoon baking powder
- 1 teaspoon salt
- 1 ½ cups (360g) warm water (110°F)
- 2 large eggs room temperature
- ¼ cup (53g) olive oil
Garlic Parmesan Topping
- 1 ½ tablespoons (21g) melted butter see recipe notes for dairy-free
- 2 tablespoons grated parmesan see recipe notes for dairy-free
- ¼ teaspoon garlic powder
- ¼ teaspoon kosher salt or sea salt
- ¼ teaspoon Italian seasoning
Instructions
- Using a stand mixer with paddle attachment, mix together the gluten-free flour, sugar, yeast, psyllium husk powder, baking powder, and salt on low speed until combined.3 cups (438g) gluten-free all purpose flour, 2 tablespoons (25g) granulated sugar, 1 packet (2 ½ tsp, 9g) instant rapid rise yeast, 1 tablespoon (11g) psyllium husk powder, 1 teaspoon baking powder, 1 teaspoon salt
- Add warm water, eggs, and olive oil. Mix on low speed to let the dough come together, about 1 minute.1 ½ cups (360g) warm water (110°F), 2 large eggs, ¼ cup (53g) olive oil
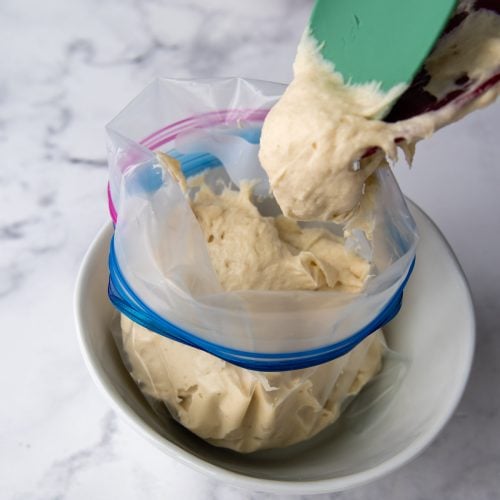
- Increase speed to medium and beat for 5 minutes, scraping down paddle and bowl halfway through. The batter will be slightly thick, like brownie batter.
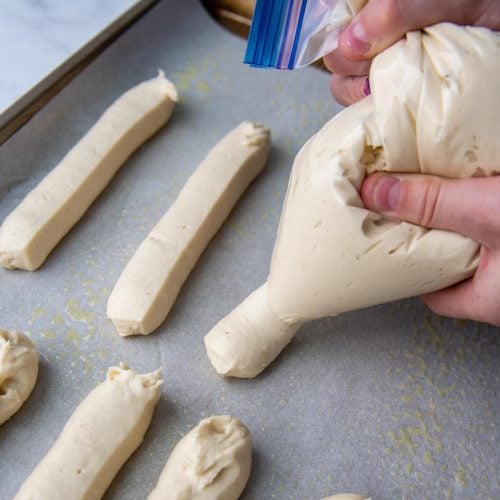
- Line a baking sheet with parchment paper and spray with nonstick cooking spray. Place a quart ziplock bag in a medium bowl and fold over sides so it’s open. Use two silicone spoons to scrape the dough into the bottom of the bag. Squeeze out excess air and close.
- Snipe off a 1-inch corner of the bag so you have a makeshift piping bag. Be sure to not cut too big of a corner, or you will have large breadsticks. Pipe 6-inch long breadsticks onto the prepared baking sheet, about 2-inches apart. You may need a second baking sheet to fit all the dough.
- Set the pan in a warm, draft-free place to rise for about 15 minutes while the oven preheats oven to 375°F.
- Bake for 15-17 minutes, or until the bottoms are lightly browned and the internal temperature of the bread reaches 190-200°F.
- While the breadsticks are baking combine the topping ingredients. Immediately brush on the topping when they come out of the oven. Serve immediately or transfer to a wire rack to cool completely before storing.1 ½ tablespoons (21g) melted butter, 2 tablespoons grated parmesan, ¼ teaspoon garlic powder, ¼ teaspoon kosher salt or sea salt, ¼ teaspoon Italian seasoning
- DID YOU MAKE THIS RECIPE?? DON'T FORGET TO LEAVE FEEDBACK AND RATE BELOW!
Notes
Dairy-free Breadsticks
For the garlic topping, omit the parmesan cheese and substitute olive oil for the melted butter.best tips and tricks
- The size of snipped off corner is important. The first time I made these I cut off too much and the breadsticks were huge! Error on going smaller and you can always snipe off more. Remember they will rise slightly in the oven.
- Brush on the garlic butter immediately when you pull them from the oven.
- These are best served warm, but if you need to make them ahead, wrap cooled breadsticks in a paper towel and microwave for 10-15 seconds.
- For make-ahead breadsticks, they can also be baked, cooled, and frozen until ready to serve. Thaw at room temperature for 1 hour before rewarming.
freezing, storing, and rewarming
For best results, enjoy the breadsticks immediately or within the day. If you need to rewarm them, wrap the breadsticks in a paper towel and microwave for 10-15 seconds. For oven rewarming, wrap the breadsticks in foil and place in a 350ºF oven for 5-7 minutes. Leftover breadsticks may also be frozen. Wrap each individually and transfer to a ziplock freezer bag. Freeze up to three months.Nutrition
Calories: 164kcal | Carbohydrates: 23g | Protein: 4g | Fat: 7g | Saturated Fat: 2g | Polyunsaturated Fat: 1g | Monounsaturated Fat: 4g | Trans Fat: 1g | Cholesterol: 29mg | Sodium: 258mg | Potassium: 44mg | Fiber: 3g | Sugar: 3g | Vitamin A: 84IU | Vitamin C: 1mg | Calcium: 46mg | Iron: 1mg