

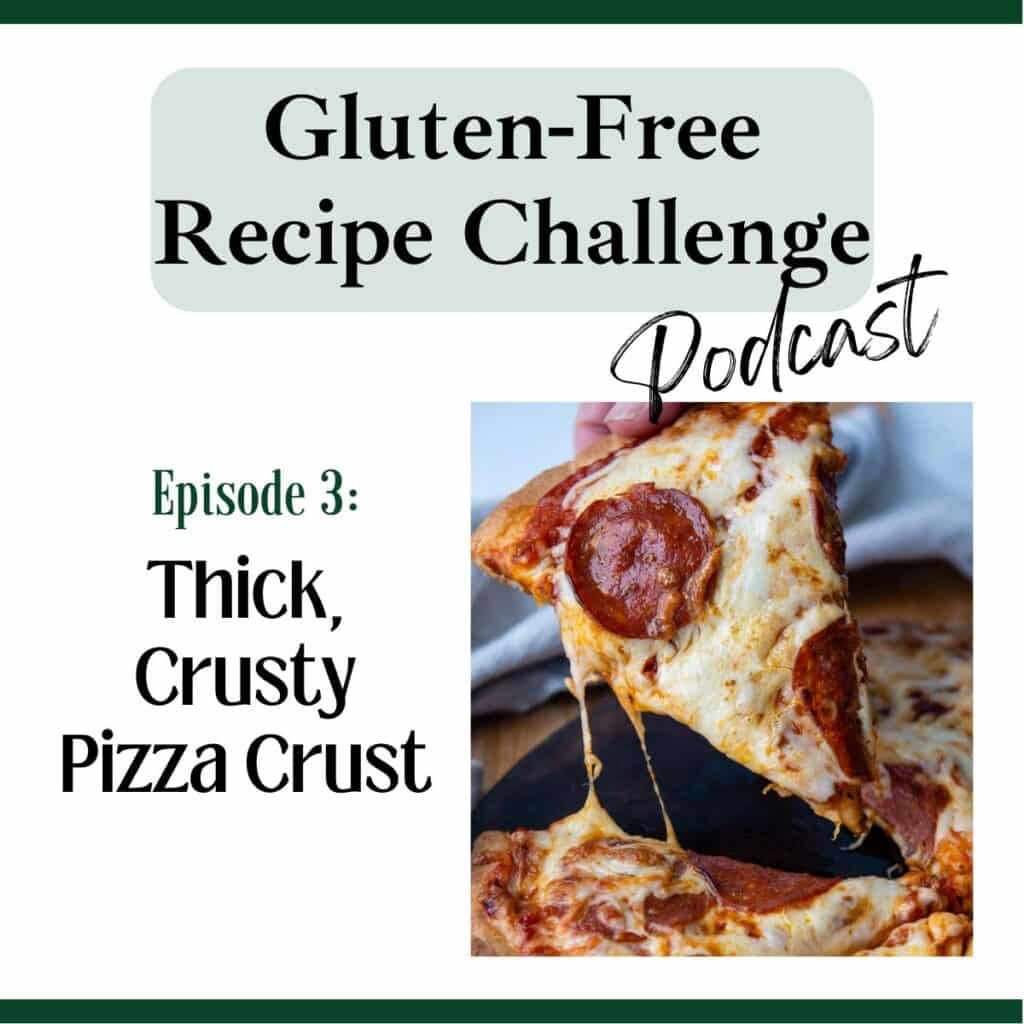
In episode 03 we learn how to make a thick, yet crispy gluten-free pizza crust that is unrecognizably GF. This audio recipe for gluten-free pizza will help you make this easy, from-scratch recipe in your own kitchen. Join Melissa as she shares how to make the best pizza, step-by-step, along with many expert gluten-free baking tips!
Recipes and Resources Mentioned
Recommended Equipment
Recommended ingredients
Follow Along
Don’t forget to subscribe to our weekly newsletter! Besides receiving an immediate GLUTEN-FREE BAKING BONUS, this weekly newsletter gives you direct access to the newest recipes, helping you with menu planning and exclusive tips!
Transcript
Hey y’all. I’m Melissa Erdelac, host of the Gluten-Free Recipe Challenge podcast and creator behind the gluten-free website, Mamagourmand. Here we take beloved recipes you thought you’d never enjoy again and transform them into easy copycat versions, just as good as the originals.
In episode one, we learned how to overcome probably the biggest gluten-free bummer, soft, great-tasting bread. Today we’re gonna conquer a close runner up, a gluten-free pizza crust that doesn’t suck. Actually, it’s just as good as anything you might have gotten at pizza parlors before. Things have gotten a little bit easier for us now at pizza places. Pretty much everyone carries a gluten-free pizza crust, which is great and easy, but that also has a couple problems.
The major one being cross-contamination. So pizza places carry these gluten-free pizza crusts because a lot more people are gluten-free and it’s a smart business move to offer those people something they could have, but their kitchens are not gluten-free. Often the pizzas are baked right in the same oven as the other pizzas, and that could be a big issue if you’re highly sensitive or you have celiac.
The other thing, which is my biggest problem is that pizza crust isn’t really that good. It’s just like this thin, crispy, I don’t know. It doesn’t even really taste like food. It’s just more of a vehicle to hold the toppings and bring them up to your mouth. So yes, it kind of scratches an itch because you’re not foregoing pizza while everyone else has it.
But it’s not really as good as it used to be either. So this recipe is gonna be a game changer for you. It actually tastes like the pizza crust you remember eating. In fact, it does so much so that when I make it for my kids and my husband, , they have no idea that it’s gluten free.
I use it a couple of ways. First, I will have one in the freezer ready to go, so if we ever order pizza, you can bake it right from frozen. I just put on whatever toppings I want and I bake that while everyone else has pizza from some takeout place. Or the other thing I do is I use it for homemade pizza nights and I will buy regular wheat flour pizza dough.
It’s usually in re refrigerated or frozen in your grocery store. My kids and my husband will make those and I use this pizza for myself.
The third way I use this crust is if we are having homemade pizza.
I usually make pizzas for the kids, and then I will use this to do a more gourmet, adventurous pizza for the adults, which the kids end up eating. And to be honest, they don’t realize that it’s any different than their pizza .
Besides the taste and texture, why else would you wanna try this recipe?
First of all, it’s actually easier to make than homemade pizza dough with wheat flour. If you think pizza dough is way outside your baking jurisdiction, then this is the recipe for you. It’s as easy as you mix it all in a bowl. You spread it on a pan. You don’t even need a rolling pin and you bake it. You don’t have to let it rise twice. You don’t have to roll it out, you don’t have to throw it in the air or have any sort of impressive baking expertise.
Plus, like I said earlier, it’s great to freeze. I usually double the recipe and I have one then, and then I freeze for those last minute pizza nights, and like I said, you just bake it directly from frozen. . Lastly, if you miss grilled pizzas, you can use this recipe for that. You par bake the crust first.
That means you bake the dough before putting the toppings on, and at that point you could add the toppings and throw it all in the grill. You just need to put it on the grill to warm the bottom crust and to melt the cheese.
So as far as equipment for this recipe, I use a stand mixer. I always like to use a stand mixer when working with gluten-free dough. And I do this because usually when you’re mixing gluten-free dough, it has to mix longer, which helps aerate the batter and soften the gluten-free starches. With my stand mixer, I use a Flex Edge beater. It’s the paddle attachment, and it has silicone sides, so it scrapes dough down around the side of the bowl and works it back towards the middle.
It makes it really easy, so you just throw everything in the bowl, turn it on, and you don’t have to do anything else . The other thing which would be helpful to have is a pizza stone. You don’t necessarily need this piece of equipment, but I do think it makes a way better pizza crust. It makes it crispy on the bottom, but soft and doughy on top. What you do is you put your pizza stone in the oven while the oven is preheating to a high heat. Usually you bake pizza at around 450 to even 500 degrees. The pizza stone heats up really nice and hot, and then you put the dough right on it.
That way it gives it a jumpstart for a crispy crust. And since pizza has a shorter baking time, it doesn’t need a long time to get that bottom crust crispy while the top has the melted cheese and toppings. You can also use a pizza pan with this, just a round pizza pan or a baking sheet, but if you do that, I recommend preheating it in the oven to make the crust as crisp as possible, that’s better than just putting the dough on a cold pan. A rimless baking sheet would also work, and that works better, especially if you don’t have a pizza paddle to slide it on.
So speaking of a pizza paddle. , they are pretty affordable to buy and they make making homemade pizzas so much easier. So what I do is I just put a piece of parchment paper on my pizza paddle. I put the dough on and then all the toppings. And when I’m ready to bake it, you just slide the whole parchment paper with the dough and toppings and everything onto the preheated stone.
This saves you from burning your fingers or doing any other dangerous maneuvers in the oven. If you wanted to, you could just put the pizza on a parchment piece of paper and put it on the hot stone. I would just be very, very careful.
Let’s talk about ingredients. So first of all, my favorite gluten-free flour , Cup4Cup. For this recipe you’ll want a gluten-free flour that doesn’t have any weird aftertaste or gritty texture, and my number one choice for that is always going to be Cup4Cup.
I will say Cup4Cup does contain milk powder. So if you cannot have dairy, this isn’t the flour for you. My second runner up I recommend is King Arthur Measure-for-Measure, and this is a little bit more allergen- friendly. It does have a little bit of that grittiness, but not as bad as some other ones.
The other thing you’ll need for this recipe is a little bit of almond flour.
When I was testing the recipe, I first tested it using all gluten free flour, but I found it had a little bit of chewiness to it. So what I did was I removed a little bit and replaced it with the almond flour, which adds moisture back to the crust, making it not as chewy. If you don’t have almond flour on hand, you can just use all gluten-free flour or replace it with a little bit of oat flour too.
Next, you’ll need psyllium husk powder. This is my magic gluten-free ingredient. What it is is basically fiber that absorbs moisture. It’s helpful in gluten-free dough because it gives it elasticity, it eliminates that dense gumminess you sometimes have. That comes from gluten-free starches not being able absorb moisture as well. The psyllium helps absorb that moisture and it basically helps mimic a wheat flour texture. It’s really affordable to buy. You could get it off of Amazon or any nutrition health store. It lasts forever and usually I only add a tablespoon or two to recipes.
Next, you’ll need yeast. I use instant Rise yeast, and I do this because you could just add instant rise yeast straight to the dry ingredients without having to proof it first. If you only have dry active yeast, you will just have to proof it in the warm water before adding it to the rest of the ingredients.
Next, you’ll need baking powder. Since gluten-free dough needs a little assistance with rising, I prefer to use a combination of baking powder with the yeast. This will help lift and aerate the texture. Lastly, you’ll need salt for flavor, warm water, and olive oil.
So let’s do this. Let’s make our gluten-free pizza crust. In a large mixing bowl put your dry ingredients. You will need one and two thirds cup of gluten-free all-purpose flour. One fourth a cup of almond flour. And I recommend this for best results. But if you do not have almond flour, you can use additional gluten-free flour or oat flour.
Two teaspoons of psyllium husk powder. One and 1/4 teaspoon of baking powder, one teaspoon of salt and a half a teaspoon of instant yeast. Mix that on low speed just to combine the dry ingredients. Now while you’re mixing on low speed, slowly pour in the warm water and oil. Mix that until it is just combined and there’s no flour pockets remaining anymore. Increase the speed of your mixer to medium high and you’re going to beat it for five minutes. The dough will not resemble pizza dough at this point, or what you think pizza dough should look like. It’s going to look more like a sticky batter, and that is fine. You’re on the right track.
Now you’re ready to let the dough sit and rise. You want to take a rubber spatula and scrape all the dough down into the center of the bowl. Cover it with a piece of plastic wrap and let it rise in a draft free place for 90 minutes. You’ll know when it’s done when you use a spoon to look inside the dough, and it should have bubbles or little air pockets.
Okay, so now you’re ready to shape the crust and do the first bake. For the first bake, you preheat the oven to 325. For this bake you don’t have to worry about putting the pizza stone in the oven and warming it up first. That comes in the second bake after you add cheese.
Take your pizza stone, or if you do not have a pizza stone, take your pizza pan or baking sheet and line it with parchment paper.
You wanna spray the paper with non-stick cooking spray to grease it. Scrape your dough into the center of the parchment paper and use a greased silicone spoon to spread out the dough into the circle. You could spread a little bit of olive oil on a silicone spoon, or you could just spread it with non-stick cooking spray, and you’re just going to use that spoon to spread the dough around into a circle. If the spoon starts to stick to the dough, you just spray it again or put some more olive oil on it. You want to spread it out into an about 11 inch circle. If you want your circle more round or shaped better, you can spray your fingers or put oil on your fingers and spread it out with your hands as well.
You can also use your hands to make a little raised crust around the edge too.
So there’s no need for a rolling pin. You just used a greased spoon or your greased hands and just kind of pat it out into a circle, and that is all you need to do. At this point you’re going to bake the crust. You bake it for 45 to 50 minutes or until the dough is firm to the touch and it slightly starts to brown underneath.
This is another reason why I like to make this crust ahead of time, since the first bake is so long. Say if I know I’m gonna have pizza later in the week, or I just want to have pizza on hand, I bake it and put it in the freezer. So when you do the second bake, it only takes a few minutes and it’s ready to go.
After you’re done baking it , especially if you’re gonna use it later, remove the pizza crust to a wire rack and let it cool completely. At this point, it could also sit at room temperature for four hours, say you’re gonna make a pizza later in the evening, or wrap it up securely with plastic wrap, cover it with aluminum foil and freeze it up to three weeks. When you’re ready to bake it, assemble the toppings and sauce on it, and bake right from frozen.
Okay, so now we’re ready to bake our pizza. This is when you’re going to preheat your pizza stone, and if you have a pizza paddle, you’re gonna put it to work.
Put your pizza stone or baking sheet or pizza pan in the oven and pre-heat it to 500 degrees. Put the par baked crust on your pizza peel so you could easily transfer it to the hot stone. If you don’t have a pizza peel, put it on a piece parchment paper. Spread on the pizza sauce, cheese, whatever toppings you want, and then slide the pizza onto the hot stone using your pizza peel or place it on with the parchment paper.
Bake it for 8 to 10 minutes or until the crust has browned and the cheese is bubbly. Another trick I do when I’m making pizzas and to give it that gourmet pizza parlor look is at the end, I will turn on the broiler and I will broil the cheese, so it’s nice and bubbly and golden.
Some things to remember while you’re making this recipe. When you’re shaping the pizza dough into this circle, it’s best to spread it out into a at least 11 inch circle. If it’s shorter than that, if you’re constricted by a smaller baking sheet or a smaller pizza pan, the dough is going to be too thick. Therefore, using a round stone or a round pizza pan is recommended.
Also, the dough is really easy to work with. As long as your hands or the silicone spoon is very well greased. Keep non-stick cooking spray or a pastry brush with olive oil handy when you’re shaping the dough, so you have it there to grease if things are starting to stick a little bit.
Lastly, I recommend when you make this recipe, serve it as an experiment. Don’t tell anyone that it’s actually gluten-free. Serve it to your family and friends and see if they notice anything that there’s different about it. I’m guessing they won’t. No one ever knows that this is gluten-free pizza when I serve it to them.
That’s all for this episode of the Gluten-Free Recipe Challenge. Remember, you can always find the full printable recipe on the show notes page. To get to it go to my recipe website mamagourmand.com and click on the podcast tab. You can also click on the link provided in whatever podcast app you’re listening on.
The show notes page includes the full recipe, tips, along with any recommended ingredients or equipment I’ve mentioned.
Also, can you do me a fave? Since this podcast is just starting out, I’d be so appreciative if you could rate and leave me a comment on your podcast app. Don’t forget to follow and subscribe to the show so you never miss a new recipe.
If you have a recipe idea, something you’d love to enjoy a delicious version of again, don’t be shy. Reach out to me. You can DM me on Instagram. My handle is @mamagourmand. Or email melissa@mamagourmand.com.
Leave a Reply